SLA を設定する
Keep your team on track by setting goals for how quickly you respond to and resolve tickets. If these goals are set by your customer contracts, you might know them as Service-Level Agreements, or SLAs.
SLAs might track goals like:
24 時間以内に高優先度のリクエストを解決する
2 時間以内にすべてのリクエストに応答する
Once you set SLAs, you can view them in queues and on issues. You can also get alerts for SLAs that are about to breach, and create reports to track SLAs over time.
SLA の設定
Service desk project administrators can set SLAs in Project settings > SLAs.
When you set an SLA, you choose two things:
目標
目標までの時間の測定方法
SLA に名前を付ける
後で名前を変更することはできないので、SLA の内容と測定対象が明確にわかる名前を付けます。
目標の設定
In the Goals section, choose the type of issue you want to track, how quickly you want to resolve it (the goal), and your working hours (calendar). Here are some examples of goals you might set:
24 時間以内にブロッカー課題を解決する
ビルド エンジニアリング チームが作成したブロッカー課題は 12 時間以内に、経理チームが作成したブロッカー課題は 36 時間以内に解決する
課題のライフサイクルを通じて変化しない基準に対して目標を設定することをお勧めします。たとえば、課題のステータスに基づいた目標を作成しないようにします。
目標の設定方法は以下のとおりです。
Use JQL to define the Issues you want to track.
[目標] は時間および分単位で入力します。たとえば、30m、1h15m、48h30m、または 72h などです。
Choose which work Calendar to follow.
Here's an example of a goal to resolve issues in different time frames for different customers. In this example, you provide 24/7 support for Gringotts Bank and 9-5 support for Stark Industries:
SLA は目標を「および」ではなく、「または」と読み取ります。つまり、目標の順序が重要になります。課題が開始条件と一致する場合、SLA はその課題に対応付けられている最初の目標に対して計時を開始します。課題が 2 つ以上の目標と対応付けられている場合、SLA はリストの最初にある目標を追跡します。
- プロジェクトあたり 30 項目の SLA 目標を作成できます。足りない場合は、目標を組み合わせたり、不要になった目標を削除できないかどうかをご確認ください。
- 1 つの課題で報告者と担当者が同じユーザーの場合、SLA が課題を正しく追跡しない可能性があります。
時間メトリックの設定
The time metric is like a stopwatch that starts and stops the countdown to your SLA goal. For example, you might pause time while you wait for the customer to respond, and stop time when the issue is resolved. The calendar counts time according to your team's schedule. For example, you might pause it outside of business hours, or during holidays.
You can set multiple conditions for the start, stop, and pause time. For example, the goal of this SLA is to respond to Access issues within two hours. This includes responding when the issue is created, as well as when the customer updates the issue:
開始、停止、および一時停止条件は「および」ではなく、「または」と解釈されます。2 つの開始条件を追加すると、SLA は課題がこれらの条件のいずれかを満たす場合に計時します。
作業時間の設定 (オプション)
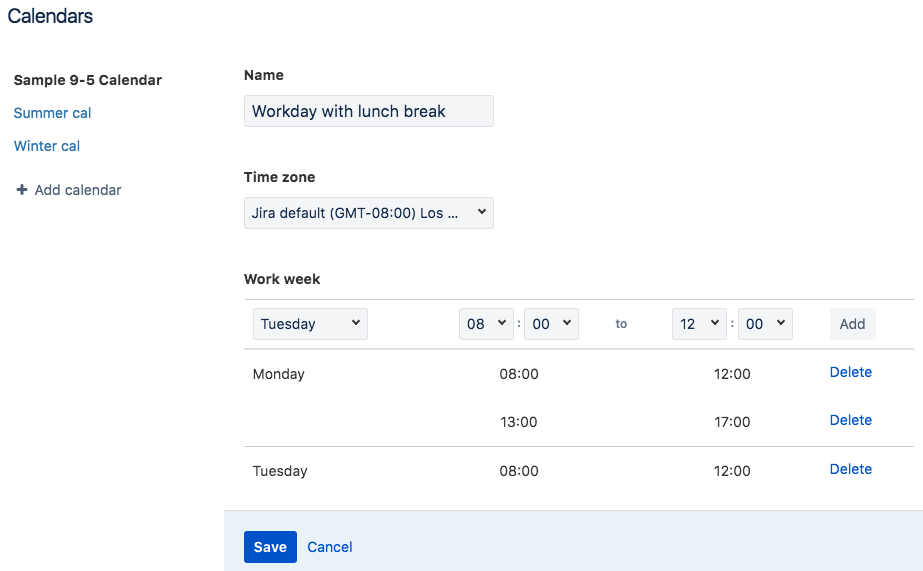
By default, SLA clocks run 24/7. If you want to exclude lunch breaks, holidays, or weekends, go to SLAs > Calendars to set your working hours.
For example, you could tweak the Sample 9-5 Calendar to add a 1-hour lunch break that doesn't count toward the SLA. Just delete the 09:00-17:00 timeframe and add a timeframe for before lunch (08:00-12:00) and after lunch (13:00-17:00). Here's what it looks like:
SLA の更新
SLA を変更した場合の動作
SLA を編集すると、Jira Service Desk は、進行中の SLA サイクルを持つプロジェクト内のすべての課題について時間を再計算します。レポートの正確性を保つため、Jira Service Desk は、完了した SLA サイクルの時間は再計算しません。
たとえば、すべてのブロッカー課題を 6 時間以内に解決する目標が設定されているとします。この目標を 4 時間に変更すると、以下のようになります。
- 4 時間を経過した未解決のブロッカー課題は、違反としてマークが付けられます。
- 6 時間以内に解決されたブロッカー課題はそのまま SLA を満たしていることになります。
課題を変更した場合の動作
You might update an issue in a way that changes which SLA it's measured against. If you do this, the SLA clock doesn't restart but adds any elapsed time to the new goal. In some cases, this might breach the SLA.
For example, imagine you have a goal to resolve Critical issues in 5 hours, and Blocker issues in 3 hours. A Critical issue has been open for 4 hours, and someone changes the priority to Blocker. Because the issue is now a Blocker issue with 4 hours on the clock, the SLA is breached.
SLA データを管理する
If you create a new name for an SLA metric, the name - not the metric - is copied to all service desk projects on your Jira site and stored as a custom field. For example, if you create a metric called Time to resolution by priority, other service desk projects can create metrics with that name:
Jira 管理者は新しい SLA メトリック名の作成権限を付与するユーザーを選択できます。使用中のフィールドの数を表示したり、使用されていないフィールドをクリーン アップしたりすることも可能です。これらの設定を管理するには、次の手順を利用します。
- > [設定] > [アプリケーション] を選択します。
- Jira Service Deck で、[設定] を選択します。
- [SLA メトリック名] セクションで、新しい SLA メトリック名を作成できるユーザーを変更できます。使用していない SLA カスタム フィールドがある場合、[クリーン アップ] をクリックしてそのフィールドを削除します。


