Jenkins サービスの管理
このページの説明は現在は利用できません。Bitbucket Cloud での Jenkins の設定の詳細については、https://wiki.jenkins-ci.org/display/JENKINS/BitBucket+Plugin を参照してください。
Bitbucket Cloud は Jenkins との連携に対応しています。ただし、アトラシアン サポートはこの設定の支援は行いません。
If assistance with this kind of configuration, please consult with the vendor(Jenkins), or raise a question on Atlassian Answers.
With this service, you can integrate Bitbucket Cloud with Jenkins, an extendable open source continuous integration server. If you are having trouble with the service, see Troubleshoot Bitbucket Cloud services. For help understanding Jenkins' security options and their implications to triggering remote builds, please review the Jenkins documentation.
サービスをセットアップする
このサービスを追加するには、リポジトリへの管理権限を持っている必要があります。
- リポジトリの設定に移動します。
- 左側のナビゲーションにある [サービス] をクリックします。
サービス ページが表示されます。 - サービスのドロップダウン リストから [jenkins] を選択します。
- [サービスの追加] をクリックします。
Jenkins サービスに新しいセクションが表示されます。 以下の情報を入力します:
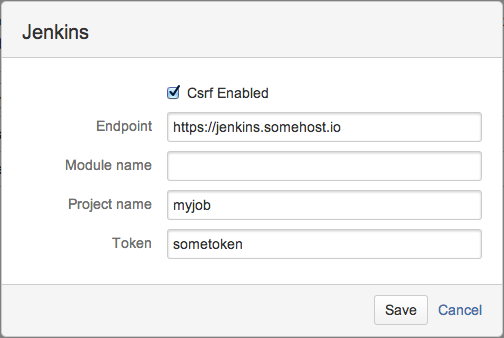
フィールド 説明 例 必須 Csrf の有効化 設定した場合、サーバーで csrf が有効になっているときにサービスは Jenkins と連携します。 
モジュール名 設定すると、指定したモジュール (またはディレクトリ) に対するコミットのみが Jenkins ビルドをトリガーします。 apps/Bitbucket トークン ビルドでトークン認証を有効にしている場合は、ここに挿入します。 プロジェクト名 ビルドを実行する Jenkins ジョブの名前。 bitbucket Selenium Tests 
エンドポイント Jenkins インスタンスのエンドポイント URL。標準 URL 形式を使用できます。フィールドにユーザー名とパスワードを入力した場合、基本認証が使用されます。
http|s://username:password@domain:port/pathhttps://www.bitbucket.org:8080/jenkins/
- [保存] をクリックします。