Marketplace アプリのインストール
Apps (also known as add-ons or plugins) extend what your Atlassian application can do.
With just a few clicks, you can browse the Atlassian Marketplace and install apps in your application, all without leaving your Atlassian product.
On this page:
A note about safety: apps are very powerful, they can change the behavior of almost any part of the Atlassian application. It's very important that you trust an app before you install it. Always be aware of where (and who) an app comes from.
Install a cloud app
If you have an Atlassian Cloud application, you can subscribe to a wide range of cloud compatible apps.
To install a cloud app:
- From the top navigation bar in your product, select Settings (
 ).
). - Select Find Apps.
- Search by the app name, or choose a category.
- Follow the prompts to Get app, or get a Free trial.
You can't use the file upload method to install apps in Cloud applications.
Install a Data Center app
Apps are installed using the Universal Plugin Manager (also known as UPM). The method you use will depend on whether the app is available on marketplace, and if your site is behind a firewall.
Install an app from Marketplace
If your application can reach the Marketplace site, you can browse for apps without leaving your application.
To install an app:
- From the top navigation bar in your application, select Apps, and then Manage apps.
- Select Find apps. This is usually located in the sidebar of your application's admin console.
- Search by the app name, or choose a category.
- Follow the prompts and choose to Install, Buy now, or start a Free trial.
See Finding new Marketplace apps for more information on how to browse for new apps.
Once installation is complete, the app will be listed on the Manage apps page. You may need to enter a license before you can use the app.
Install an app from a file
This method is useful if your firewall prevents the Universal Plugin Manager from accessing Atlassian Marketplace, or if you have developed your own custom app.
To download a specific version of an app from Marketplace, from the Versions tab, select See all versions. Make sure you download the appropriate file for your Data Center site.
Apps are normally distributed as JAR or OBR (OSGi Bundle Repository) files. These are the only types of app distribution files that are accepted by the file upload mechanism.
UPM supports two installation flows depending on whether the App signing feature is enabled or disabled.
If you do not see the option to upload an app on the Manage Apps page, you may need to provide a startup argument in Jira to enable this.
App signing enabled
- From the top navigation bar in your application, select Apps, and then Manage apps.
- [アプリをアップロード] を選択します。
- Select the app file (it will be a .jar or .obr file) or enter the URL where the file can be found.
- Enter app signature.
- [アップロード] を選択します。

Screenshot: The upload app dialog with app signing enabled
App signing disabled
- From the top navigation bar in your application, select Apps, and then Manage apps.
- [アプリをアップロード] を選択します。
- Select the app file (it will be a .jar or .obr file) or enter the URL where the file can be found.
- [アップロード] を選択します。
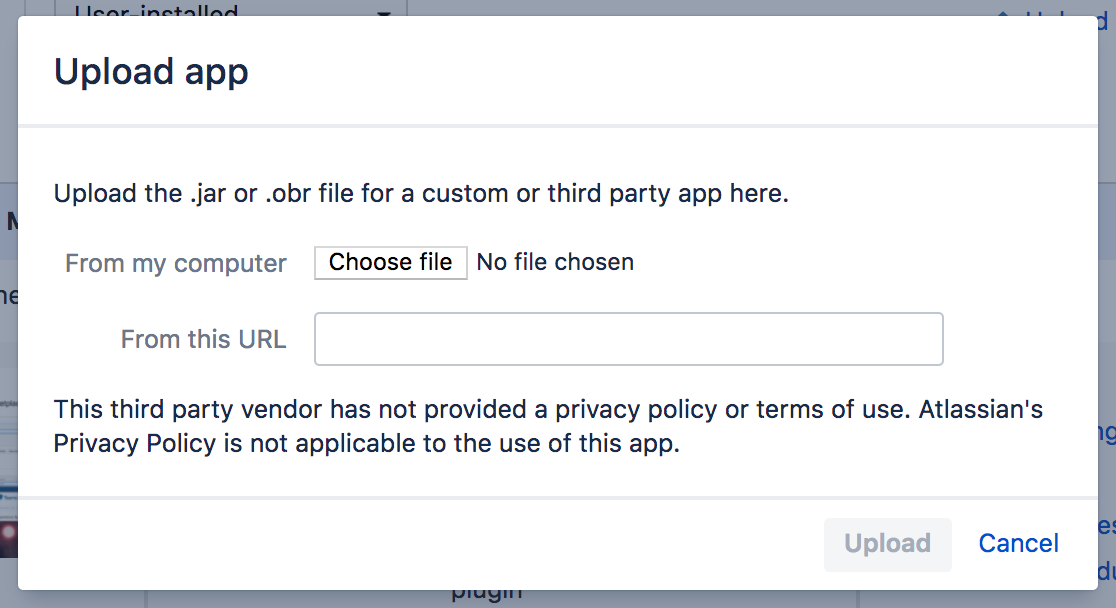
Screenshot: The upload app dialog with app signing disabled
Once installation is complete, the app will be listed. You may need to enter a license before you can use the app.
Enter a license for your app
If you have installed a paid app, you'll need to apply a license. Some apps will provide a configuration page where you can enter a license, but for most you can expand the app listing,
To enter an app license:
- From the top navigation bar in your application, select Apps, and then Manage apps.
- Select your app in the list to expand the listing.
- Paste your license key into the License key field.

Screenshot: app listing showing license field
Free apps don't require a license.
Bundled Data Center apps
From February 2021, the following apps are bundled with Data Center. You'll need to either upgrade to a Data Center product version with the app included, or install the version of the app listed below on a site with a Data Center license.
You don't need a separate app license, we’ll recognise your product's Data Center license:
- Team Calendars for Confluence 7.0.7
- Advanced Roadmaps for Jira Software 3.29.5
- Insight Asset Management for Jira Service Management 8.7.1
- Insight Discovery for Jira Service Management 2.29.0
If you still see a license error after upgrading the app, you may also need to upgrade Universal Plugin Manager to version 4.3.0 or later
Read more about this in our FAQ
トラブルシューティング
If you attempt to install a file that isn't a JAR or OBR file in the Manage add-ons or Manage apps page, one of the following errors appear:
Could not find a handler capable of installing the app at filename. Check that the file is a valid app.
Could not find a handler capable of installing the add-on at filename. Check that the file is a valid add-on
You should refer to the installation instructions provided with the app in this case, as there may be additional steps you need to complete first.
Install a Plugins 1 legacy app
About plugin framework versions
Apps come in three types: Plugins 1, Pugins 2 (for Data Center and Server applications), and Connect and Forge apps (for Atlassian cloud applications). The most prominent type for Data Center and Server applications is Plugins 2. This version number refers to the version of the underlying Atlassian SDK framework used to build the app. This identifier is distinct from the app's individual versioning scheme.
Plugin 2 SDK で構築されたアプリは、アトラシアン アプリケーションに組み込まれている内部の OSGi フレームワークを使用します。場合により、ホスト アプリケーションに Plugins 1 アプリをインストールできない場合があります。このような場合、手動で実行する必要があります。Plugins 1 アプリがサポートされていない場合に、それをファイル アップロードでインストールしようとした場合、次のようなエラー メッセージが表示されます。
The add-on name-version.jar is a type 1 add-on. Type 1 add-ons cannot be dynamically installed. For more information on installing type 1 add-ons see the UPM documentation.
SDK バージョン 1 フレームワークで作成されたアドオンをインストールまたはアンインストールする場合、いくつかの点を考慮する必要があります。これらのタイプのアドオンは、Marketplace で "Plugins 1" アドオンとして表示されます。
Jira および Bamboo で Plugins 1 タイプのプラグインをインストールする
- Jira または Bamboo で Plugins 1 アドオンを Universal Plugin Manager を使用してインストールすることはできません。アドオンのディストリビューションをダウンロードして、個々のインストール手順に従う必要があります。このようなアドオンの場合、製品ページで [インストール] ボタンの代わりに [ダウンロード] ボタンが提供されています。ほとんどの場合、ファイルを
<INSTALL_DIR>/atlassian-jira/WEB-INF/libディレクトリに移動またはダウンロードする必要があります。 - 同様に、Jira および Bamboo の Plugins 1 アドオンには、[アンインストール] ボタンがありません。アドオンをファイル システムから手動で削除する必要があります。
- Confluence では、Universal Plugin Manager を使用して Plugins 1 アドオンをインストールおよびアンインストールできます。アドオンのエントリで [インストール] または [アンインストール] ボタンを確認できます。
アドオンの JAR ファイルをダウンロードまたは作成したら、次の手順にしたがって Jira にインストールします。
- Jira をシャットダウンします。
- JAR ファイル (例: example_plugin_jar) を次のディレクトリにコピーします。
- Plugins 1 アドオンをインストールする場合、JAR ファイルを Jira インストール ディレクトリの
atlassian-jira/WEB-INF/lib/の配下にコピーします。 - Plugins 2 (OSGi) アドオンをインストールする場合、JAR ファイルを Jira のホーム ディレクトリの
plugins/installed-plugins/のは以下にコピーします。
- Plugins 1 アドオンをインストールする場合、JAR ファイルを Jira インストール ディレクトリの
- Jira を起動します。
- [管理] > [アドオンの管理] に移動して、インストールが完了していることを確認します。アドオン (例: example_plugin) が一覧に有効化済みとして表示されます。
Plugins 1 アドオンの JAR ファイルを Plugins 2 アドオン用のインストール ディレクトリにコピーしたり、その逆を行ったりしてインストールを試行した場合、誤ったディレクトリにアドオンがインストールされている旨の警告が Jira によって表示されます。
しかしながら、誤って Plugins 2 ディレクトリ (<JIRA home directory>/plugins/installed-plugins/) にインストールされた場合にこの警告を生成しない Plugins 1 アドオンが少数存在する可能性があります (例: JIRA RPC Plugin)。このような場合もアドオンは適切に動作せず、[アドオンの管理] 画面には多くの場合、アドオンのモジュールがゼロである旨の情報が表示されます。
この問題を解決するには、次の手順で JAR ファイルを適切なディレクトリに再インストールします。
- Jira をシャットダウンします。
- JAR ファイルを
<JIRA installation directory>/atlassian-jira/WEB-INF/lib/に移動します。 - Jira を再起動します。