Enabling and testing app signature check in UPM
The app signing feature was introduced in Data Center (DC) products in 2025. To learn more about this feature, explore the latest CDAC post.
This page describes how to test an installation of your app with app signing enabled. This way, you can verify that your app is compatible with the app signing feature.
このページの内容
Configuration requirements
To test app signing, you need to configure a truststore folder where the certificates are stored. Until app signing is enabled by default, a configuration file is also required. For detailed instructions, check the UPM app signature check configuration. This configuration is sufficient for checking signatures. However, some tests require installing apps, which means you'll need to generate a valid signature. For security reasons, the tools provided for signing test apps use the custom app signature mode. You can either use an existing Ed25519 private key and certificate or create a new one. You must install the certificate in the UPM’s truststore folder, and the key will be used to generate signatures.
Step 1. Configure UPM and Data Center product
There are two options to configure UPM and DC products for testing: use AMPS (recommended for ease of use) or upm-signing-tool.
Option 1. Use AMPS configuration (recommended)
Starting from version 9.2, Atlassian Maven Plugin Suite (AMPS) can create the required configuration and enable the app signature check feature in products for you. Here is a sample AMPS configuration:
<enablePluginSigning>true</enablePluginSigning>
<atlassianCertificates>STAGING</atlassianCertificates>
<customCertificate>
    <name>AMPS</name>
    <issuer>Atlassian Maven Plugin</issuer>
    <duration>P1D</duration>
</customCertificate>
AMPS contains several Maven plugins. The generic one is called AMPS and can do basically anything, but it requires some configuration. For example, amps:run needs to specify which product to run. There are also product-specific plugins (for example, confluence-maven-plugin) that can be viewed as shortcuts to AMPS for a given product.
Here confluence-maven-plugin:run is equivalent to amps:run -Dproduct=confluence.
Use one of the run, runStandalone, debug, or integrationTest goals of AMPS or one of the product-specific apps such as confluence-maven-plugin. This will create the following files in the target folder.
Using one of the goals will also add the required configuration properties for the product to pick up this configuration on startup.
| プロパティ | 説明 | 既定値 |
|---|---|---|
enablePluginSigning | Specifies if the UPM app signature check feature should be enabled when starting products. When set to | false |
upmConfigPath | Specifies the location of UPM's configuration. |
For example, |
overwriteUpmConfig | Specifies if AMPS should overwrite any existing UPM configuration item. If you use the default location for upmConfigPath, it will be deleted when invoking the clean Maven goal, which is usually done before running AMPS, so the overwrite option has no effect. | false |
atlassianCertificates | Specifies which Atlassian-issued certificates must be added to UPM's truststore. If absent, no certificates will be added. If present, use PROD to add the certificates for signatures issued by Atlassian Marketplace. | No default value. If not specified, the certificate is not added. |
customCertificate | Specifies the properties AMPS will use to create a custom private key and certificate pair. You can later use this private key to sign apps during tests. The table below describes the properties of this object. | No default value. If not specified, the certificate is not added. |
The following table describes the customCertificate object properties.
| プロパティ | 説明 | 既定値 |
|---|---|---|
| The certificate issuer (required). | |
name | A symbolic name for the key/certificate pair. This value is needed to sign apps during tests. | Defaults to the issuer with blanks replaced by _. |
| A duration with an optional - prefix that is used to compute the certificate’s validity date. This is added to the current date if there is no prefix. Otherwise it is removed from the current date (that is, startOffset is “minus 1 day”). | Defaults to 0. |
| The validity period of the certificate expressed as a duration. | Defaults to 1 day. |
Example configuration:
<configuration>
  <customCertificate>
    <issuer>Self Issued Certificate</issuer>
    <name>my_key_certificate_pair</name>
    <startOffset>-P1D</startOffset>
    <duration>P1Y</duration>
  </customCertificate>
</configuration>
With this configuration, AMPS will create two files:
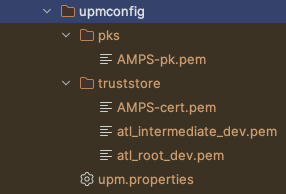
my_key_certificate_pair-pk.pemin the${upmConfigPath}/pksfolder.my_key_certificate_pair-cert.pemin the${upmConfigPath}/truststorefolder.
The certificate's issuer would be Self Issued Certificate, and its validity period would last for 1 year starting 1 day before the current date. For example, certificate issued on March 20, 2025 will be valid from March 19, 2025 till March 19, 2026.
Option 2. Use upm-signing-tools
If you’re using Atlassian tools (AMPS) to build apps, you can benefit from the tools that we have developed to assist with UPM configuration. You can find the tools in the upm-signing-tools library.
1. Enable app signing manually
Follow the UPM app signature check configuration guide. Essentially, you need to:
- Create the UPM configuration folder, referred to as
${upmconfig}. - Create the
${upmconfig}/upm.propertiesfile in the configuration folder and enable the feature by adding:atlassian.upm.signature.check.enabled=true. - Create the
truststorefolder:${upmconfig}/truststoreand add certificates to it. - If necessary, set the
atlassian.upm.configuration.directorysystem property to point to the${upmconfig}folder.
If the UPM configuration folder can't be owned by a different user than the one running the product, add the loose check configuration options:
- Set the
atlassian.upm.config.loosecheck.allowedsystem property totrue. - Add the following property to the
upm.propertiesfile:securitycheck.strict=false.
2. Use upm-signing-tools for UMP configuration
- Add the library to your pom.xml at the root of the project:
<dependency> <groupId>com.atlassian.amps</groupId> <artifactId>upm-signing-tools</artifactId> <version>${amps.version}</version> <scope>test</scope> </dependency> - Assuming upmConfigPath variable represents the desired location, add the following code snippet anywhere in the test code to create the configuration. This code must run before any test that uses UPM to install an app.
// initialize the writer
UpmConfigWriter writer = new UpmConfigWriter(upmConfigPath);

// writes the configuration to the folder,
//    - true = overwrite if exists,
//    - EnumSet.allOf(AtlassianCertificate.class) : adds all Atlassian certificates to the truststore.
writer.createConfig(true, EnumSet.allOf(AtlassianCertificate.class));

// create a PrivateKeyAndCert from existing values,
PrivateKeyAndCert pkAndCert = new PrivateKeyAndCert("private key string", "certificate string");

// create a PrivateKeyAndCert from existing files,
PrivateKeyAndCert pkAndCertFromFiles = PrivateKeyAndCert.load(privateKeyPath, certificatePath);

// create a key/certificate pair
ZonedDateTime now = ZonedDateTime.now();
PrivateKeyAndCert newPkAndCert = PrivateKeyAndCert.generateSelfSignedX509Certificate(now,
                                                                                     now.plusDays(1),
                                                                                     "Certificate Issuer");

// Write the certificates and private keys :
writer.writePrivateKeyAndCertificate("FIRST", pkAndCert);
writer.writePrivateKeyAndCertificate("SECOND", pkAndCertFromFiles);
writer.writePrivateKeyAndCertificate("THIRD", newPkAndCert);

// Make the configuration writable on exit (it is made readonly to comply with safety rules)
Runtime.getRuntime().addShutdownHook(new Thread(
    () -> {
        try {
           writer.makeConfigWritable();
        } catch (Exception e) {
           throw new IllegalStateException("Unable to make UPM config writable", e);
        }
      }, "My Shutdown hook");
2. Sign the app for tests
After generating key/certificate pairs and adding them to the configuration, proceed to use them with the help of the upm-signing-tools library.
1. Load the private key to sign apps
To use the upm-signing-tools library, add the following code to your pom.xml file:
<dependency>
    <groupId>com.atlassian.amps</groupId>
    <artifactId>upm-signing-tools</artifactId>
    <version>${amps.version}</version>
    <scope>test</scope>
</dependency>
Ensure you use the same version as the AMPS version configured for your tests or the one you used to write the configuration. Obtain an instance of com.atlassian.maven.plugins.amps.upm.signing.tools.SignatureBuilder using one of the following options:
- Load a
PrivateKeyAndCertinstance from files:PrivateKeyAndCert pkAndCertFromFiles = PrivateKeyAndCert.load(privateKeyPath, certificatePath); SignatureBuilder signatureBuilder = new SignatureBuilder(pkAndCertFromFiles); - Use the
UpmConfigWriterclass. In this second code snippet,NAMErefers to the value used in the filename patterns described earlier.UpmConfigWriter writer = new UpmConfigWriter(upmConfigPath); PrivateKeyAndCert pkAndCertFromUpmWriter = writer.getPrivateKeyAndCertificate("NAME"); SignatureBuilder signatureBuilder = new SignatureBuilder(pkAndCertFromFiles);
These options allow sharing configuration between different processes, as the product (which will use the certificates to check signatures) and the tests (in which we will use the private keys to sign apps) can run in separate processes.
2. Sign an app
Once you have a SignatureBuilder instance, in your code for automated tests, use its methods to get the signature that UPM needs:
// Create a signature for a File
String forgeSignature(File file)
// Create a signature for a byte array
String forgeSignature(byte[] dataBytes);
// Create a signature for an inputStream
public String forgeSignature(InputStream inputStream);
3. Install a signed app during tests
There are several ways to install an app during tests:
- UI tests: Use the
com.atlassian.upm.pageobjects.UploadPluginDialogmethods:uploadFromUri(URI uri, String signature)uploadFile(File pluginFile, String signature)
These methods will fill in the signature field of the UPM Upload app dialog.

- Other tests: Use UPM’s API directly, as the UI would do. To install an app, make a POST request to the
<https://host:port/context/rest/plugins/1.0>endpoint with the following payload:
{
  "pluginSource": "UPLOAD",
  "pluginUri": "<http://localhost:8080/plugins/plugin.jar>",
  "signature": {
    "signature": "signature"
  }
}
The signature field is embedded in a signature container because it also has an additional optional certificate field, which is not required in the context of checking custom build signatures.