bitbucket-pipelines.yml を設定する
bitbucket-pipelines.yml ファイルは、Pipelines のビルド構成を定義します。Pipelines に馴染みが薄い場合、こちらで詳細をご確認ください。
基本構成
基本構成では、プロジェクトをビルドおよびデプロイするためのスクリプトを作成したり、キャッシュを構成してビルドを高速化するなどの設定を行うことができます。また、ステップごとに異なるイメージを指定して、パイプラインで実行しているアクション間で異なる依存関係を管理することもできます。
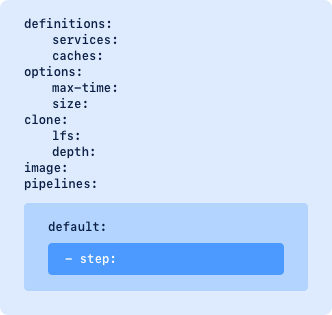
パイプラインはステップの一覧として構成され、構成ファイル内で複数のパイプラインを定義できます。次のグラフでは、default セクションで設定されたパイプラインを確認できます。パイプライン構成ファイルには、特定のキーワードで識別される複数のセクションを含めることができます。

はじめる前に
- ファイルには少なくとも、1 つ以上のステップを含む 1 つのパイプライン セクションと、ステップ内に 1 つのスクリプトを含める必要があります。
- 各ステップでは 4 GB のメモリを使用可能です。
- 1 つのパイプラインに、最大 100 のステップを含めることができます。
- パイプラインの各ステップは、別の Docker コンテナを実行します。必要に応じて別のイメージを選択することで、各ステップで別のタイプのコンテナを使用できます。
手順
1. yaml ファイルを構成するには、Bitbucket でリポジトリ > [Pipelines] に移動し、![]() をクリックします。Bitbucket のインターフェイスを使用せずに yaml ファイルを構成することもできます。
をクリックします。Bitbucket のインターフェイスを使用せずに yaml ファイルを構成することもできます。
2. 言語を選択します。
注意: Pipelines は、任意の言語で記述されたプロジェクトのビルドまたはデプロイ用に構成できます。言語ガイド
3. イメージを選択します。
注意: Pipelines を初めて利用したときに製品から直接編集するか、![]() をクリックしてパイプライン内からいつでも、またはリポジトリから編集できます。
をクリックしてパイプライン内からいつでも、またはリポジトリから編集できます。
ファイルには少なくとも、1 つ以上のステップを含む 1 つ以上のパイプライン セクションと、ステップ内に 1 つのスクリプトを含める必要があります。
セクション 説明
default - 他のセクションのパイプライン定義に一致しないすべてのブランチのパイプライン定義が含まれます。
default パイプラインは、ブランチ固有のパイプラインが定義されている場合を除き、リポジトリへのプッシュのたびに実行されます。ブランチ パイプラインは branch セクションで定義できます。
注: default パイプラインはタグまたはブックマークでは実行されません。
branches - すべてのブランチ固有のビルド パイプラインのセクションを定義します。このセクションの名前または表現は、次の情報と照合されます。
- Git リポジトリのブランチ
- Mercurial リポジトリの名前付きブランチ
See Branch workflows for more information about configuring pipelines to build specific branches in your repository.
![]() Check out the glob patterns cheat sheet to define the branch names.
Check out the glob patterns cheat sheet to define the branch names.
tags - すべてのタグ固有のビルド パイプラインを定義します。このセクションの名前または表現は、Git リポジトリのタグや注釈付きタグと照合されます。
![]() Check out the glob patterns to define your tags.
Check out the glob patterns to define your tags.
bookmarks - すべてのブックマーク固有のビルド パイプラインを定義します。このセクションの名前または表現は、Mercurial リポジトリのブックマーク名に照合されます。
![]() Check out the glob patterns cheat sheet to define your bookmarks.
Check out the glob patterns cheat sheet to define your bookmarks.
pull-requests - リポジトリから開始されたプル リクエストでのみ実行される特別なパイプラインです。実行前に宛先ブランチを作業ブランチにマージします。フォークされたリポジトリからのプル リクエストは、パイプラインをトリガーしません。マージが失敗すると、パイプラインが停止します。
重要
プル リクエスト パイプラインは定義されている任意の branch および default パイプラインに加えて実行されるため、定義が重複すると 2 つのパイプラインが同時に実行される場合があります。
構成にすでにブランチがあり、すべてのブランチをプル リクエストでのみ実行したい場合、キーワード branches を pull-requests. に置き換えます。
![]() Check out the glob patterns cheat sheet to define the pull-requests.
Check out the glob patterns cheat sheet to define the pull-requests.
custom - Bitbucket Cloud インターフェイスから手動またはスケジュール実行でのみトリガーできるパイプラインを定義します。
image: node:10.15.0

pipelines:
  custom: # Pipelines that are triggered manually
    sonar: # The name that is displayed in the list in the Bitbucket Cloud GUI
      - step:
          script:
            - echo "Manual triggers for Sonar are awesome!"
    deployment-to-prod: # Another display name
      - step:
          script:
            - echo "Manual triggers for deployments are awesome!"
  branches:  # Pipelines that run automatically on a commit to a branch
    staging:
      - step:
          script:
            - echo "Auto pipelines are cool too."
上記のような構成の場合、Bitbucket Cloud の [パイプラインの実行] ダイアログに次のパイプラインが表示されます。

For more information, see Run pipelines manually.
例:
image: node:10.15.0

pipelines:
  default:
    - step:
        name: Build and test
        script:
          - npm install
          - npm test
  tags:                         # add the 'tags' section
    release-*:                  # specify the tag
      - step:                   # define the build pipeline for the tag
          name: Build and release
          script:
            - npm install
            - npm test
            - npm run release
  branches:
    staging:
      - step:
          name: Clone
          script:
            - echo "Clone all the things!"
高度な設定
サービスを実行し、テストを並行して実行するには、詳細オプションを使用します。手動ステップの構成や各ステップの最大時間の設定、2x ステップを構成した 8 GB メモリの使用なども行えます。
はじめる前に
- パイプラインの YAML ファイルには、キーワードと 1 つ以上のステップを含むセクションが少なくとも 1 つ必要です。
- 各ステップでは 4 GB のメモリを使用可能です。
- 1 つのパイプラインに、最大 100 のステップを含めることができます。
- パイプラインの各ステップは、別の Docker コンテナを実行します。必要に応じて別のイメージを選択することで、各ステップで別のタイプのコンテナを使用できます。
グローバル構成オプション

キーワードの一覧
キーワード 説明
variables - (カスタム パイプラインのみ) パイプラインの起動時に提供される変数が含まれます。変数を有効にするには、パイプラインを実行するときに入力するカスタム パイプラインの下に変数を定義します。
pipelines:
  custom:
    custom-name-and-region: #name of this pipeline
      - variables:          #list variable names under here
          - name: Username
          - name: Region
      - step:
          script:
            - echo "User name is $Username"
- echo "and they are in $Region"[ブランチ] > [...] > [ブランチのパイプラインを実行] > [カスタム] でカスタム パイプラインを実行すると、それらを渡すことができます。

キーワード variables は、サービスの定義の一部にすることもできます。
name - キーワード名が yaml の variables セクションにある場合、このキーワードはカスタム パイプラインを実行するときに追加または更新できる変数を定義します。Pipelines は、ステップ内でキーワードを使用できます。
parallel - 並行ステップを使用すると、一連のステップを同時に実行して、ビルドやテストを迅速に行えます。ステップを平行にした場合も、パイプラインが使用する合計のビルド時間数は変わりません。ただし、結果はより早く表示されます。
並列または単独のどちらで実行されているかにかかわらず、パイプラインで実行できるステップの合計数は 100 に制限されています。
同時に実行するステップをインデントで定義します。
Learn more about parallel steps.
step - ビルドの実行単位を定義します。ステップは bitbucket-pipelines.yml ファイルで読み込まれる順序で実行されます。パイプラインでは最大 100 ステップを使用できます。
パイプラインの各ステップは個別の Docker コンテナを起動し、script で構成されたコマンドを実行します。各ステップは次のように構成できます。
- 別の Docker イメージを使用する。
- カスタムの max-time を構成する。
- 固有のキャッシュとサービスを使用する。
- 後のステップで使用できるアーティファクトを生成する。
- クローン セクションを置くことができます。
ステップは、実行前に手動トリガーを待機するように構成できます。ステップを手動として定義するには、bitbucket-pipelines.yml ファイルのステップに trigger: manual を追加します。手動ステップには次のような特徴があります。
- 設定されている順序でのみ実行できます。手動ステップをスキップすることはできません。
- 前の手順が正常に完了した場合にのみ実行できます。
- リポジトリへの書き込みアクセス権限を持つユーザーのみがトリガーできます。
- Pipelines の Web インターフェイス経由でトリガーされます。
If your build uses both manual steps and artifacts, the artifacts are stored for 14 days following the execution of the step that produced them. After this time, the artifacts expire and any manual steps in the pipeline can no longer be executed.
注: パイプラインの最初ステップを手動ステップに設定することはできません。
name - ステップで実行される内容をわかりやすく表示するため、ステップの名前を定義します。

image - Bitbucket Pipelines では、Docker コンテナを使用してビルドを実行します。
- You can use the default image (
atlassian/default-image:2) provided by Bitbucket or define a custom image. You can specify any public or private Docker image that isn't hosted on a private network. - イメージは、グローバルまたはステップ レベルで定義できます。ブランチ レベルでは定義できません。
イメージを指定するには、次のイメージを使用します: <your_account/repository_details>:<tag>
For more information about using and creating images, see Use Docker images as build environments.
trigger - ステップを自動で実行するか、誰かが手動でトリガーした後にのみ実行するかを指定します。トリガーのタイプは manual または automatic に定義できます。トリガーのタイプが定義されていない場合、既定では、ステップは自動で実行されます。最初のステップを手動にすることはできません。パイプライン全体を手動トリガーからのみ実行したい場合、custom パイプラインを使用します。
deployment - [Deployments] ダッシュボードで使用される、デプロイメント ステップの環境タイプを設定します。有効な値: test、staging、または production。
次のステップが Deployments ビューの test 環境に表示されます。
有効な値: test、staging、または production
size - ステップまたはパイプライン全体に追加リソースを割り当てることができます。サイズ 2x を指定すると、利用可能なリソースが倍増します (例: 4 GB メモリ → 8 GB メモリ)。
現時点では、有効なサイズは 1x および 2x です。
2x パイプラインは、倍のビルド時間数 (分) を使用します。
script - 連続して実行されるコマンドの一覧が含まれています。スクリプトは、ステップに記載された順序で実行されます。大規模なスクリプトは個別のスクリプト ファイルに移動し、それらを bitbucket-pipelines.yml から呼び出すことをおすすめします。
pipe - パイプは多くの作業をバックグラウンドで実行して、複雑なタスクを容易にします。つまり、ユーザーは使用したいパイプを選択し、必要な変数を指定するだけです。パイプのリポジトリで、実行中のコマンドを確認できます。パイプの詳細はこちらをご覧ください。
Opsgenie にメッセージを送信するパイプは次のようになります。
after-script - after-script セクション内のコマンドは、ステップが成功または失敗した時に実行されます。これは、特に after-script が BITBUCKET_EXIT_CODE の値を使用している場合、クリーンアップ コマンド、テスト カバレッジ、通知、またはロールバックの実行に便利です。
注: after-script セクションのコマンドが失敗した場合、次のようになります。
- そのセクションでは以降のコマンドは実行されません。
- ステップに対して報告されているステータスには影響しません。
artifacts - ステップで生成される、次のステップで共有できるファイル (レポートや JAR ファイルなど) を定義します。
アーティファクトは glob パターンを使用して定義できます。
options - すべてのパイプラインに適用するグローバル設定を含みます。ここで使用する主なキーワードは max-time です。
max-time - ステップを実行できる最大時間 (分単位) をグローバル レベルまたはステップ レベルで定義できます。0 より大きく 120 より小さい整数を使用します。
max-time を指定しない場合、既定で 120 に設定されます。
clone - リポジトリのクローンをコンテナに作成した時の設定を含みます。ここでの設定には以下が含まれます。
LFS- Git lfs のサポートdepth- Git クローンの深度enabledを false に設定すると、Git クローンが無効になります。
lfs (Git のみ) - クローンでの LFS ファイルのダウンロードを有効化します。指定しない場合、If は既定で false に設定されます。このキーワードは Git リポジトリでのみサポートされることに注意してください。
depth (Git のみ) - すべてのパイプラインの Git クローンの深度を定義します。このキーワードは Git リポジトリでのみサポートされます。
深度を指定する際は、0 より大きい整数を使用します。フル クローンには full を使用します。Git クローンの深度を指定しない場合、既定で 50 に設定されます。
enabled - enabled setting を false に設定すると、Git クローンが無効になります。
condition - これを使用すると、条件またはルールを満たす場合にのみ手順を実行できます。現在、サポートされる条件は changesets のみです。changesets を使用して、いずれかの変更済みファイルが includePaths. の表現と一致する場合にのみ手順を実行します。
考慮される変更内容は次のとおりです。
プル リクエスト パイプラインではすべてのコミットが考慮され、includePath パターン一覧を提供すると、1 つ以上のコミットの変更がいずれかの条件に一致する場合に手順が実行されます。パターン マッチングの形式は、以下のページで説明する glob パターンに従います。
ファイルに変更がない場合、ステップはスキップされ、パイプラインが成功します。
その他の種類のパイプラインでは、最後のコミットのみが考慮されます。これはたとえば master のプル リクエストのマージ コミットでは問題ありませんが、同時に複数のコミットをブランチにプッシュする場合や、指定されたブランチに複数回プッシュする場合は、失敗しているステップが次回の実行でスキップされるために、失敗しているパイプラインが緑色に変わる、直感的でない挙動が生じることがあります。
条件とマージ チェック
プル リクエストのマージ チェックでビルド結果の成功が共通している場合、ステップの条件によってブランチ パイプラインの誤検知が発生する可能性がある点に注意してください。ビルド結果の一貫性がもっとも重要である場合は、条件の完全な回避を検討するか、プルリクエスト パイプラインのみを使用します。
definitions - パイプライン構成の別の場所で使用されているリソースを定義します。リソースには以下を含めることができます。
- Services that run in separate Docker containers – see Use services and databases in Bitbucket Pipelines.
- Caches – see Caching dependencies.
- YAML アンカー - yaml を分割して定義して使いやすくする方法。「YAML アンカー」を参照してください。
services - Pipelines は、サービス用に別々の docker コンテナをスピンアップできます。これによりビルドが高速化され、サービスを容易に編集できるようになります。
サービスの使用方法の詳細についてはこちらをご覧ください。
caches - ビルドの各ステップでインターネットから依存関係を再度ダウンロードすると、長い時間がかかる場合があります。キャッシュを使用すると、これらの依存関係はサーバーへ 1 回ダウンロードされ、ビルドのたびにローカルに読み込まれます。
YAML anchors - YAMLアンカー - yaml のチャンクを定義して使いやすくする方法。「YAML アンカー」を参照してください。