9.4 へのアップグレードに備えて Jira を準備する

このページの内容

お困りですか?

アトラシアン コミュニティをご利用ください。

コミュニティに質問

Complete the pre-upgrade steps to ensure you have a smooth upgrade. At this point, you shouldn't make any changes to your production Jira instance.

Getting a test environment

Create a replica of your Jira instance in a test environment so you can test the upgrade.

テスト環境の作成

Checking if your database needs upgrading

  • Postgres 9.6 support was deprecated in Jira 8.16 and removed in Jira 8.19. Jira 9.x will notify you that this database isn’t supported: the database health check will fail, but Jira may continue operating normally. The database upgrade may be required before the Jira upgrade.

  • MySQL 5.7 support was deprecated in Jira 9.1 and removed in Jira 9.2. Jira 9.4 will notify you that this database isn’t supported: the database health check will fail, but Jira may continue operating normally. The database upgrade may be required before the Jira upgrade.

サポート対象のプラットフォームの詳細を確認する

Checking supported databases

Make sure you know what databases are supported so that your upgrade runs smoothly. Learn more in the Supported databases list.

Estimating and planning the downtime

If you’re upgrading from 8.x, downtime estimation is the first step you should take. The downtime is caused by your database upgrade and Jira full reindex. It’s triggered because you’re upgrading to the other major version. Learn more about index changes

If you’re already on 9.x, skip this step. Jira full reindex won’t be triggered during the upgrade, so no downtime will be caused. Learn more details about the index startup procedure in Jira 9.4

The upgrade includes steps to generate and reindex versions for all issues and related entities in the system. This requires two potentially time-consuming upgrade tasks that will perform only during the startup of the first node in the cluster, upgraded to 9.0. Other nodes can't be started at this time.

As part of the process, the upgrade from 8.x to 9.x also triggers Jira full reindex. This causes some downtime that will prevent your users from working on the instance. So, to make a minimal impact on users, you should estimate the downtime correctly and plan the upgrade time carefully. We recommend running the upgrade on a day when your organization doesn’t use Jira.

The time of full reindex mainly depends on the number of issues and custom fields. To estimate the approximate downtime, use the following formula:

(number of issues / number of indexing threads) * issue index time

Learn more about full reindex, the changes it causes, and how to handle them 

If you’re upgrading from Jira 8.x, full reindex will take roughly the same amount of time as it took when you were upgrading to the previous LTS versions — Jira 8.13 or Jira 8.20.

If you experience any issues with full reindex while upgrading from Jira 9.x to version 9.4, check this troubleshooting practical guide to the upgrade.

If you’ve found out that the downtime is too long, there are a few ways to make it shorter.

Archiving issues for the upgrade

Archiving issues is the easiest way to reduce the size of the index because archived issues aren’t indexed. Select non-critical issues for archiving because they won’t be visible to users right after the upgrade. You’ll unarchive and reindex them later on, in upgraded Jira.

概要

Archived issues won’t change until you upgrade to the new version. After upgrading, you'll perform an initial reindex, which will be much shorter without the archived issues. Once you have a working index and open Jira to your users, you can restore as many of the archived issues as you need and reindex Jira again. The second reindex will take more time but you'll perform it on a single node, without shutting down Jira to your users.

After the upgrade, archives issues will be read-only and accessible via a direct link. Your users won’t be able to search for them until the second reindex, that’s why you should identify issues that can be archived and aren’t critical. To learn more about how archived issues will behave after the upgrade, see Archiving an issue

はじめる前に

You can complete these steps without shutting down Jira Data Center.

アーカイブする課題の特定

Identify issues you won’t need right after the upgrade. It’s not only about the number of issues, but mostly about their content: attachments, work logs, custom fields, history, or comments.

The more content an issue has, the more it affects reindex. You can select any issues, but the easiest way would be to sort out the issues your users will need right after the upgrade and archive the rest.

課題をアーカイブするための SQL クエリの作成

Once you’ve identified issues for archiving, you should create an SQL query. Here are some example queries that we’ve built based on the PostgreSQL database.


SQL クエリ
1Archive all issues created before 01 Jan 2022
update jiraissue 
	set 
		archived='Y', 
		archivedby='admin', 
		archiveddate=current_timestamp 
	where id in (
		select 
			i.id 
		from jiraissue i 
		where i.created < timestamp '2022-01-01'	
);

2Archive all issues that haven’t been updated for two years
update jiraissue 
	set 
		archived='Y', 
		archivedby='admin', 
		archiveddate=current_timestamp 
	where id in (
		select 
			i.id 
		from jiraissue i 
		where i.updated < (current_timestamp - interval '2 year')	
);
3Archive issues that are from the Jira project labeled as “archive“ and created between 01 Jan 2022 and 01 Oct 2022
update jiraissue 
	set 
		archived='Y', 
		archivedby='admin', 
		archiveddate=current_timestamp 
	where id in (
		select 
			i.id 
		from jiraissue i 
		inner join project p on i.project = p.id
		inner join label l on l.issue = i.id
		where UPPER(p.pkey) = 'JIRA' 
			and l.label = 'archive'
			and i.created  between timestamp '2022-01-01' and timestamp '2022-10-01'	

Jira Data Center のアップグレード

Shut down Jira Data Center and start the upgrade.

Perform a regular upgrade of the Jira Data Center cluster by following the steps from Upgrading Jira Data Center

再インデックスについて

During the upgrade procedure, you'll perform a reindex on the first node you’ve upgraded. Then, you’ll copy the index and the installation directory to the remaining nodes. This initial reindex will be much faster because it doesn’t include issues marked as archived. After the upgrade, you can open Jira to users so that they have access to issues that haven’t been archived and can create new issues.

アーカイブされた課題の復元と再インデックス

After Jira Data Center is upgraded and functioning, you can restore the archived issues and reindex Jira again. You don’t need to close Jira for your users because reindexing will be performed on a single node.

  1. Run a reverse SQL query to change the status of archived issues to “not archived”.
  2. To perform the reindex, go to Administration () > System.
  3. In the left-side panel, select Indexing
  4. Select Full re-index and Re-index.

This reindex takes more time to complete but it doesn’t block your users from using Jira. Once the reindex is complete, the new index will be automatically distributed to the remaining nodes.

Reindexing outside the cluster

概要

Every time a node goes offline and rejoins the cluster, it updates its index with recent operations, read directly from the database only while reindexing in the background. If a node has an index, the missing changes are still in the database due to a configurable retention period, and they make less than 10% of the whole index.

Let’s use a similar approach here. You’ll create an index by connecting a copy of your database for a fresh installation of Jira 9.4 to make the index compatible with the new version. This index will contain most of your data, and the nodes will apply the missing changes added to the original database when you start the upgrade.

After you upgrade the whole cluster, the nodes will detect the new index and add the missing changes instead of creating the whole index from scratch.

The only downtime for your users is the upgrade itself. Jira will be functional shortly after the upgrade.

You can upgrade the Jira 8 cluster to the Jira 9 cluster with minimal downtime by eliminating the two longest downtime elements: upgrade task adding index versions and full reindex. Learn more about how to do this

The linked knowledge base article is a practical step-by-step instruction for handling the upgrade task and full reindex, while the following guide provides more theoretical details of downtime minimization. You can use both the article and the guide here to complete all the steps successfully and know the theory behind them.

Jira Data Center のアップグレード

You can complete the following Step 1 and Step 2 without shutting down Jira Data Center.

Step 1: Creating the index outside the cluster

Make a copy of your database and connect Jira 9.4 to it. This will allow you to create an index compatible with your current Jira version outside your production cluster.

Copy the database

Make a copy of your live database. Don’t worry about users adding new data. You’ll switch back to the original database later on.

Complete this step as close to the actual upgrade as possible so that the difference between the original and cloned database isn’t too big and doesn’t exceed the retention period.

The maximum time of the retention period is two days by default. That’s how long information about recent operations is stored in the database, in the table ReplicatedIndexOperations. If you exceed this limit, the nodes won’t be able to add all missing changes from your original database because any changes older than two days will be deleted.

You can extend the retention period if you need more time. But if the changes exceed 10% of the whole index, the nodes will need a full reindex.

Connect the database copy to Jira 9.4

You’ll need a separate Jira 9.4 environment to which you’ll connect your database copy. Here are the requirements for this environment:

  • Jira 9.4 である必要があります。
  • Must have the same apps as your production instance. apps can provide more data from custom fields and add this data to the index during reindexing.
  • Must have a Data Center license. But you can use a single node.

To set up the environment:

  1. Follow the Upgrade Jira on the first node instruction from Upgrading Jira Data Center. When configuring Jira 9.4, make sure to connect it to the copy of your database.
  2. Follow the Post-upgrade steps on the first node instruction from Upgrading Jira Data Center

By following these steps, you will install a separate 9.4 instance, disable automatic reindex, and thus, give yourself time to install the apps or copy them from your production environment. When everything is ready, you can perform the reindex manually.

After the manual reindex is completed, you should have a Jira 9 index based on the information from the database copy. It’s still missing all the information added to the original database since you made the copy. But it'll be easier for your nodes to add missing entries for these changes than to create the whole index from scratch.

Step 2: Copying the index to your nodes

The Jira 9 index is stored in a different directory than the old one, so it won’t affect the existing cluster. You can already copy the new index to each node, so they don’t have to download it. Use the following directory: <local-home-directory>/caches/indexesV2

Now, shut down Jira Data Center and start the upgrade.

Step 3: Upgrading the first node

We recommend that you upgrade Jira Data Center by choosing a single node and upgrading it. After you start the first node, the database will be upgraded. As the next step, the node will detect the compatible index and only add entries for the missing changes. Other nodes will pick an index snapshot from the shared home.

This is the difference between the original database and cloned database that you used to create the Jira 9 index. From the node’s perspective, it looks like it was offline for a while.

To upgrade the node:

  1. クラスタを停止します。
  2. Upgrade the first node. Follow the Upgrade Jira on the first node instruction from Upgrading Jira Data Center. When following the instruction, complete the last step and disable the reindex.
  3. Complete post-upgrade steps on the first node. Follow the Post-upgrade steps on the first node instruction from Upgrading Jira Data Center. When following the instruction, skip rebuilding the index because you've already created the index outside the cluster.
Combined: archiving issues and reindexing outside the cluster

Follow the guides to issue archiving and Jira reindexing outside the cluster. First, archive issues and proceed with the reindex.

Running health check

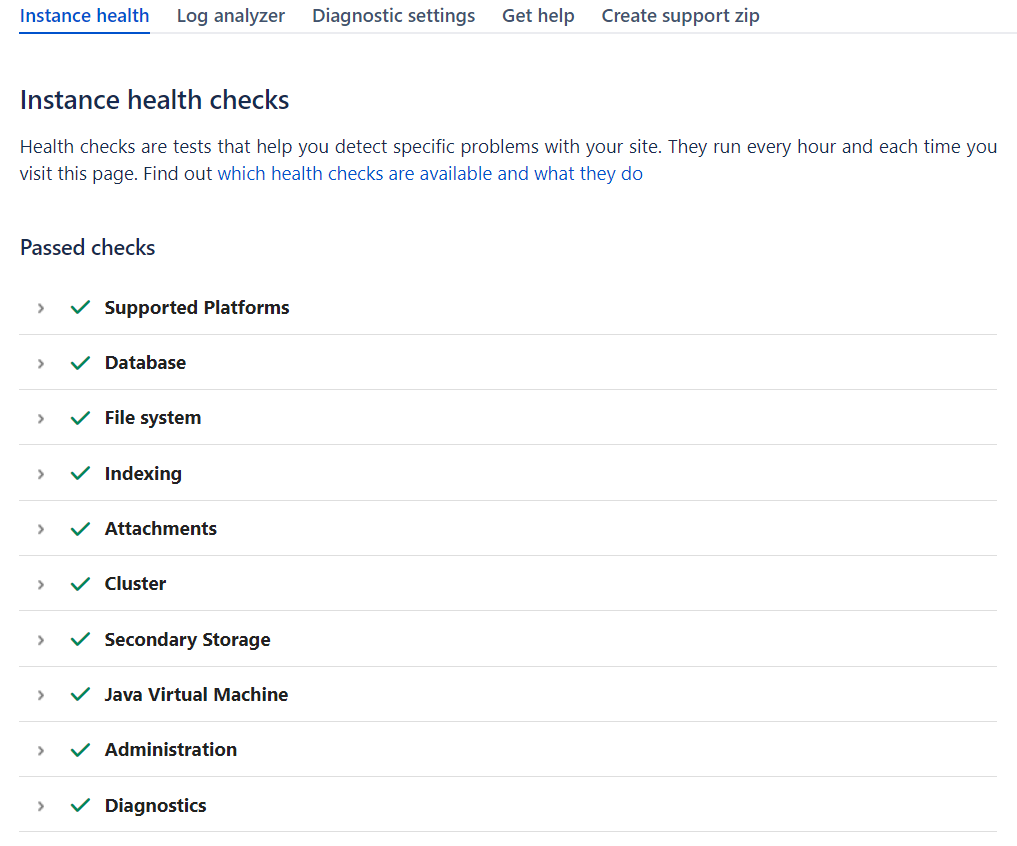
Jira には複数のヘルス チェックがあり、Jira インスタンスのアップグレードの準備が完了しているかどうかを検証することができます。

  1. Go to Administration > System.
  2. In the left-side panel, select Troubleshooting and support tools.
  3. Under Instance health, check the results of all instance health checks. Every health check will have a brief description of what it does and a link to an article with more information. So, you know how to fix any detected problem.
  4. Make sure that checks related to the license and database don't report any problems. But you can fix these too.

Jira instance health checks

Checking the compatibility of apps

Version compatibility of Jira apps is very important for a successful upgrade. Depending on whether you want to test the upgrade or steer clear of all app-related issues, there are two scenarios of compatibility checks:

  • Test the upgrade in a testing environment first. This procedure has some differences defined by your current Jira versions. See the separate guides for the upgrade from Jira 8.x and Jira 9.x.
  • Go without testing but mitigate all app-related risks.

Upgrading apps from Jira 8.x to Jira 9.4

To upgrade Jira apps:

  1. Go to Administration () > Manage apps.
  2. At the bottom of the page, select JIRA update check and look up the suggestions provided by your Universal Plugin Manager (UPM). Some apps have cross-platform compatibility and can be updated even before the upgrade. Update them in advance to speed up the upgrade process. 

    In Jira Data Center, some apps that you might previously install and upgrade via the UPM are now bundled with Jira and Jira Service Management.

    • AR4J (Advanced Roadmaps for Jira Software, formerly Jira Portfolio) is bundled since Jira 8.15.
    • A4J (Automation for Jira) is bundled since Jira 9.0.
    • Insights (now Assets) is bundled since Jira 8.15 (JSM 4.14).
  3. Select a version you want to upgrade to and select Check.
  4. Based on the app compatibility results described in the following table, take recommended actions.

結果

アクション

Incompatible

アプリは新しいバージョンとの互換性を持ちません。

Disable these apps before the upgrade.

互換性あり

アプリは新しいバージョンとの互換性を持ちます。

No actions are needed, you're good to go.

Compatible, if updated

アプリを更新することで、新しいバージョンでも使用できます。

Upgrade your apps before you proceed with the upgrade. When you run the Jira update check again, they’ll be marked as compatible.

Compatible once both are updated

Jira と対象のアプリの両方をアップグレードすることで、新しいバージョンでもアプリを使用できます。

  1. Disable the apps before the upgrade.
  2. Upgrade Jira to the new version.
  3. Upgrade and enable the apps.

Unknown

We can't check the compatibility of this app. This result usually applies to custom apps.

  1. Disable the apps before the upgrade.
  2. Upgrade Jira to the new version.
  3. Upgrade and enable the apps. Check how they behave in the test environment.

If you’ve upgraded your Jira 8.x to version 9.4 before checking and upgrading the apps, you should upgrade them separately.

When you upgrade Jira from 8.x to 9.x with full reindex enabled, data on apps from Jira 8.x aren’t added to the index. These apps won’t work or won’t be compatible with Jira 9.x. So, you’ll have to upgrade the apps separately and rerun full reindex again. This will cause another downtime.

To prevent Jira from triggering the automatic reindex during the start-up, disable the automatic reindex.

Upgrading apps from Jira 9.x to Jira 9.4

To upgrade your applications:

  1. Go to Administration () > Manage apps.
  2. At the bottom of the page, select JIRA update check and look up the suggestions provided by your Universal Plugin Manager (UPM). Some apps have cross-platform compatibility and can be updated even before the upgrade. Update them in advance to speed up the upgrade process. 
  3. Select a version you want to upgrade to and select Check.
  4. Test the upgrading apps on your test environment first. So, you'll know which apps to upgrade or remove before you move to production.

Based on the app compatibility results described in the following table, take recommended actions.

結果

アクション

Incompatible

アプリは新しいバージョンとの互換性を持ちません。

Disable these apps before the upgrade.

互換性あり

アプリは新しいバージョンとの互換性を持ちます。

No actions are needed, you're good to go.

Compatible, if updated

アプリを更新することで、新しいバージョンでも使用できます。

Upgrade your apps before you proceed with the upgrade. When you run the Jira update check again, they’ll be marked as compatible.

Compatible once both are updated

Jira と対象のアプリの両方をアップグレードすることで、新しいバージョンでもアプリを使用できます。

  1. Disable the apps before the upgrade.
  2. Upgrade Jira to the new version.
  3. Upgrade and enable the apps.

Unknown

We can't check the compatibility of this app. This result usually applies to custom apps.

  1. Disable the apps before the upgrade.
  2. Upgrade Jira to the new version.
  3. Upgrade and enable the apps. Check how they behave in the test environment.
You don't have a plan to test the upgrade or you want to mitigate all app-related risks

In this case, we recommend removing all apps and installing only the compatible ones after the upgrade. 

First, get the list of apps for future reference. This list will help you determine which apps are compatible with the version you're upgrading to. To get the list:

  1. Go to Administration > Manage apps.
  2. At the bottom of the page, select JIRA update check.
  3. Select a version you want to upgrade to and select Check.

Now, back up and delete the contents of the /plugin folder in Jira. This will delete all the apps you have. 

  • For Server, go to <local-home-directory>/apps
  • For Data Center, go to <shared-home-directory>/apps

After you've upgraded, install the compatible versions of your apps.

Verifying breaking changes that might affect your apps

If you have custom apps, you should check if any of the upgrades we've introduced have an impact on these apps.

Check the Preparing for documentation for all the versions between the one you're currently on and the one you're upgrading to. Specifically, if you're upgrading from Jira 8.x, make sure you’ve reviewed Preparing for Jira 9.0 as we introduced a number of breaking changes in this release.

Backing up your Jira instance

Back up the Jira database and important directories so you can safely roll back to the previous setup if something goes wrong.

データベース

Use the database native tools to create the backup. If your database doesn't support online backups, you'll need to stop Jira first.

Jira ディレクトリ

Jira ディレクトリを他の場所にコピーすることでバックアップします。

To check the location of all these directories, go to Administration > System. In the left-side panel, select System info and scroll down to File Paths.

  • For Jira Server, back up the Jira installation and Jira home directories.
  • For Jira Data Center, back up the Jira installation and home directories on all nodes as well as the shared directory.

次のステップ

Follow the guide to upgrade from your Jira to version 9.4:

If you experience any issues with the preparation for the upgrade from Jira 9.x to version 9.4, check this troubleshooting practical guide to the upgrade.

最終更新日 2022 年 11 月 18 日

この内容はお役に立ちましたか?

はい
いいえ
この記事についてのフィードバックを送信する
Powered by Confluence and Scroll Viewport.