VS Code での Bitbucket Cloud 課題
Within the Atlassian sidebar, the VS Code extension provides a tree view displaying the Bitbucket pull requests, pipelines, and issues of each repository connected to your current Bitbucket account.
The tree views can be disabled/enabled from Atlassian Settings. You can also configure how often the tree views auto-refresh and the frequency of new pull request notifications. You can also manually refresh the tree views at any time by clicking the refresh icon ![]() on each tree view's title bar.
on each tree view's title bar.
VS Code での Bitbucket Cloud 課題の表示
Select the Atlassian logo on the leftmost sidebar. This opens the Atlassian sidebar which displays any Jira issues and Bitbucket pull requests, pipelines, and issues connected to your current Bitbucket or Jira account. These panels should be displayed by default; if not, click on the title bar of each to open and display any issues, pull requests or pipelines.
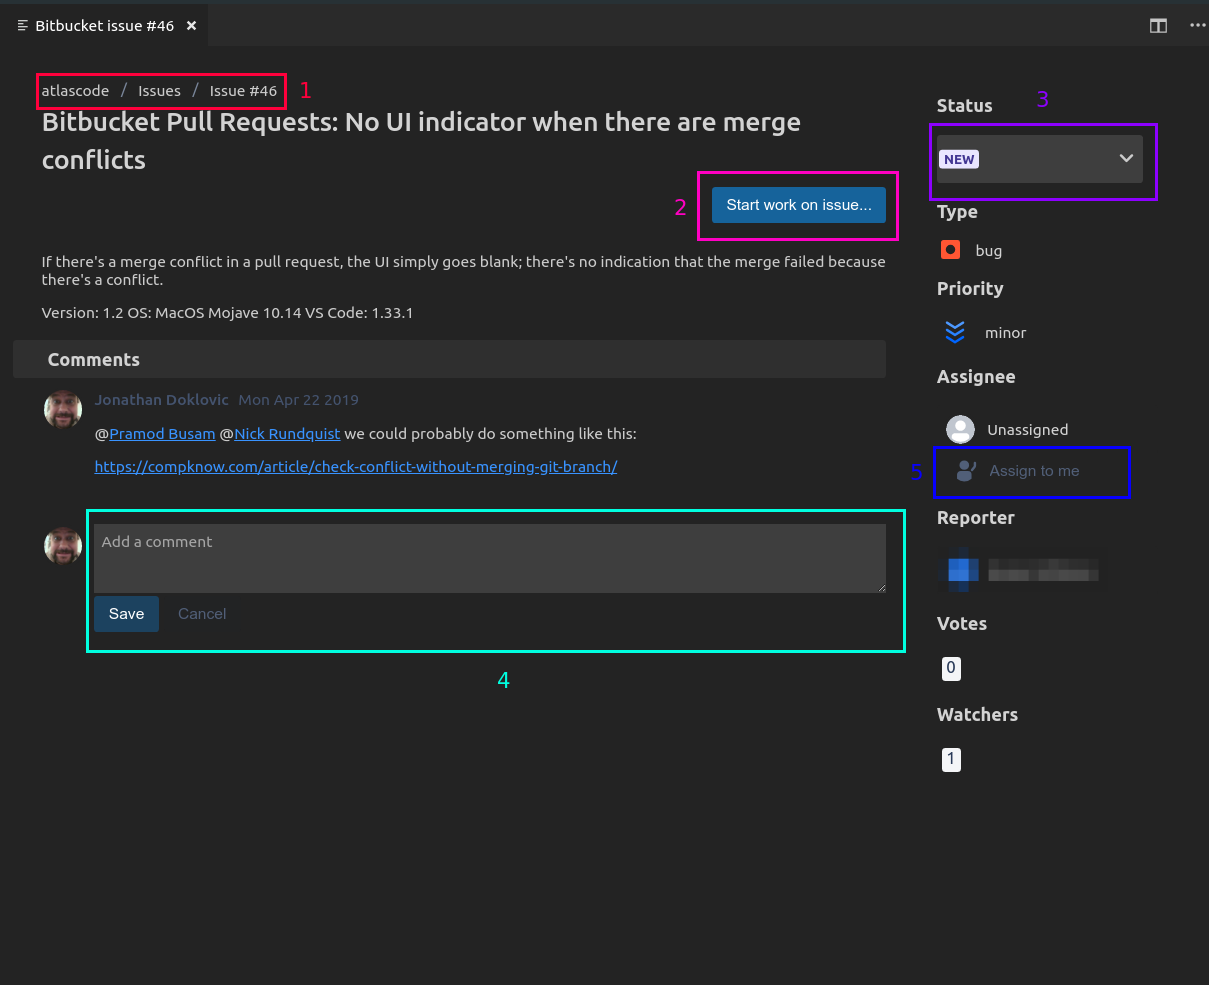
課題ツリーで任意の課題をクリックすると、課題の表示と編集に使用できる [Issue Details] 画面が表示されます。これらの機能については、次のセクション「Bitbucket 課題の詳細の表示と変更」を参照してください。
Bitbucket の課題の詳細の表示と変更
Bitbucket 課題の課題の詳細画面を開くには、Bitbucket の課題一覧で課題をクリックします。
課題の詳細画面
課題の詳細画面には、課題についての詳細情報のほか、課題へのコメント、課題のステータスの変更、および自身への課題の割り当てと "start work on an issue" 機能があります。
VS Code から Bitbucket Cloud の課題を作成する
- 新しい Bitbucket 課題を作成するには、コマンド パレットで [Create Bitbucket Issue] オプションを使用するか、Bitbucket Issues ツリーの "+" ボタンを使用します。
- 必要に応じてフィールドに入力し、[Submit] ボタンをクリックして課題を作成します。
コマンド パレットから
- Open the command palette by executing the following Atlassian: Open Settings command: Command + Shift + P (on Mac) or Ctrl + Shift + P (on PC) and search for Create Bitbucket issue.
- From the command palette: choose the Atlassian: Create Bitbucket Issue command.
- [Create Issue] フォームの任意のフィールドに入力または更新します。
- 右上の [Submit] ボタンを押します。
Bitbucket 課題のツリーから
- 左端のナビゲーション バーにあるアトラシアンのロゴをクリックします。
- Click on the BITBUCKET ISSUES heading on the Atlassian status bar.
- 右上の [+] をクリックします。
- [Create Bitbucket Issue] をクリックします。
- [Create Issue] フォームの任意のフィールドに入力または更新します。
- 右上の [Submit] ボタンを押します。
課題が作成されると、対応する課題の詳細画面が VS Code で開かれます。
通知は、リポジトリをワークスペースに接続しているすべてのユーザーの VS Code にも表示されます。
Bitbucket Cloud の課題で作業する
Start work on issue 機能は Bitbucket に必要なすべての手順を実行するため、ユーザーはすぐにコーディングを開始できます。
課題を自身に割り当てる
課題の新しいブランチを作成し、課題のキーとブランチ名を含める
新しいブランチをローカルにチェックアウトし、それをリモート リポジトリ ブランチにリンクする
この機能を使用するには、次の手順を実行します。
Bitbucket 課題を開きます。
課題をダブルクリックして開きます。
[Start work on issue] ボタンをクリックします。
- ソース ブランチとローカル ブランチが正確であることを確認します。これらはドロップダウンをクリックして変更できます。
- [Start] をクリックして、課題を自身に割り当て、新しいローカル ブランチに切り替えます。