課題での編集とコラボレーション
課題の編集とコラボレーションのための以下のヒントとコツを利用して、課題への取り組みの効率を高めましょう。
このページでは、課題の編集とコメントの基本的な方法を確認できるほか、次の操作の参考情報を確認できます。
- Wiki ツールバーを利用してコメントや説明を装飾する
- チームとの課題の共有や、他のユーザーのメンション
- ラベルと課題のウォッチャーで課題を追跡する
ファイルやスクリーンショットの添付
管理者が添付ファイルを有効化している場合、ユーザーやカスタマーはファイルやスクリーンショットを作業中の課題に添付できます。詳細は、「ファイルやスクリーンショットを課題に添付する」を参照してください。
課題でのコラボレーション
課題を他のユーザーと共有する
メールを使ってチームと課題を共有することで、チームに情報を継続的かつ簡単に提供できます。
課題を共有する方法は次のとおりです。
画面右上で [共有] ボタンを選択します。
課題を共有するユーザーのユーザー名またはメール アドレスを入力します。
[共有] を選択します。
管理者がプロジェクトへの匿名アクセスを有効にしている場合、Jira ユーザーではないユーザーのメール アドレスを入力して課題を共有することもできます。
[共有] () ボタンを使用して他の Jira ユーザーと課題を共有することで、チームに情報を継続的かつ簡単に提供できます。管理者が匿名アクセスを有効にしている場合、Jira ユーザーではないユーザーのメール アドレスを入力して課題を共有することもできます。
課題についてユーザーにメンションする
チームのメンバーを招待して課題への取り組みの協力を依頼したい場合、課題の説明またはコメントに @ とそのユーザー名を入力することでメンションできます。
ユーザー一覧の上位には報告者やコメント作成者などの課題にすでに携わっているユーザーが表示されるため、素早く選択できます。メンションしたユーザーへの通知は課題の説明またはコメントの保存時に行われます。
課題の詳細を編集する
どのような権限が必要ですか?
課題を編集するには、その課題が関連するプロジェクトの課題の編集プロジェクト権限が必要です。この権限を持っていない場合、管理者に連絡してください。
既存の課題を編集するには、[編集] を選択して課題の編集ダイアログボックスを開きます。編集する必要があるフィールドを変更したい場合、[フィールド設定] > [カスタム] を選択し、表示または非表示にしたいフィールドを選択します。[更新] を選択して変更を保存します。
課題にコメントする
どのような権限が必要ですか?
課題にコメントを追加するには、関連プロジェクトで次の権限を持っている必要があります。
コメントしたい課題を表示する、プロジェクトの参照権限
課題にコメントを追加する、コメントの追加権限 (この権限がないと [コメント] ボタンは表示されない)
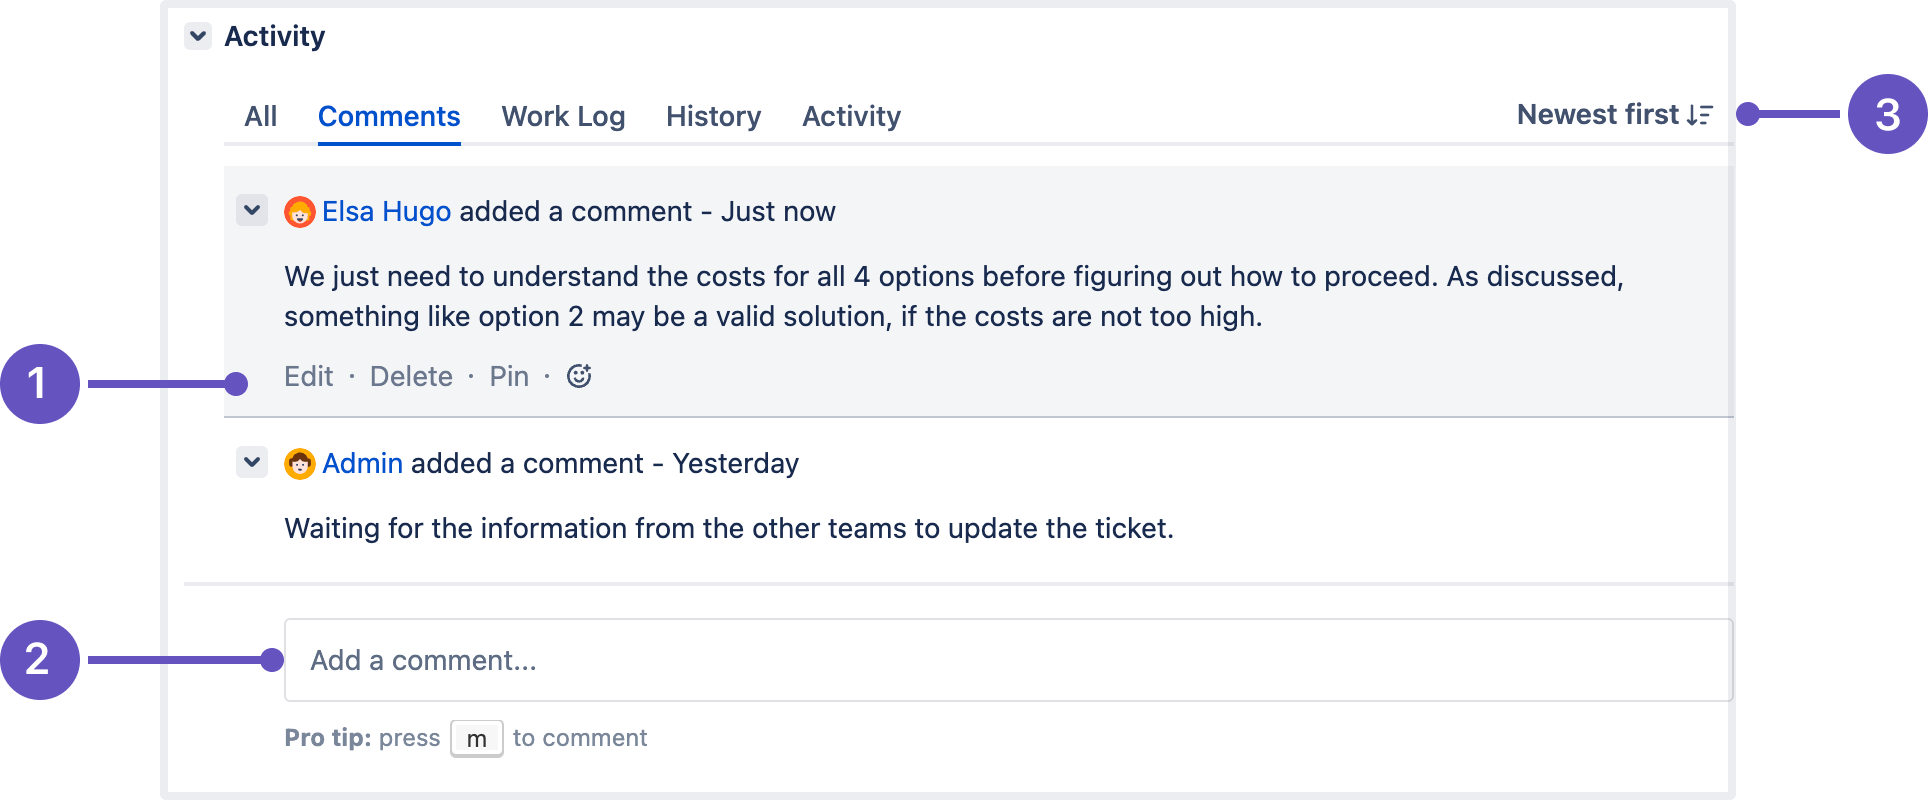
課題ビューでコメントを追加して管理できます。
- コメントを編集、削除、または固定します。
- スティッキー コメント フッター: 課題に新しいコメントを追加
- コメントの並べ替え: コメントを新しい順または古い順に表示できます。
コメントの追加
コメントする課題を開き、次のうち任意の方法でコメントを追加します。
スティッキー コメント フッターにメッセージを入力し始めます。
- m を押してコメント フッターに直接移動し、更新の内容を入力し始めます。
Jira では、コメントを追加すると、自動的にその課題のウォッチャーになります。これを無効にする方法は次のとおりです。
- 画面右上で自分のユーザー名を選択して、[プロファイル] を選択します。
- 基本設定セクションで、[自動ウォッチ] を [無効化済み] に設定します。
コメントの削除
コメントした課題を開き、削除するコメントを見つけて、コメントの下部にある [削除] を選択します。プロンプトで [削除] を選択して、課題からコメントを削除することを確認します。
他のユーザーが追加したコメントは削除できません。
コメントの編集
課題を開き、自分のコメントの下部にある [編集] を選択して、必要に応じてテキストまたは制限 (表示可能ユーザー) を編集します。修正済みのコメントを保存すると、コメントの日付の横に「編集済み」というテキストが表示されます。これはコメントが編集されたことを示しています。
「編集済み」にカーソルを合わせると、誰がいつコメントを編集したかを表示できます。
コメントを固定する
課題にコメントを固定するには、"課題の編集" 権限が必要です。
課題を開き、コメントの下部にある [ピン] を選択すると、そのコメントが他のすべてのコメントの上に表示されます。
コメントを固定すると、そのコメントは [コメント] タブの上部にある [固定したコメント] セクションに表示されます。[すべてのコメント] セクションには、固定したコメントも含め、すべての課題が表示されます。
固定したコメントは並べ替えできません。新しく固定したコメントが常に一番上に表示されます。
[固定したコメント] または [すべてのコメント] セクションで、固定したコメントの固定解除、編集、削除ができます。固定したコメントの制限を変更して、特定のユーザー グループにのみ表示されるようにすることもできます。
コメントへのリンク
コメントのタイムスタンプを右クリックして、リンク アドレスをコピーします。コピーした固定リンクをメールまたはチャット メッセージに貼り付けます。
固定リンクをクリックすると、Jira 課題内の特定のコメントにジャンプします。Jira 課題に含まれているコメントのリストが広範囲に及ぶ場合、課題のページは自動的にスクロールダウンされ、リンクされているコメントが表示されます。
コメントの制限
開いている鍵のアイコン を選択して、コメントの表示制限を適用します (制限がすでに適用されている場合は を選択します)。
wiki マークダウンでテキストを書式設定する
Jira アプリケーションのテキスト書式の表記によって、以下のようなリッチテキスト機能を使用できます:
- 斜体、太字、下線付きテキスト
- さまざまなレベルの見出し
- 箇条書き、番号付きリスト、表、引用
- 画像
- マクロ
課題の説明やコメント、リッチテキストフィールドを編集する場合、シンプルな wiki エディターツールパーを開いてテキストをフォーマットし、プレビューを選択して、フォーマットされたテキストがどのように表示されるか確認することができます。レンダラーが使用できる wiki マークダウンは Jira 管理者が有効化、無効化、設定できるため、オプションが少し異なることがあります。
HTMLマクロ
課題に HTML コードを追加できる HTML マクロを使用する際は、{{<body>}} 内に直接含める場合と同じ形式を使用する必要があります。これにより、誤ってページの書式設定が壊れたり、Jira の CSS が上書きされるのを防ぎます。
管理者がリッチ テキスト エディタを有効にしている場合でも wiki マークダウンを使用してコンテンツの書式設定を行うことはできますが、ビジュアル エディタを選択するとマークダウンが直接適用されるようになります。
ラベルで課題を追跡する
ラベルは、課題を分類して検索するのに役立ちます。課題を表示し、[その他] > [ラベル]を選択して、ラベルの追加または削除を行います。ラベルは [詳細] セクションに表示されます。
ラベル (例: 上記のスクリーンショットの doc) をクリックして課題ナビゲーターにジャンプし、 このラベルを持つすべての課題の一覧を確認できます。また、ラベル ガジェットをダッシュボードに追加して、あなたやチームに関連するラベルを持つ課題を素早く検索することもできます。
課題のウォッチと投票
どのような権限が必要ですか?
課題をウォッチしたり課題に投票したりしている他のユーザーを表示するには、投票者とウォッチャーの表示プロジェクト権限とウォッチャー一覧の管理プロジェクト権限が必要です。
管理者が必要な通知スキームを設定している場合、この課題のウォッチを開始する を選択して、課題の更新通知を自動的に受け取ることができます。課題上でウォッチャーの数をクリックして、他の Jira ユーザーをウォッチャーに追加することも可能です。
付与された権限で、他のユーザーをウォッチャーとして課題に追加できます。[ウォッチャー] フィールドのユーザー ピッカーには、課題が属するプロジェクトへのアクセス権を持つユーザーのみが一覧表示されます。
管理者が課題に対する投票を有効化した場合、[この課題に投票する] を選択して、担当チームに課題の解決や完了を促すことができます。
課題上のサブタスクの並び替え
課題にサブタスクを追加したあとに並び替える必要がある場合、親課題の課題ナビゲーター ビューでドラッグ アンド ドロップすることができます。Jira Software のボードを使用している場合、ボード ビューでもサブタスクを並び替えることができます。ただし、これら 2 つの方法は、互いに独立しています。親課題上でサブタスクを並び替えても、既存のボード上のタスクは並び替えられず、逆も同様です。

