OAuth 2.0 および POP3 を使用して Microsoft Exchange Online に接続するにはどのサービス プロバイダーを選択すればよいですか?
プラットフォームについて: Server および Data Center のみ。この記事は、Server および Data Center プラットフォームのアトラシアン製品にのみ適用されます。
サーバー*製品のサポートは 2024 年 2 月 15 日に終了しました。サーバー製品を利用している場合は、アトラシアンのサーバー製品のサポート終了のお知らせページにて移行オプションをご確認ください。
*Fisheye および Crucible は除く
目的
Microsoft Exchange Online is deprecating basic authentication according to the information in their Exchange Team Blog.
Jira has been supporting OAuth with IMAP but has recently included the same support for POP3 and SMTP (for outgoing mail).
OAuth 2.0 support for POP3 mailboxes has been added to the following Jira versions: 8.5.12, 8.13.4, and 8.15.0.
OAuth 2.0 support for Microsoft SMTP outgoing mail has appeared in Jira 9.2.0 and will be available in the next versions.
ソリューション
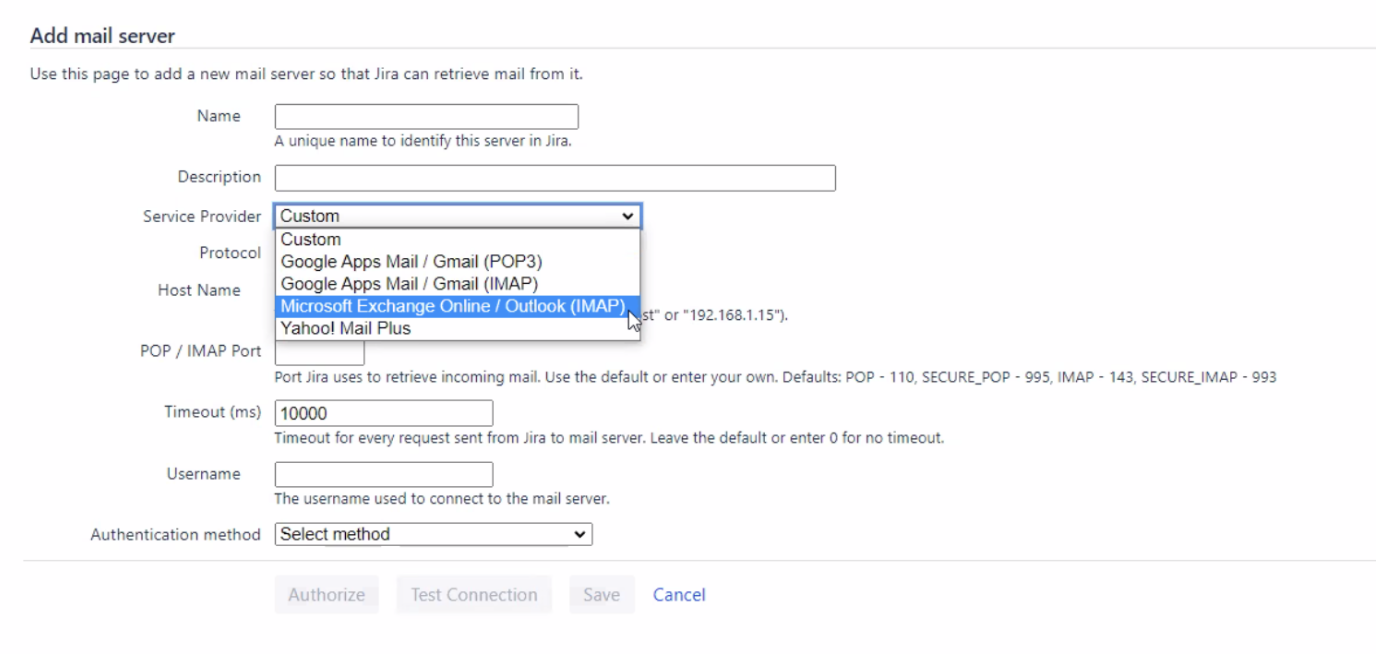
Since POP3 for Microsoft Exchange Online isn’t listed as an option for a service provider setting, you should select Microsoft Exchange Online / Outlook (IMAP) in your incoming mail server configuration.
To create the working configuration, you should
Add Microsoft as a new integration for OAuth 2.0 in Jira
Generate a correct OAuth 2.0 key and secret in Azure
Complete the incoming mail server configuration in Jira with the new server
To complete these steps, follow the instructions in this document.
Add Microsoft as a new OAuth 2.0 integration
To add Microsoft as a new integration for OAuth 2.0, check the Jira version you’re using and follow the corresponding instructions.
OAuth 2.0 と Microsoft Azure の統合の詳細な設定手順については、こちらのナレッジ ベースをご確認ください。
Jira 8.22 以降
Follow the instructions on configuring an outgoing link
Jira 8.21 以前
Go to Administration > System > OAuth 2.0.
Select Add new integration.
In the Service Provider field, select Microsoft.
In the Redirect URL field, select Copy.
Generate an OAuth key and secret in Azure and go back to Jira. See the following instructions.
Learn more about Jira integration with OAuth 2.0
Generate an OAuth 2.0 key and secret in Azure
The following are common high-level steps for setting up the OAuth 2.0 application and related parameters in Azure. Please reach out to your MSFT administrator or their documentation and support if you need additional assistance or have questions. The work in Azure is outside of Jira’s support scope. However, to better assist our customers we created this detailed guide.
To get an OAuth key and secret in Azure:
Login to https://portal.azure.com/.
Select App registrations.
Select New registration.
Enter a friendly, easy-to-identify name.
Under Supported account types, select Accounts in any organizational directory (Any Azure AD directory - Multitenant) and personal Microsoft accounts (e.g. Skype, Xbox).
Under Redirect URI, select Web and insert the URL retrieved previously
Select Register.
Select API permissions.
Select Add a permission.
Select Microsoft Graph.
Select Delegated permissions.
以下のパーミッションを選択します:
OpenId permissions: offline_accessIMAP: IMAP.AccessAsUser.AllPOP: POP.AccessAsUser.All
Select Add permissions.
Select Grant admin consent for.
In the left menu, select Certificates & secrets.
Select New client secret.
Enter a description and select an expiration date.
Save the generated
Value. You’ll use it as the Client secret in Jira. You’ll see theValueonly once.Select Overview.
Save the
Application (client) ID. You’ll use it as the Client ID in Jira.Go back to Jira and complete the configuration by inserting the following details:
Client ID from step 20
Client secret from step 18
Scopes: "
https://outlook.office.com/IMAP.AccessAsUser.All", "https://outlook.office.com/POP.AccessAsUser.All" and"offline_access"
保存 を選択します。
Test the connection.
If the connection is successful, proceed with the following steps.
Optionally, check the Microsoft doc on how to get the Client ID and secret.
Complete the OAuth configuration in Jira
To complete the OAuth 2.0 configuration, on your Jira instance:
[管理] > [システム] の順に移動します。
Under Mail, select Incoming mail.
In the Mail servers section, select Add mail server.

- In the Service Provider field, select Microsoft Exchange Online / Outlook (IMAP) even though you are using a POP3 account.
In the Username field, insert the email address used by Jira.
In the Authentication method field, select the newly created server.
Select Authorize and log in to Microsoft using the user account that is associated with the mailbox being configured.
Select Test Connection to ensure that it’s successful.
[保存] を選択します。
Learn more about the OAuth 2.0 configuration in the documentation on: