Setting up OAuth 2.0 integration
OAuth 2.0 is now part of application links
This page is obsolete and describes the state of OAuth 2.0 as it was released with Jira 8.10 EAP. In Jira 8.22 and later, you can set up your OAuth 2.0 integrations in application links. To do this, go to Administration > Applications, and then Application links.
For more information on OAuth 2.0 and how to set up your integrations, see Link to other applications.
To add Microsoft as a new integration, you should have an OAuth key and secret from Microsoft Azure. Learn how to generate them
In response to Google and Microsoft planning to deprecate Basic Authentication, we are adding three-legged OAuth 2.0 authentication methods for incoming email. If you currently use email to create issues and issue comments, you will need to reconfigure your incoming mail settings.
What if I don’t update my settings?
Once Google and Microsoft disable Basic Authentication, you will not be able to create issues and comments from email and your connection to the Gmail and/or Microsoft Exchange Online server will no longer be operational. You don't need to update the settings in your custom email servers or other service providers if they use IMAP or POP3. They will continue to work.
POP Support for OAuth 2.0 using Microsoft is only available for the following Jira versions:
- 8.5.12 (or any newer 8.5.x version)
- 8.13.4 (or any newer 8.13.x version)
- 8.15.0 以降
Please check JRASERVER-72033 - Getting issue details... STATUS for more information.
ユーザー側で必要な操作について
You need to configure OAuth 2.0 for your Google and/or Microsoft email server and update your email server configuration. You need to be a system administrator to do that.
You need to configure the OAuth 2.0 settings first. To do that you will require specific info such as a client ID from your service provider. You can generate this data on the service provider’s side. Then, you need to copy the data to the OAuth plugin in your application to generate a redirect URL. You need to provide the redirect URL that your application generated at the service provider’s site. Once you save your configuration, you can proceed to configure your mail server to use OAuth 2.0 as the authentication method.
前提条件は何ですか。
以下を確認する必要があります。
サーバーには HTTPS 経由でアクセスできる必要があります。これを行わない場合、OAuth 2.0 を構成できなくなります。
Your base URL needs to be configured correctly. This is important as the redirect URL you’ll need to provide is based on Jira’s base URL.
How do I do it?
最初に、メール サーバーが使用する OAuth 2.0 連携を追加する必要があります。次に、この連携を使用するメール サーバーを構成する必要があります。
Configure OAuth 2.0 for Google, Microsoft, or your own custom server
Using Jira 8.22 or later? To configure OAuth 2.0, follow the steps in Configure an outgoing link.
OAuth 2.0 と Microsoft Azure の統合の詳細な設定手順については、こちらのナレッジ ベースをご確認ください。
- Go to Jira administration > System > OAuth 2.0.
- Select Add new integration.
- Select your Service provider.
- 連携の名前を入力します。
- For Google and Microsoft, we will auto-fill the authorization and the token endpoint data. However, if you are using a custom service provider, you need to get this data from the service provider and fill it in yourself.
- Copy the generated redirect URL, which you’ll have to provide at the service provider’s site to obtain the client ID and client secret.
Different providers might have additional requirements related to the redirect URL. For example, Google does not allow it to be a private IP address. Make sure you provide an external URL (for example a load balancer for the Data Center). - Go to the service provider to generate the data to enter on the plugin’s site to complete the integration.
Google: Go to https://developers.google.com/identity/protocols/oauth2/web-server to learn how to generate the required data.
Microsoft: Go to https://docs.microsoft.com/en-us/azure/active-directory/develop/v2-oauth2-auth-code-flow to learn how to generate the required data.
You will need the following data for the integration:Scopes - this is the level of the authenticated user data that you allow your service provider to share with the application.

For Google, we recommend using the
https://mail.google.com/scope for IMAP and POP3. For Microsoft, we recommendhttps://outlook.office.com/IMAP.AccessAsUser.All or https://outlook.office.com/POP.AccessAsUser.All,andoffline_access.To learn more about scopes, see detailed information from Microsoft and Google.
When you complete the application registration process with your provider, you obtain the following unique credentials to authorize the OAuth Client (for example, Jira) with the OAuth Server (for example, Google). Copy and paste them into Jira at the OAuth 2.0 site:
Client ID
Client Secret
If you use a custom service provider, you might need to generate the client ID and the client secret yourself. Make sure that the values are the same on the application and the service provider side. Save your configuration.
To add Microsoft as a new integration for OAuth 2.0, please review the below steps:
To add google as a new integration for OAuth 2.0, please review the below steps:
Configure your Jira incoming mail server to use OAuth 2.0
Using Jira 8.22 or later? To configure OAuth 2.0, follow the steps in Configure an incoming link.
- Go to Jira configuration > System > Incoming mail.
- Click Edit next to the mail server.
- If you use a Microsoft server, select Custom in the Service provider dropdown.
- Select the OAuth 2.0 integration you’ve configured as your authentication method.
- Click Authorize to give Jira access to mail.
- Log in to the mailbox's mail account. This should display the service provider’s popup asking you to allow Jira to access the account. Click Allow.
- To verify that everything works, click Test connection. If the connection doesn't work, you will be unable to save your settings.
- Click Save to complete the process.
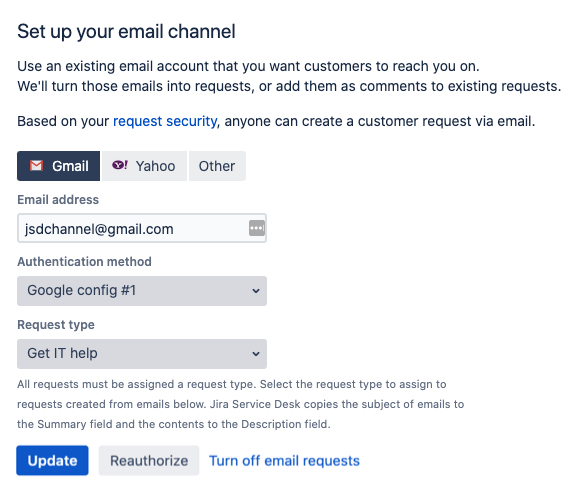
Configure Jira Service Desk to use OAuth 2.0
For Jira Service Desk projects, you’ll need to reconfigure email channels that allow customers to create requests via email. This can be done by a Jira admin, for each project separately.
Open your desired Service Desk project.
Go to Project settings > Email requests. There can only be one email channel for a project, so you should see the details of your current channel.
Change the authentication method to the OAuth 2.0 integration that you created earlier (Administration > System > OAuth 2.0).
When adding your email account, you need to be able to authenticate to the email service provider used in your OAuth 2.0 integration.
Click Update to save the changes, and then Authorize (if you’re creating a brand new configuration, these actions will be called Save and authorize).
Log in to your email account. Unlike basic authentication, it can’t just be any email address. It must belong to a domain that was configured in the OAuth 2.0 integration.
Once authorized, you will see a success message about the channel is enabled. Your customers should now be able to create their requests via email.
Is there anything else I need to do as a plugin vendor?
Check whether you need to go through the Google verification process for your app. This might be needed if your app uses sensitive user scopes and is available to external users. Unless the app is internal only, you might need to pay for the verification. See Google OAuth 2.0 verification process.
If your app provides a custom mail handler, the OAuth 2.0-related changes should not affect it. This feature doesn’t deliver any new API, and it’s up to the admin to set the mail handler to use the updated mail server.
既知の問題
It's possible that the connection to the mail server breaks. If it’s not because your token has expired, you need to renew your consent. Go to Jira configuration > System > Incoming mail, click Edit next to the mail server and click Authorize.