OAuth 2.0 と Microsoft Azure の統合の詳細な設定手順
プラットフォームについて: Data Center - この記事は、Data Center プラットフォームのアトラシアン製品に適用されます。
このナレッジベース記事は製品の Data Center バージョン用に作成されています。Data Center 固有ではない機能の Data Center ナレッジベースは、製品のサーバー バージョンでも動作する可能性はありますが、テストは行われていません。サーバー*製品のサポートは 2024 年 2 月 15 日に終了しました。サーバー製品を利用している場合は、アトラシアンのサーバー製品のサポート終了のお知らせページにて移行オプションをご確認ください。
*Fisheye および Crucible は除く
要約
This guide aims to provide a more detailed overview of every step required to integrate Jira using OAuth2.0 authentication with Microsoft Azure.
It shows screenshots of the location of each piece of information we need to successfully complete the integration.
Creating the OAuth 2.0 application link in Jira:
First, start creating an application link integration:
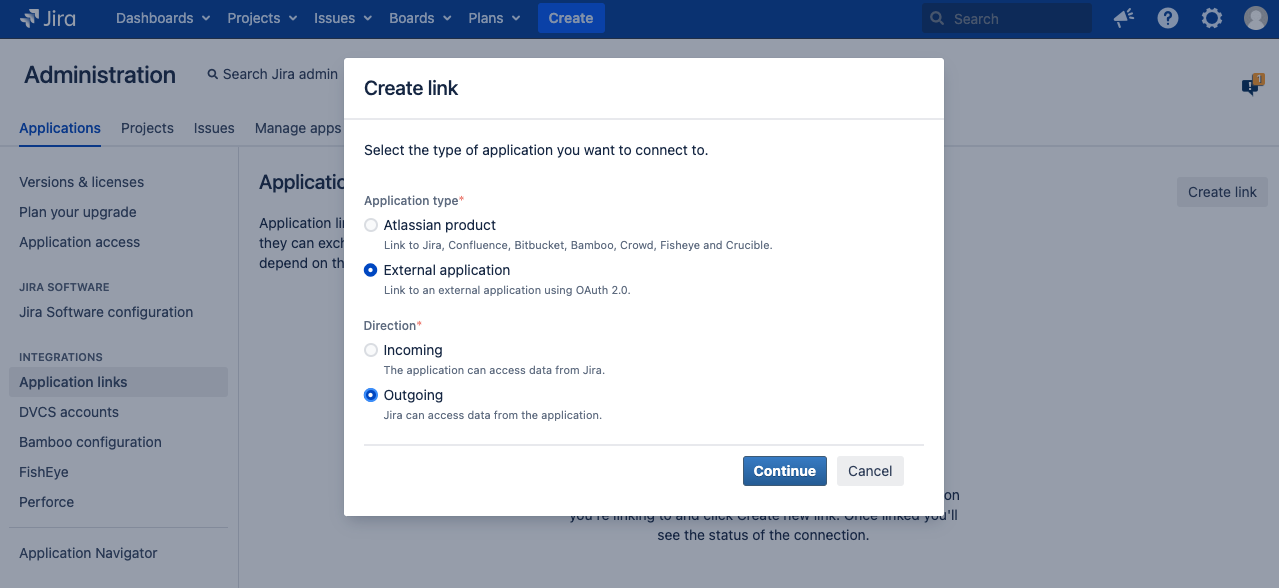
For Jira 8.22+/4.22+:
Go to Jira administration > Applications, and then Application links.
NOTE: Select External application and Outgoing, then Microsoft as the provider if you're on a "non-GCC" or a "normal GCC plan, or choose Custom if you're on a DoD or GCC-High plan. (More details will follow in the next steps)
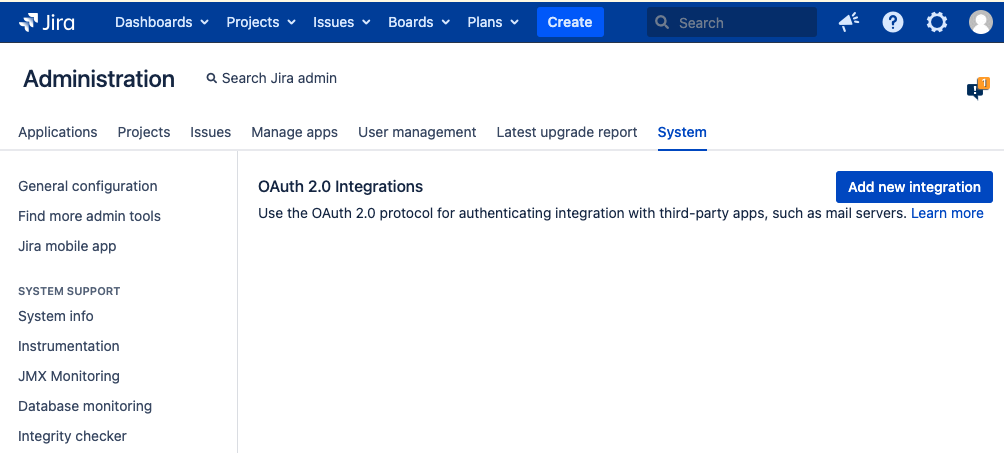
For older Jira versions:
Go to Jira administration > System > OAuth 2.0
NOTE: Add New integration and Select Microsoft as the provider for default settings:
Initial configuration on the Jira side:
1. On the bottom section, copy the Redirect URL from the Jira OAuth2.0 integration that you created.

Now to the Azure side:
2. Go to "https://portal.azure.com/"
3. Click on App registrations
4. Click on New registration
5. Let's pick up a friendly name so it will be easier to identify
6. Under the "Supported account types" section, let's choose "Accounts in any organizational directory (Any Azure AD directory - Multitenant) and personal Microsoft accounts (e.g. Skype, Xbox)"
NOTE: In this step is important to choose the "and personal Microsoft accounts", as this uses the common endpoint.
7. Under the "Redirect URI" section, let's pick up Web and insert the URL from the step #1 above
8. Click on Register

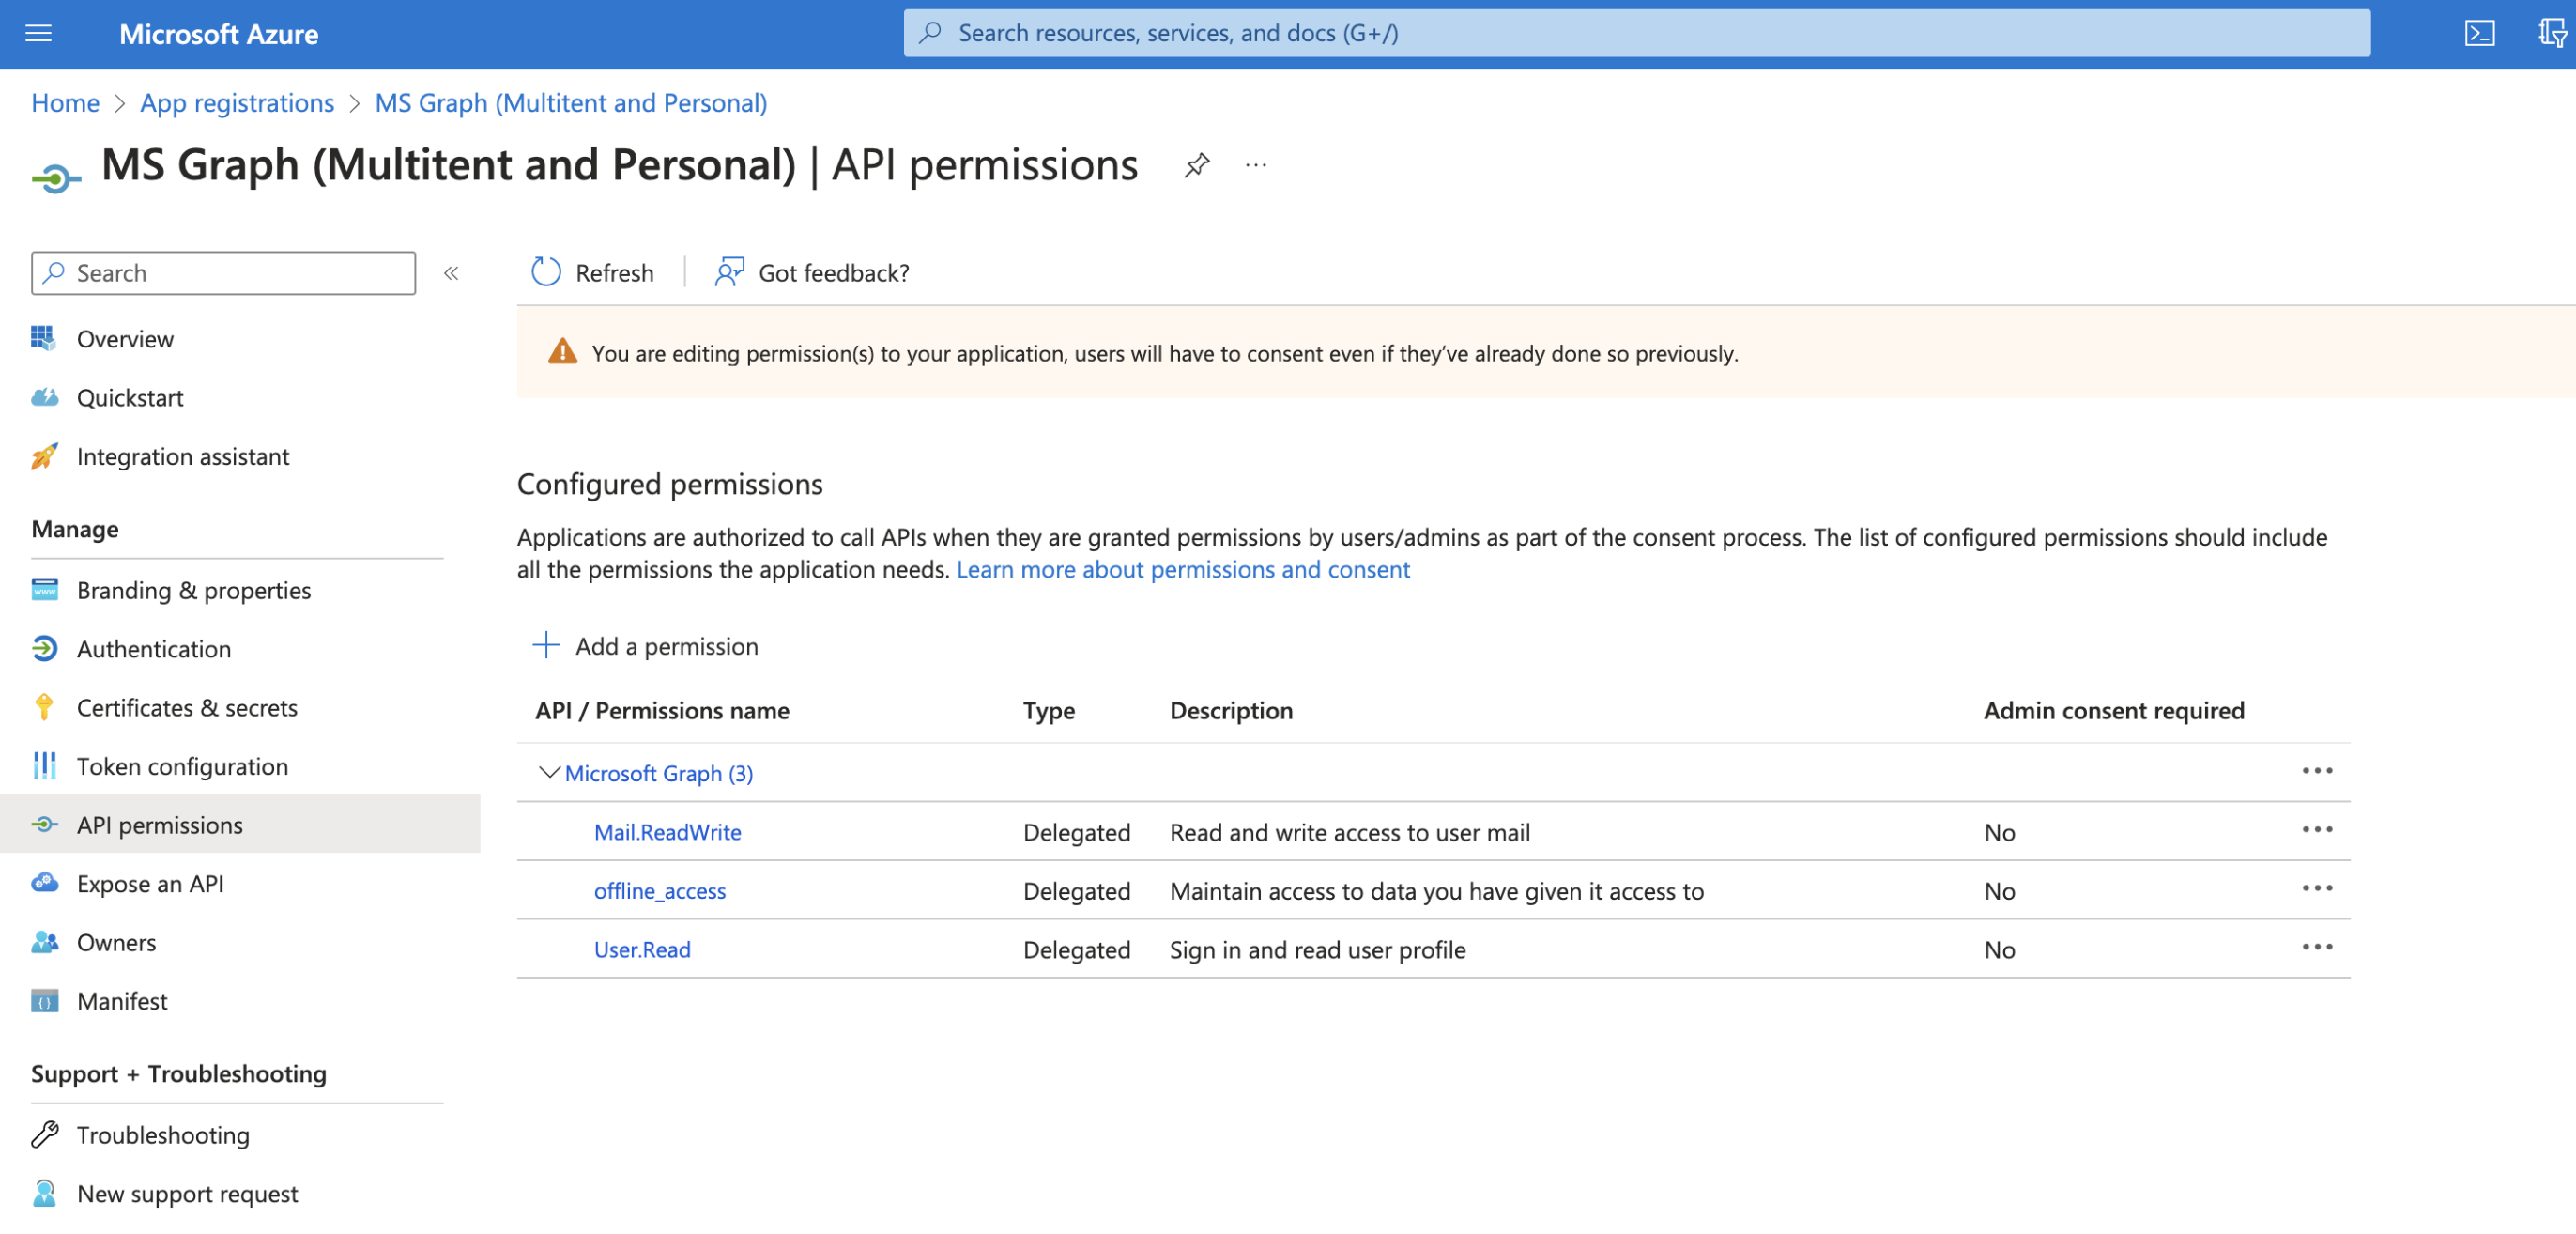
9. Click on API permissions
10. Click on Add a permission
11. Click on Microsoft Graph
12. Select Delegated permissions
13. Search and select the following permissions, depending on what protocols you are going to use:
- If you're using the regular API:
offline_access
IMAP.AccessAsUser.All
POP.AccessAsUser.All- Or these if you're using Microsoft Graph API:
Mail.ReadWrite
Mail.ReadWrite.Shared (for shared mailboxes only)
offline_access
NOTE: Check with Microsoft which one you should be using.
14. Click on Add permissions
15. Click on Grant admin consent... if this option is not available, there must be a message saying that your grant is already given above this table.
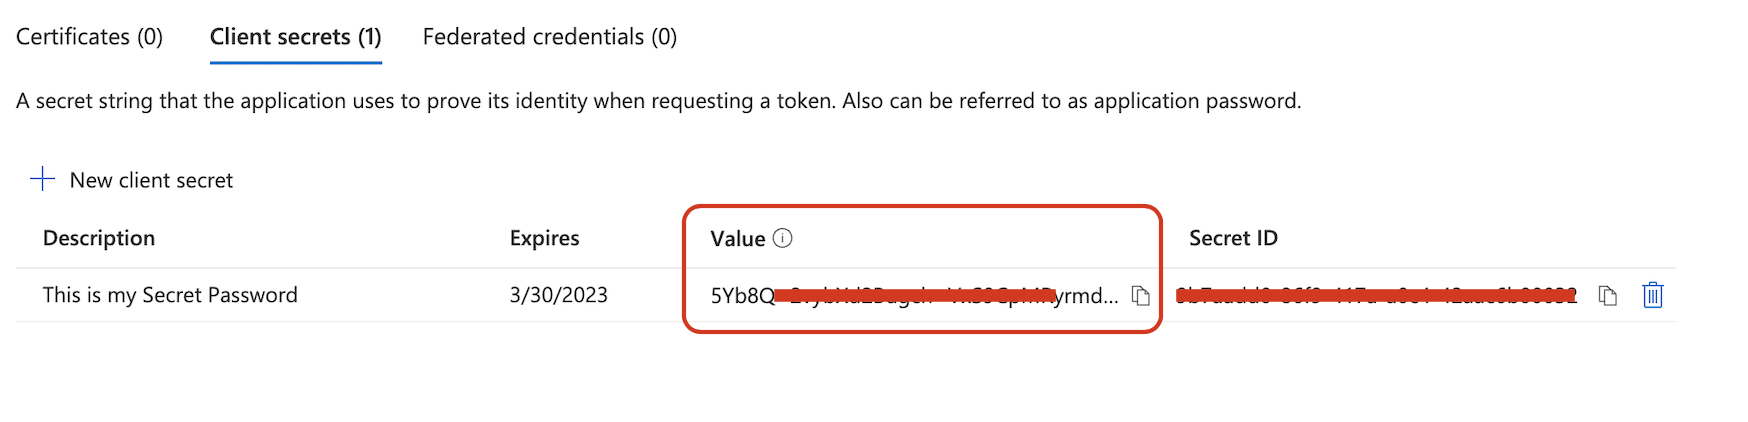
16. Click on Certificates & secrets
17. Click on New client secret
18. Choose a description and expiration date
19. Copy the Value generated, as this "Value" will be used as the "Client secret" in Jira to complete the configuration.
Known errors:
The "Value" is the "Client secret" we need to use on Jira. If you use the "Secret ID" as the "Client secret" on the Jira OAuth settings it will cause an authentication error.
20. Click on Overview
21. Take note of the Application (client) ID, we'll use this as the "Client ID" at the Jira side config.

Extra step:
On the Overview page, there's a link on the top called "endpoints", check if your "OAuth 2.0 authorization endpoint (v2)" and "OAuth 2.0 token endpoint (v2)" match the same ones defaulted on the Jira side.
Correct them on the Jira side to the Endpoints Azure is expecting if needed as this is the root cause of several "single-tenant" and "multi-tenant" issues.

Jira side part 2:
22. Let's go back to Jira and complete the configuration by inserting the following details:
- Client ID = "Application (client) ID" from step #21 above.
- Client secret = "Value" from step #19 above.
23. For the Scopes, manually copy and paste individually these URLs, depending on what protocols you are going to use and on your Azure account type:
For non-GCC, and "normal" Government Community Cloud (GCC) plans, which are the most commons type of plans, use the following scopes:
https://outlook.office.com/IMAP.AccessAsUser.All
https://outlook.office.com/POP.AccessAsUser.All
offline_access
For US Government DoD or US Government GCC High plans, use the following scopes:
https://outlook.office365.us/IMAP.AccessAsUser.All
https://outlook.office365.us/POP.AccessAsUser.All
offline_access
Known errors:
Using GCC High scopes with non-GCC or "normal" GCC accounts will cause connection issues.
Read more for similar issues caused by wrong scope
For more details on GCC High accounts, check this even more detailed guide:
For Microsoft Graph API, use these:
Scopes for Microsoft Graph API (valid for Jira 9.9+ or Jira Service Management 5.8+ only):https://graph.microsoft.com/Mail.ReadWrite https://graph.microsoft.com/offline_access https://graph.microsoft.com/Mail.ReadWrite.Shared (for shared mailboxes only)Microsoft Graph API
For more details of the use and configuration of the Microsoft Graph API, check these pages:
24. Click on Save
25. Test the connection
You'll be redirected to the authentication page.
If the Auth is successful, you'll return to Jira with a confirmation message that the integration worked!
What if the authorization fails?
We'll most likely have a network issue that is preventing this Authorization from being fully completed, as the root cause requires a deeper debug, please raise a ticket on our Atlassian Support Channel.
Known issues and errors:
AADSTS7000215: Invalid client secret is provided
2022-xx-xx 20:34:03,014+0000 http-nio-8080-exec-253 ERROR username 1234x5727202x3 1i8mi5a 0.0.0.0.0.0.0.0 /rest/oauth2-client/latest/config/flow/xxxxxxxxx-xxxx-xxxx-xxxx-xxxxxxxxxxx [c.a.o.c.rest.resource.ClientConfigurationResource] Error occurred while authorizing an integration. The error message is: AADSTS7000215: Invalid client secret provided. Ensure the secret being sent in the request is the client secret value, not the client secret ID, for a secret added to app 'xxxxxxxxx-xxxx-xxxx-xxxx-xxxxxxxxxxx'.
    Trace ID: xxxxxxxxx-xxxx-xxxx-xxxx-xxxxxxxxxxx
    Correlation ID: xxxxxxxxx-xxxx-xxxx-xxxx-xxxxxxxxxxx
    Timestamp: 2022-xx-xx 20:33:57Z
This might indicate that the secret value / ID was wrongly copied, as step #19 states.
Or, create a new secret to use with this Jira application link.