Confluence 用 WebDAV クライントの設定
WebDAV を使用すれば、ユーザーは Microsoft Windows の「My Network Places」などの WebDAV クライアントを介して、Confluence のコンテンツにアクセスできます。ユーザーに権限があれば、Confluence のスペース、ページ、添付ファイルを読み書きできるようになります。ユーザーはログインするように求められ、標準の Confluence コンテンツへのアクセス権限が、WebDAV クライアントを通じて利用できる同等のコンテンツに適用されます。
Confluence WebDAV ネットワーク ドライブの割り当てには、特定の基準を満たす必要があります。具体的な情報については、Windows ネットワーク ドライブの要件 を参照してください.
Confluence の WebDAV クライアント統合の概要
既定では、すべての WebDAV クライアントが Confluence への書き込み権限を持っています。書き込み権限には、Confluence インストールのスペース、ページ、添付ファイルに関連付けられたコンテンツを作成、編集、移動、削除する WebDAV クライアント用の機能が含まれています。
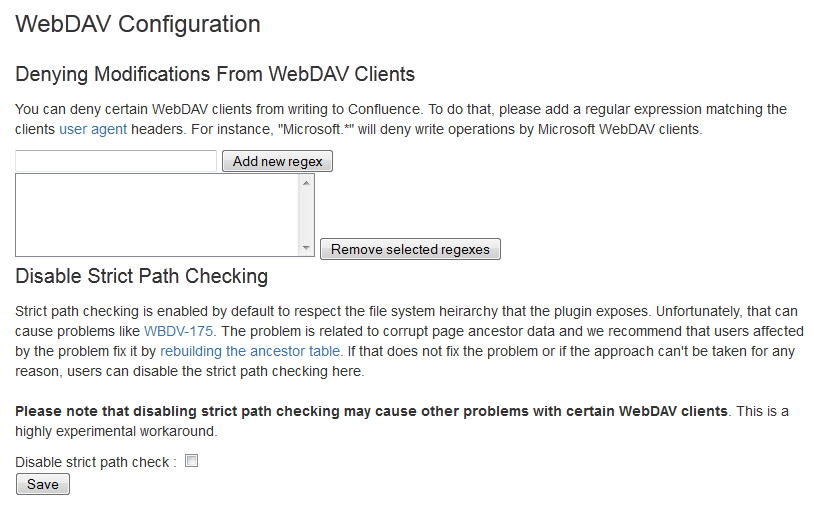
Confluence 管理コンソールの [WebDAV 設定] 画面では、次の操作ができます。
- 正規表現(regex)を使用して、Confluence インストールへの WebDAV クライアントの書き込み権限を拒否する
- 厳密なパス チェックを無効化または有効化する
- 特定の仮想ファイル/フォルダーへのアクセスを有効化または無効化する
注意:
- [WebDAV 設定] ページは、WebDAV プラグインが有効になっている場合にのみ使用できます。このプラグインは Confluence にバンドルされており、システム管理者が有効または無効にすることができます。
- [WebDAV 設定] ページの設定は、外部添付ファイル ストレージ設定には適用されません。
ページで利用するために WebDAV クライアントを利用する
次のセクションでは、各種のオペレーティングシステムで WebDAV クライアントをネイティブに設定する方法を説明します。WebDAV クライアントは、Microsoft Windows のWindows Explorer、Linux の Konqueror など、オペレーティング システムのファイル ブラウザ アプリケーションでは、一般的にドライブとして表示されます。
Mac OSX の Finder で Confluence にアクセスする
HTTPS の使用時は、正常に接続できても、コンテンツを表示できないため、この手法は Confluence Cloud では機能しません。代わりに、サードパーティの WebDAV クライアントを使用してください。
Finder を使用して、Confluence のコンテンツを表示、管理するには、
- Finder で [移動] > [サーバーへの接続] を選択します。
次の形式で Confluence の URL を入力します。
http://<confluence base URL>/plugins/servlet/confluence/defaultたとえば、Confluence URL が http://ourconfluence.sample.com/wiki である場合は、次のように入力します。
http://ourconfluence.sample.com/wiki/plugins/servlet/confluence/defaultConfluence のユーザー名とパスワードを入力し、[接続] を選択します。
メール アドレスがユーザー名である場合を除き、メール アドレスではなく、ユーザー名(jsmith)を使用してください。
Confluence は Finder で共有ドライブとして表示されます。Cyberduck など、サードパーティの WebDAV クライアントを使用する場合、同じ URL で接続できます。
Microsoft Windows の Explorer で Confluence にアクセスする
ここでは、Microsoft Windows で WebDAV クライアントをネイティブに設定する 2 つの方法を説明します。
- ネットワーク ドライブとして設定
- Web フォルダーとして設定
このようなネットワーク ドライブ方式を使用できる場合は、Web フォルダー方式よりも包括的な Confluence と WebDAV クライアントとのやり取りが実現します。しかし、この方式を使用するには、Confluence のインスタンスがいくつかの環境制約を満たす必要があります。インスタンスの設定がこれらの要件を満たさない場合は、Web フォルダー方式またはサードパーティの WebDAV クライアント ソフトウェアを使用します。
SSL を使用している場合、サーバー URL の末尾に @SSL を追加する必要がある場合があります。
http://<confluence server url>@SSL/confluence/plugins/servlet/confluence/defaultこのセクションの手順で問題が発生した場合は、 WebDAV のトラブルシューティング ページを参照してください。
Windows ネットワーク ドライブ
Confluence WebDAV クライアント ネットワーク ドライブを割り当てるには、Confluence インスタンスの設定が、以下の基準を すべて 満たす必要があります。
- コンテキスト ルートがない
- ネットワーク ドライブの割り当てを妨げる課題がある。以下のネットワーク フォルダーの手順を回避策として使用してください。
こうした制約は、Microsoft の Mini-Redirector コンポーネントでの制限に起因します。詳細については、Microsoft の サーバー検出の問題 を参照してください。
Microsoft Windows で Confluence WebDAV クライアント ネットワーク ドライブを割り当てるには、
- Windows で [ネットワーク ドライブの割り当て] に移動します。
お使いの Windows バージョンでこの画面に移動する方法については、Windows ドキュメントの「Windows でネットワーク ドライブを割り当てる」を参照してください。 - 次の入力を指定して、WebDAV クライアントをネットワーク ドライブとして割り当てます。
- ドライブ:
<Any drive letter>(例:Z:) - フォルダ:
\\<hostname>\webdav(例:\\localhost\webdav)
- ドライブ:
- [完了] を選択します。
ログイン認証情報の入力を求められたら、Confluence のユーザー名とパスワードを指定します。
Windows Web フォルダー
Confluence WebDAV クライアント Web フォルダをマッピングする方法は、次のとおりです。
- [マイ ネットワーク プレース] に移動して [ネットワーク プレースを追加する] を選択し、プロンプトに従います。
- [インターネットまたはネットワーク アドレス] フィールドに、Confluence WebDAV の場所の URL (例:
http://<confluence server url>/confluence/plugins/servlet/confluence/defaultやhttp://<confluence server url>/plugins/servlet/confluence/default) を入力し、[次へ] をクリックします。 - Confluence のユーザー名とパスワードを入力します。
- わかりやすい Web フォルダー名を指定し、ウィザードに従って続行します。
- [完了] を選択します。
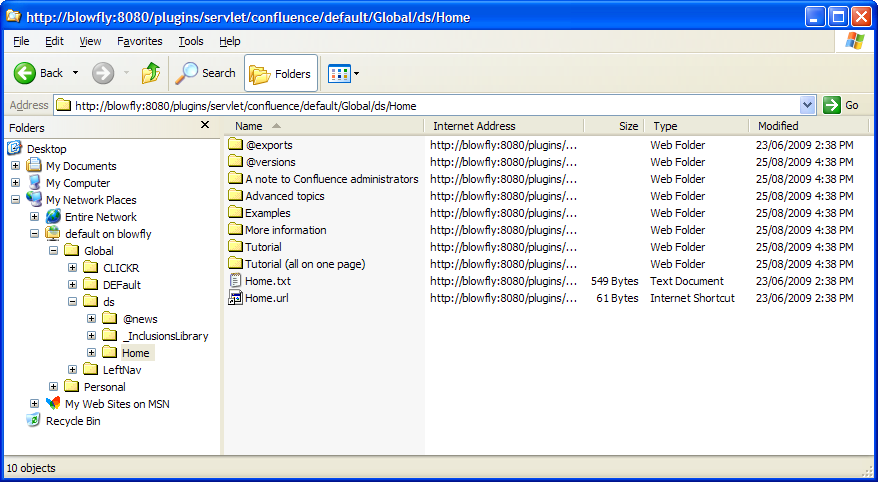
スクリーンショット:Windows XP の Confluence WebDAV クライアント Web フォルダー
Linux で WebDAV クライアントをセットアップする
これらのオペレーティング システムに WebDAV クライアントを設定するには、多くのツールやメカニズムが利用できます。そこで、Linux K デスクトップ環境の一部であるファイルマネージャー、Konqueror を使用して、これを実証することにしました。
Konqueror で Confluence WebDAV クライアントを設定するには、
- Konqueror を開きます。
- [場所] フィールドに、'protocol'
webdavs(例:webdavs://<confluence server url>/confluence/plugins/servlet/confluence/defaultまたはwebdavs://<confluence server url>/plugins/servlet/confluence/default) を使用して Confluence WebDAV の URL を入力し、Enterを押します。 - プロンプトが表示されたら、Confluence のユーザー名とパスワードを入力します。
クリックすると、多くのファイルをロードできるはずですが、すべてのファイルをロードできるわけではありません。実際は、変更したファイルをローカルで保存し、そのあと Konqueror ウィンドウにドラッグして、Confluence にアップロードするのが普通です。
Confluence への WebDAV クライアント書き込みアクセスの制限
WebDAV プラグインの以前のバージョンでは、WebDAV クライアントの書き込み権限(つまり、作成、移動、編集を行う操作)を制限する別のオプションが利用可能でした。しかし、このプラグインの現在のバージョンでは、オプションが簡素化され、これらのすべての操作を網羅する一般的な書き込み権限の制限にまとめられています。
現在、WebDAV クライアントのユーザー エージェント ヘッダー内の特定のコンテンツに一致する regex を設定することによって、WebDAV クライアントは Confluence インストールへの書き込み権限を拒否されます。設定された regex は、制限を受ける WebDAV クライアントの一覧に追加されます。この一覧の regex に一致するユーザー エージェント ヘッダーを持つすべての WebDAV クライアントは、Confluence インストールへの書き込み権限を拒否されます。
例:Microsoft Web フォルダー WebDAV クライアントによって生成された PROPFIND メソッド ヘッダーです。ユーザー エージェント ヘッダー フィールドを示しています。
PROPFIND /plugins/servlet/confluence/default HTTP/1.1
Content-Language: en-us
Accept-Language: en-us
Content-Type: text/xml
Translate: f
Depth: 1
Content-Length: 489
User-Agent: Microsoft Data Access Internet Publishing Provider DAV
Host: 127.0.0.1:8082
Connection: Keep-Alive
すべての WebDAV クライアントの書き込み権限を制限することしかできなかった以前のバージョンの WebDAV プラグインとは異なり、 このプラグインの現在のバージョンでは、特定の WebDAV クライアントに対して書き込み権限を制限できます。
Confluence インストールへの WebDAV クライアントの書き込みアクセス権限を制限するには、
- [管理 ] メニューで [一般設定] を選択します。
- 左側のパネルで [WebDAV 設定] を選択します。
- 制限したい WebDAV クライアントによって送信されたユーザー エージェント ヘッダーの特定のコンポーネントと一致する regex を入力します。
- [新しい正規表現の追加] を選択します。
3 と 4 の手順を繰り返し、制限を追加する WebDAV クライアントごとに正規表現を追加します。 - [保存] を選択します。
Confluence インストールへの書き込みを制限された、1 つ以上の WebDAV クライアントの書き込みアクセス権限を復元するには、
- [管理 ] メニューで [一般設定] を選択します。
- 左側のパネルの [設定] で [WebDAV 設定] を選択します。
- 復元対象である制限された WebDAV クライアント(複数可)から送信されたユーザー エージェン ト ヘッダーに一致する regex(複数可)を一覧から選択します。
- [選択した正規表現の削除] を選択します。
- [保存] を選択します。
スクリーンショット:WebDAV 設定
厳密なパス チェックの無効化
Confluence サイト上には存在するが、クライアントから欠落しているフォルダーがあるなど、WebDAV クライアントに特異性が見られた場合、WebDAV プラグインの厳格なパス チェック オプションを無効にして、これらの問題を最小限に抑えることができます。
WebDAV プラグインの厳格なパス チェック オプションを無効にするには、
- [管理 ] メニューで [一般設定] を選択します。
- 左側のパネルの [設定] で [WebDAV 設定] を選択します。
- [厳密なパスのチェックを無効] チェックボックスを選択解除します。
- [保存] を選択します。
仮想ファイルとフォルダー
WebDAV クライアントのパフォーマンスや安定性に問題が生じる可能性が低いイベントでは、自動的に生成された(つまり、仮想の)ファイルとフォルダーへのアクセスを有効にすることができます。
注意:
既定では、これらのオプションは [WebDAV 設定] ページで非表示になっています。オプションを表示するには、?hiddenOptionsEnabled=true パラメータを URL の末尾に追加し、ページをリロードします。例:
<Confluence base URL>/admin/plugins/webdav/config.action?hiddenOptionsEnabled=trueスクリーンショット:非表示になっている仮想ファイルとフォルダー オプション
仮想ファイルとフォルダーへのアクセスを有効化または無効化するには、
- [管理 ] メニューで [一般設定] を選択します。
- 左側のパネルの [設定] で [WebDAV 設定] を選択します。
- 上記の注意で説明したように URL を変更し、[WebDAV 設定] ページを再読み込みします。
- 必要に応じて、[仮想ファイルとフォルダ] セクションのチェックボックス オプションを選択または選択解除します。
- [保存] を選択します。


![非表示に設定されている [仮想ファイルとフォルダ] オプション](https://confluence.atlassian.com/conf91/files/1442848957/1442848964/1/1727949331874/Admin_webdavconfig_virtualfilesandfolders.png)