Confluence 用 WebDAV クライントの設定
WebDAV を使用すれば、ユーザーは Microsoft Windows の「My Network Places」などの WebDAV クライアントを介して、Confluence のコンテンツにアクセスできます。ユーザーに権限があれば、Confluence のスペース、ページ、添付ファイルを読み書きできるようになります。ユーザーはログインすることを求められ、標準の Confluence コンテンツへのアクセス権限が WebDAV クライアントを通じて利用できる同等のコンテンツに対して適用されます。
Confluence WebDAV ネットワーク ドライブの割り当てには、特定の基準を満たす必要があります。具体的な情報については、Windows ネットワーク ドライブの要件 を参照してください.
Confluence の WebDAV クライアント統合の概要
既定では、すべての WebDAV クライアントが Confluence への書き込み権限を持っています。書き込み権限には、Confluence インストールのスペース、ページ、添付ファイルに関連付けられたコンテンツを作成、編集、移動、削除する WebDAV クライアント用の機能が含まれています。
Confluence 管理コンソールの「WebDAV 設定」画面では、次の操作ができます。
- Deny a WebDAV client write permissions to a Confluence installation using a regular expression (regex).
- Disable or enable strict path checking.
- Enable or disable access to specific virtual files/folders.
注意:
- The 'WebDav Configuration' page is only available if the WebDAV plugin has been enabled. Note that this plugin is bundled with Confluence, and can be enabled or disabled by the System Administrator.
- The settings on the 'WebDav Configuration' page do not apply to external attachment storage configuration.
ページで利用するために WebDAV クライアントを利用する
次のセクションでは、各種のオペレーティングシステムで WebDAV クライアントをネイティブに設定する方法を説明します。WebDAV クライアントは、Microsoft Windows のWindows Explorer、Linux の Konqueror など、オペレーティング システムのファイル ブラウザ アプリケーションでは、一般的にドライブとして表示されます。
Mac OSX の Finder で Confluence にアクセスする
Finder を使用して、Confluence のコンテンツを表示、管理するには、
- In Finder choose Go > Connect to Server.
次の形式で Confluence の URL を入力します。
http://<confluenceURL>/plugins/servlet/confluence/defaultFor example if your Confluence URL is http://ourconfluence.atlassian.net/wiki you would enter:
http://ourconfluence.atlassian.net/wiki/plugins/servlet/confluence/defaultYou must use HTTP, you'll be able to connect with HTTPS but you wont see any content.
- Enter your Confluence username and password and click Connect.
Note: use your username (jsmith), not your email address, unless your email address is your username. Confluence will appear as a shared drive in Finder.
You can use the same URL to connect using a third party WebDav client, like CyberDuck.
Microsoft Windows の Explorer で Confluence にアクセスする
ここでは、Microsoft Windows で WebDAV クライアントをネイティブに設定する 2 つの方法を説明します。
- ネットワーク ドライブとして設定
- Web フォルダーとして設定
このようなネットワーク ドライブ方式を使用できる場合は、Web フォルダー方式よりも包括的な Confluence と WebDAV クライアントとのやり取りが実現します。しかし、この方式を使用するには、Confluence のインスタンスがいくつかの環境制約を満たす必要があります。インスタンスの設定がこれらの要件を満たさない場合は、Web フォルダー方式またはサードパーティの WebDAV クライアント ソフトウェアを使用します。
このセクションの手順で問題が発生した場合は、 WebDAV のトラブルシューティング ページを参照してください。
Windows ネットワーク ドライブ
Confluence WebDAV クライアント ネットワーク ドライブを割り当てるには、Confluence インスタンスの設定が、以下の基準を すべて 満たす必要があります。
- Uses HTTP (not HTTPS)
- Listens on port 80 (not 8090, the default for Confluence distributions)
- コンテキスト ルートがない
- There is an issue (WBDV-208) that can prevent Network Drives from being mapped. Please use the Network Folders steps below as a workaround.
こうした制約は、Microsoft の Mini-Redirector コンポーネントでの制限に起因します。詳細については、Microsoft の サーバー検出の問題 を参照してください。
Microsoft Windows で Confluence WebDAV クライアント ネットワーク ドライブを割り当てるには、
- In Windows XP, go to My Computer
->Tools menu->Map Network Drive.
In Windows Vista, go to Computer->Map Network Drive.
The 'Map Network Drive' dialog box opens. - 次の入力を指定して、WebDAV クライアントをネットワーク ドライブとして割り当てます。
- Drive:
<Any drive letter>(for example,Z:) - Folder:
\\<hostname>\webdav(for example,\\localhost\webdav)
- Drive:
- Click 'Finish'.
When prompted for login credentials, specify your Confluence username and password.
Windows Web フォルダー
Windows XP で Confluence WebDAV クライアント Web フォルダーを割り当てるには、
- Go to My Network Places and choose 'Add a network place'. The 'Add Network Place Wizard' opens.
- Click 'Next', ensure that 'Choose another network location' is selected and then click 'Next' again.
- In the 'Internet or network address' field, enter the URL for the Confluence WebDAV location (for example,
http://<confluence server url>/confluence/plugins/servlet/confluence/defaultorhttp://<confluence server url>/plugins/servlet/confluence/default) and then click 'Next'.
When prompted for login credentials, specify your Confluence username and password. - Provide a meaningful name for your web folder and proceed with the remainder of the wizard.
- Click 'Finish'.
スクリーンショット:Windows XP の Confluence WebDAV クライアント Web フォルダー

Windows Vista で Confluence WebDAV クライアント Web フォルダーを割り当てるには、
この手順は Windows XP の手順と非常によく似ています。ただし、次の手順には、Windows Vista に固有のインターフェースの違いが若干含まれています。
- Open the 'Map Network Drive' dialog box (refer to first step of the procedure above for mapping a network drive) and choose 'Connect to a Web site that you can use to store your documents and pictures'. The 'Add Network Location' wizard opens.
- Click 'Next', ensure that 'Choose a custom network location' is selected and then click 'Next' again.
- In the 'Internet or network address' field, enter the URL for the Confluence WebDAV location (for example,
http://<confluence server url>/confluence/plugins/servlet/confluence/defaultorhttp://<confluence server url>/plugins/servlet/confluence/default) and then click 'Next'.
When prompted for login credentials, specify your Confluence username and password. - Provide a meaningful name for your network location/web folder and proceed with the remainder of the wizard.
- Click 'Finish'.
Linux または Solaris で WebDAV クライアントを設定する
これらのオペレーティング システムに WebDAV クライアントを設定するには、多くのツールやメカニズムが利用できます。そこで、Linux K デスクトップ環境の一部であるファイルマネージャー、Konqueror を使用して、これを実証することにしました。
Konqueror で Confluence WebDAV クライアントを設定するには、
- Konqueror を開きます。
- In the 'Location' field, enter the URL for the Confluence WebDAV location using the 'protocol'
webdavs(for example,webdavs://<confluence server url>/confluence/plugins/servlet/confluence/defaultorwebdavs://<confluence server url>/plugins/servlet/confluence/default) and pressEnter.
If prompted for login credentials, specify your Confluence username and password.
You should be able to click to load many, but not all files. In practice, you would normally save a modified file locally, then drag it to the Konqueror window to upload it to Confluence.
Confluence への WebDAV クライアント書き込みアクセスの制限
WebDAV プラグインの以前のバージョンでは、WebDAV クライアントの書き込み権限(つまり、作成、移動、編集を行う操作)を制限する別のオプションが利用可能でした。しかし、このプラグインの現在のバージョンでは、オプションが簡素化され、これらのすべての操作を網羅する一般的な書き込み権限の制限にまとめられています。
現在、WebDAV クライアントのユーザー エージェント ヘッダー内の特定のコンテンツに一致する regex を設定することによって、WebDAV クライアントは Confluence インストールへの書き込み権限を拒否されます。設定された regex は、制限を受ける WebDAV クライアントの一覧に追加されます。この一覧の regex に一致するユーザー エージェント ヘッダーを持つすべての WebDAV クライアントは、Confluence インストールへの書き込み権限を拒否されます。
例:Microsoft Web フォルダー WebDAV クライアントによって生成された PROPFIND メソッド ヘッダーです。ユーザー エージェント ヘッダー フィールドを示しています。
PROPFIND /plugins/servlet/confluence/default HTTP/1.1
Content-Language: en-us
Accept-Language: en-us
Content-Type: text/xml
Translate: f
Depth: 1
Content-Length: 489
User-Agent: Microsoft Data Access Internet Publishing Provider DAV
Host: 127.0.0.1:8082
Connection: Keep-Alive
Note: Unlike earlier versions of the WebDAV plugin which could only restrict write permissions for all WebDAV clients, the current version of this plugin allows you to restrict write permissions to specific WebDAV clients selectively.
Confluence インストールへの WebDAV クライアントの書き込みアクセス権限を制限するには、
- Choose the cog icon
 , then choose General Configuration under Confluence Administration
 - Choose 'WebDav Configuration' in the left panel. The 'WebDAV Configuration' page is displayed.
- 制限したい WebDAV クライアントによって送信されたユーザー エージェント ヘッダーの特定のコンポーネントと一致する regex を入力します。
- Click the 'Add new regex' button. The regex is added to the list of restricted WebDAV clients.
You can repeat steps 3 and 4 to add a regex for each additional WebDAV client you want to restrict. - Click the 'Save' button to save the configuration changes.
Confluence インストールへの書き込みを制限された、1 つ以上の WebDAV クライアントの書き込みアクセス権限を復元するには、
- Choose the cog icon , then choose General Configuration under Confluence Administration
- Click 'WebDav Configuration' under 'Configuration' in the left panel. The 'WebDAV Configuration' page is displayed.
- Select the regex(es) from the list that match(es) the user agent header sent by the restricted WebDAV client(s) you want to restore.
- Click the 'Remove selected regexes' button. The regexes you had selected are removed from the list of restricted WebDAV clients.
- Click the 'Save' button to save the configuration changes.
スクリーンショット:WebDAV 設定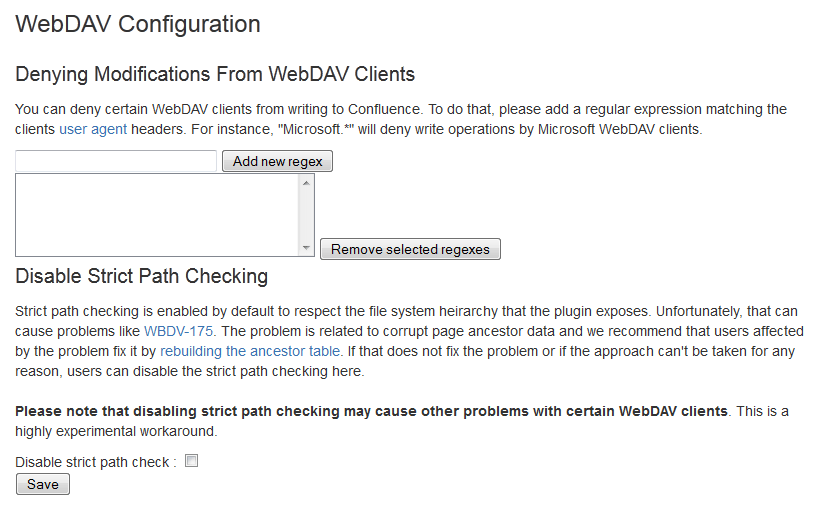
厳密なパス チェックの無効化
If you observe any idiosyncrasies with your WebDAV client, such as a folder that does exist on your Confluence site but is missing from the client, you can disable the WebDAV plugin's strict path checking option, which may minimise these problems.
WebDAV プラグインの厳格なパス チェック オプションを無効にするには、
- Choose the cog icon , then choose General Configuration under Confluence Administration
- Click 'WebDav Configuration' under 'Configuration' in the left panel. The 'WebDAV Configuration' page is displayed.
- Clear the 'Disable strict path check' check box.
 You can re-enable this option at a later point in time by simply selecting this check box.
 - Click the 'Save' button to save this configuration change.
仮想ファイルとフォルダー
In the unlikely event that you observe any problems with the WebDAV client's performance or stability, you can enable access to automatically generated (that is, virtual) files and folders.
注意:
By default, these options are hidden on the 'WebDAV Configuration' page. To make them visible, you must append the parameter ?hiddenOptionsEnabled=true to the end of your URL and reload the page. For example:
<Confluence base URL>/admin/plugins/webdav/config.action?hiddenOptionsEnabled=trueスクリーンショット:非表示になっている仮想ファイルとフォルダー オプション
仮想ファイルとフォルダーへのアクセスを有効化または無効化するには、
- Choose the cog icon , then choose General Configuration under Confluence Administration
- Click 'WebDav Configuration' under 'Configuration' in the left panel. The 'WebDAV Configuration' page is displayed.
- Amend your URL as described in the note above and reload the 'WebDav Configuration' page.
- Select or clear the check box options in the 'Virtual Files and Folders' section as required.
- Click the 'Save' button to save the configuration changes.
既知の問題
Please refer to the WebDAV plugin documentation for a description of the known issues and suggested workarounds.