開発ツールを設定する
Jira Software は、さまざまな開発ツールと接続して開発作業と同期させながらプロジェクトを追跡できます。Jira Software を異なるツールに接続することでロックを解除できる機能をご紹介します。
- Bitbucket、GitHub などのレポジトリ マネージャーに接続すると、レポジトリでイベント (たとえば、作成したコミットやブランチ、マージまたは拒否されたリクエストのプルなど) が発生した際、課題を自動的にトランジッションすることができます。Jira Software の課題から直接ブランチを作成することも可能です。また、各課題には関連するコミット、ブランチ、プル リクエストが表示されます。
- コードをレビューするには、Crucible に接続すれば、レビューがステータスを変更したときに自動的にトランジッションされるよう、課題を設定することができます。また、各課題には関連するレビューが表示されます。
- Bamboo に接続すれば、各課題に関連するビルドとデプロイが表示されます。
Jira Software を開発ツールに接続する
始める前に
- 適切な権限を必ず取得してください。Jira Software を別のアプリケーションに接続するには、Jira 管理者である必要があります。また、開発ツールの管理者でもある必要があります。
Jira Software と開発ツールの連携については、「開発ツールとの連携」(Jira 管理者向けドキュメント) の説明を参照してください。
Jira Software と開発ツールを設定する
一部の機能は、Jira Software を開発ツールに接続したときに自動的に有効になります。その他の機能には追加設定が必要です。以下は各機能とセットアップに必要な設定作業のリストです。
課題の開発パネル
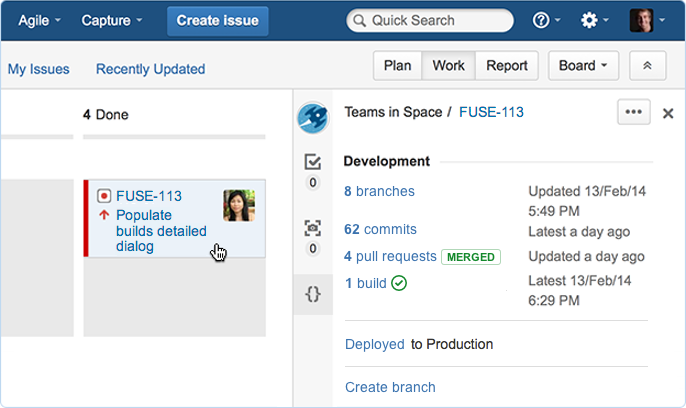
各課題に開発パネルが表示されるため、開発状況をひと目で評価することができます。さらに調査が必要な場合は、項目をクリックして詳細を表示するか、開発ツールを掘り下げます。
Jira Software を開発ツールに接続したら、他の設定は必要ありません。ただし、開発作業の課題の参照方法をチームに知らせる必要があります。
さらに詳しく:開発作業から課題を参照する
開発ツールで課題情報を閲覧する
Bitbucket、Bamboo、Fisheye/Crucible などのサポートされている開発ツールのいずれかに Jira を接続した場合、それらのツールで課題に関する情報を表示できるようになります。たとえば、Bitbucket では、チェンジセットで参照された課題を確認できます。また、Bamboo では、計画のビルドにリンクされた課題を表示できます。
もっと詳しく: Bitbucket Server、Bitbucket Cloud、Bamboo、Fishete、Crucible
課題からブランチを作成する
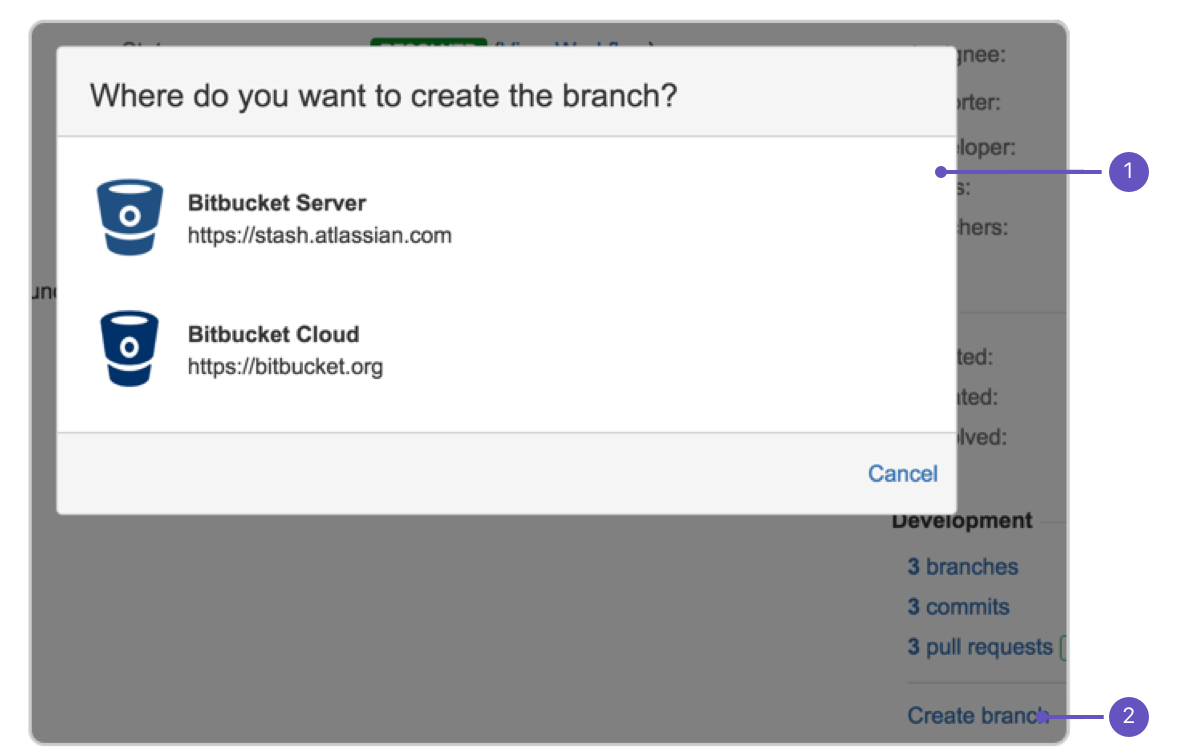
If you use Bitbucket Cloud or Bitbucket Server to manage your code repositories, you can create code branches directly from issues in Jira Software via the Create branch link. The link will open your connected repository application and launch the process of creating a branch for you. If you have multiple applications connected, then you can choose where you'd like to create the branch.
- リポジトリの選択: ブランチを作成するリポジトリを選択します。
- ブランチの作成: 課題上でこのリンクをクリクします。
ワークフロー トリガー
リンクする開発ツールのイベントに対応するワークフローに、トリガーを設定することができます。これを設定することで、後れを取ることなく開発作業と同期しながら課題のステータスを追跡することができます。例えば、開発者が Bitbucket でブランチを作成し課題に取り掛かると、ブランチ名に JIRA 課題を参照でき、課題が自動的に「作業前」から「進行中」に移動します。
Jira Software を開発ツールと連携したら、トリガーをワークフローに追加する必要があります。ワークフロー トリガーの構成に関するアトラシアンのガイドを読むことをお勧めします。
もっと詳しく: ワークフロー トリガーの構成 (Jira 管理者向けドキュメント)
リリースハブにおける開発情報
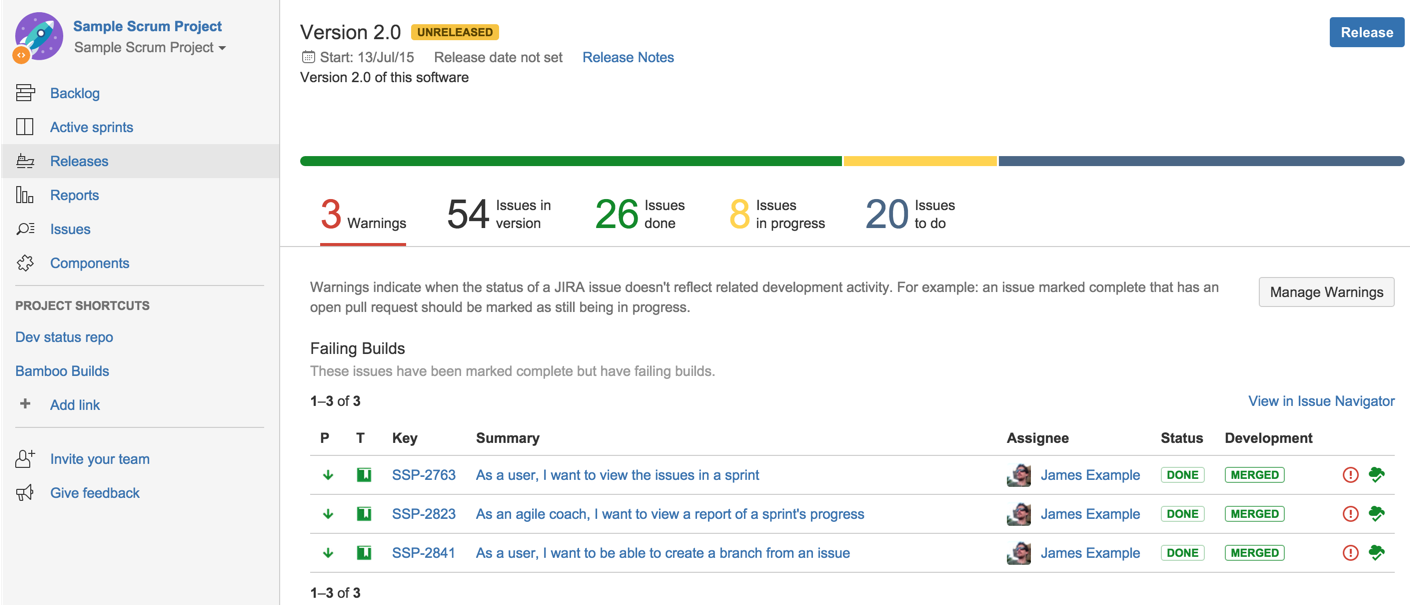
ボードのリリースハブを見れば、リリースの進捗(リリースバージョン)を見て公開すべきものをひと目で決定できるようになります。バージョンではステータスごとに分類されたすべての課題を見ることができ、バージョンのリリースに影響しうる問題も把握できます(例えば、リリースするはずの課題にマージされていないプルリクエストや、コードレビューされていない、またビルドに失敗した課題が含まれている、など)。
Jira Software を開発ツールに接続したら、他の設定は必要ありません。ただし、開発作業の課題の参照方法をチームに知らせる必要があります。
さらに詳しく:開発作業から課題を参照する
検索のリスト ビューの開発情報
検索リスト ビューの開発列では、接続した開発ツールの情報を確認できます。さらに情報が必要な場合、項目をクリックして詳細を表示するか、開発ツールを確認します。
開発パネルと同様に、Jira Software を開発ツールに接続したら、その後の構成は不要です。チームは開発作業で課題を参照する方法を知るだけで使用を開始できます。
ボードのカードでの開発情報の表示
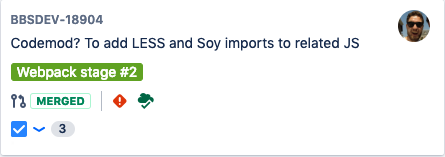
ボードのカードに開発情報を追加して、必要な時に確認できるようにしましょう。これにより、現在のスプリントまたはバックログで課題を表示する際に、さらに詳細なコンテキストを活用できます。
カードに開発情報を追加するには、ボードに移動して、[ボード] > [設定] > [カード レイアウト] を選択します。カードに [開発] フィールドを追加します。
次のステップ
サポートが必要ですか? お求めの回答がドキュメントで見つからなかった場合は、その他のリソースもご利用いただけます。「ヘルプの活用」をご確認ください。


![ワークフロー設定の [トリガー] タブ。 ワークフロー設定の [トリガー] タブ。](https://confluence.atlassian.com/jirasoftwareserver0817/files/1072472253/1072472260/1/1625138555172/jira-triggers-example6.png)

![課題一覧の [Development] 列。 課題一覧の [Development] 列。](https://confluence.atlassian.com/jirasoftwareserver0817/files/1072472253/1072472255/1/1625138554825/devcolumn.png)
