Guide explaining how to configure a Microsoft US DoD or GCC High account with a Jira or a Service Management mail handler using Oauth 2.0
Platform Notice: Data Center Only - This article only applies to Atlassian products on the Data Center platform.
Note that this KB was created for the Data Center version of the product. Data Center KBs for non-Data-Center-specific features may also work for Server versions of the product, however they have not been tested. Support for Server* products ended on February 15th 2024. If you are running a Server product, you can visit the Atlassian Server end of support announcement to review your migration options.
*Except Fisheye and Crucible
Summary
In most cases, Microsoft accounts are Worldwide account (including GCC) and following the steps from the documentation Configure an outgoing link is enough to configure Incoming Mail Handlers with the Oauth 2.0 authentication method.
However, as explained in this Official MS documentation, different types of Microsoft accounts will require different domains/endpoints to be used. Because of that, Microsoft US Government DoD or US Government GCC High accounts require specific steps to be configured with Jira (or Service Management Mail Handlers).
This knowledge article explains how to configure a Microsoft US Government DoD or US Government GCC High account with either of the 2 types of mail handlers listed below, and using the Oauth 2.0 authentication:
a Jira Mail Handler (configured in ⚙ > System > Incoming Mail)
a Jira Service Management Mail Handler (configured at the Service Management project level in Project Settings > Email Requests)
⚠️ It is important to note that these mail handlers are 2 different mail handler functionalities and therefore work differently, are configured differently, and don't support Microsoft US DoD and GCC High accounts in the same versions.
Solution
Environment
the Jira Mail Handler supports Microsoft US DoD and GCC High accounts in:
Jira Server/Data Center, any Jira version from 8.10.0
the Jira Service Management (JSM) Mail Handler supports Microsoft US DoD and GCC High accounts in:
JSM Data Center, any JSM version from JSM 4.22.0
JSM Server, any JSM version from JSM 4.22.2 (refer to the "Known Issues" section for more information)
Steps to configure the Mail Handler
Step 1 - Oauth 2.0 configuration
Regardless of the type of mail handler that you are using (Jira or JSM), the 1st step is the same and consists in configuring an Oauth 2.0 integration following the documentation Setting up OAuth 2.0 integration:
Go to the Oauth 2.0 configuration page:
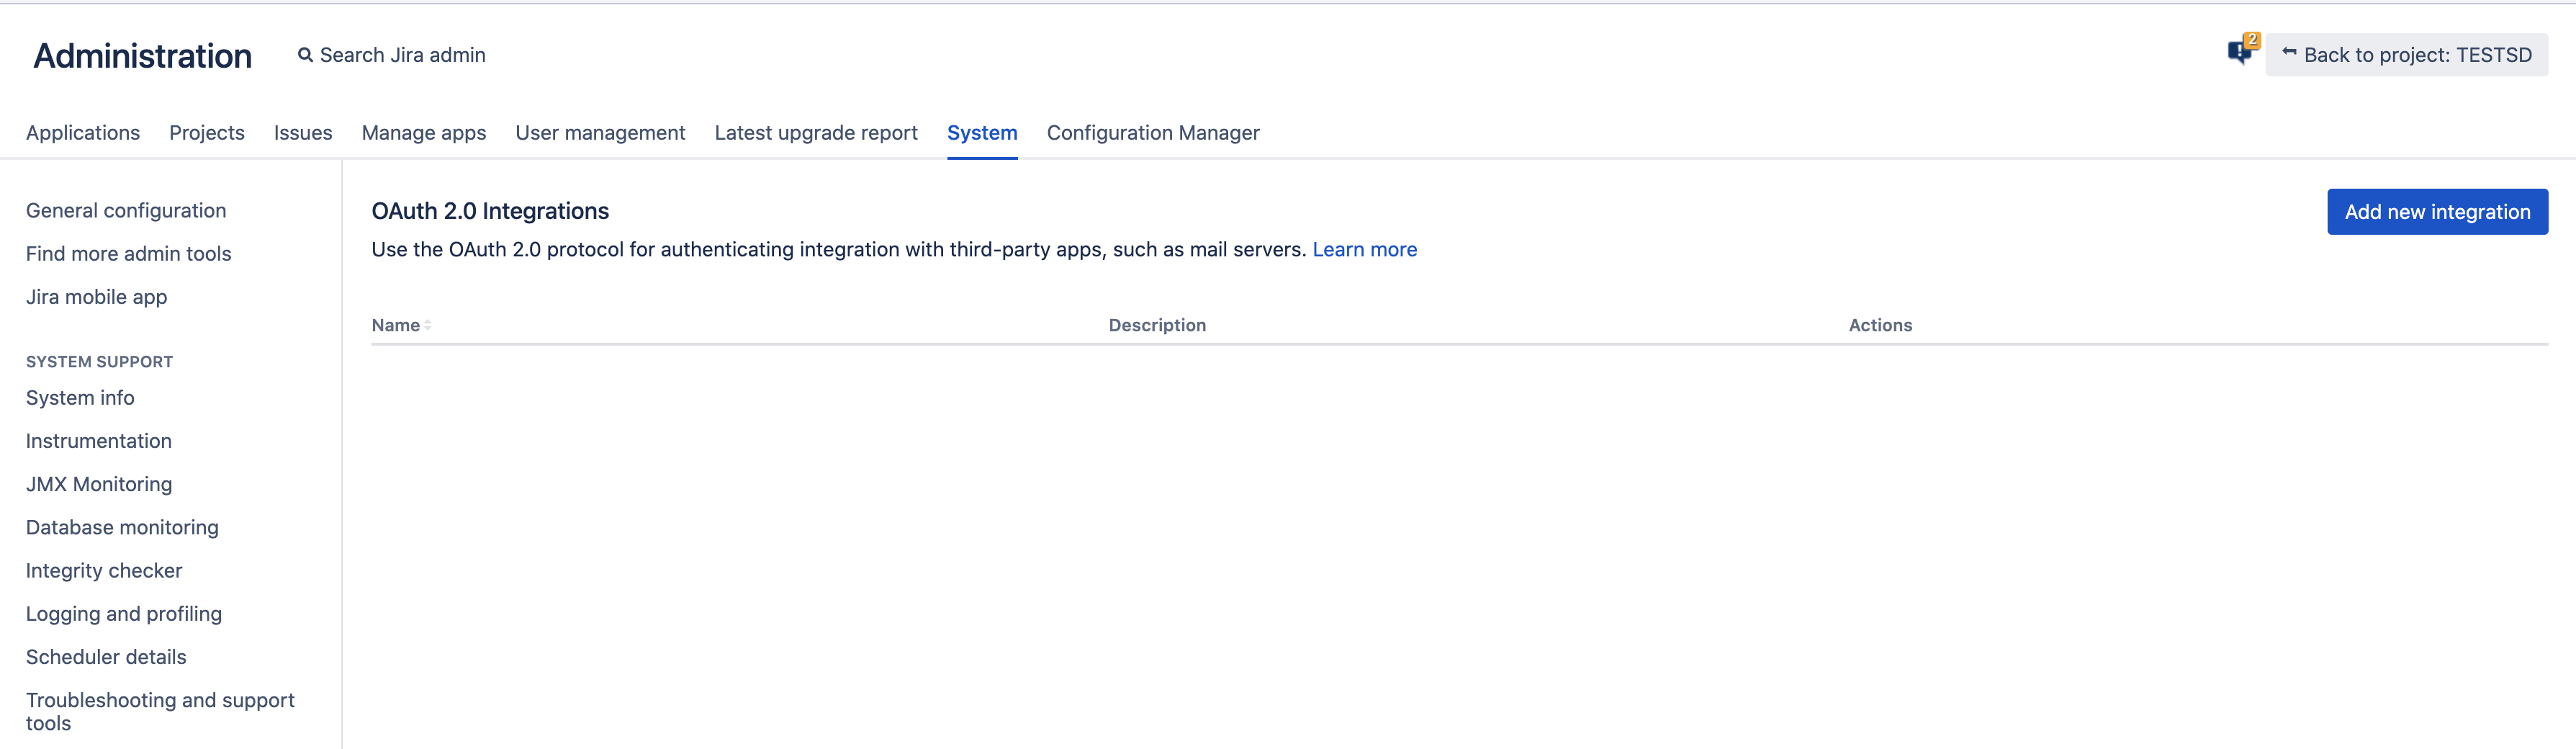
from Jira 8.10.0 to 8.21.x, the configuration of the Oauth 2.0 integration is done in the page ⚙ > System > Oauth 2.0.
From this page, click on Add new integration
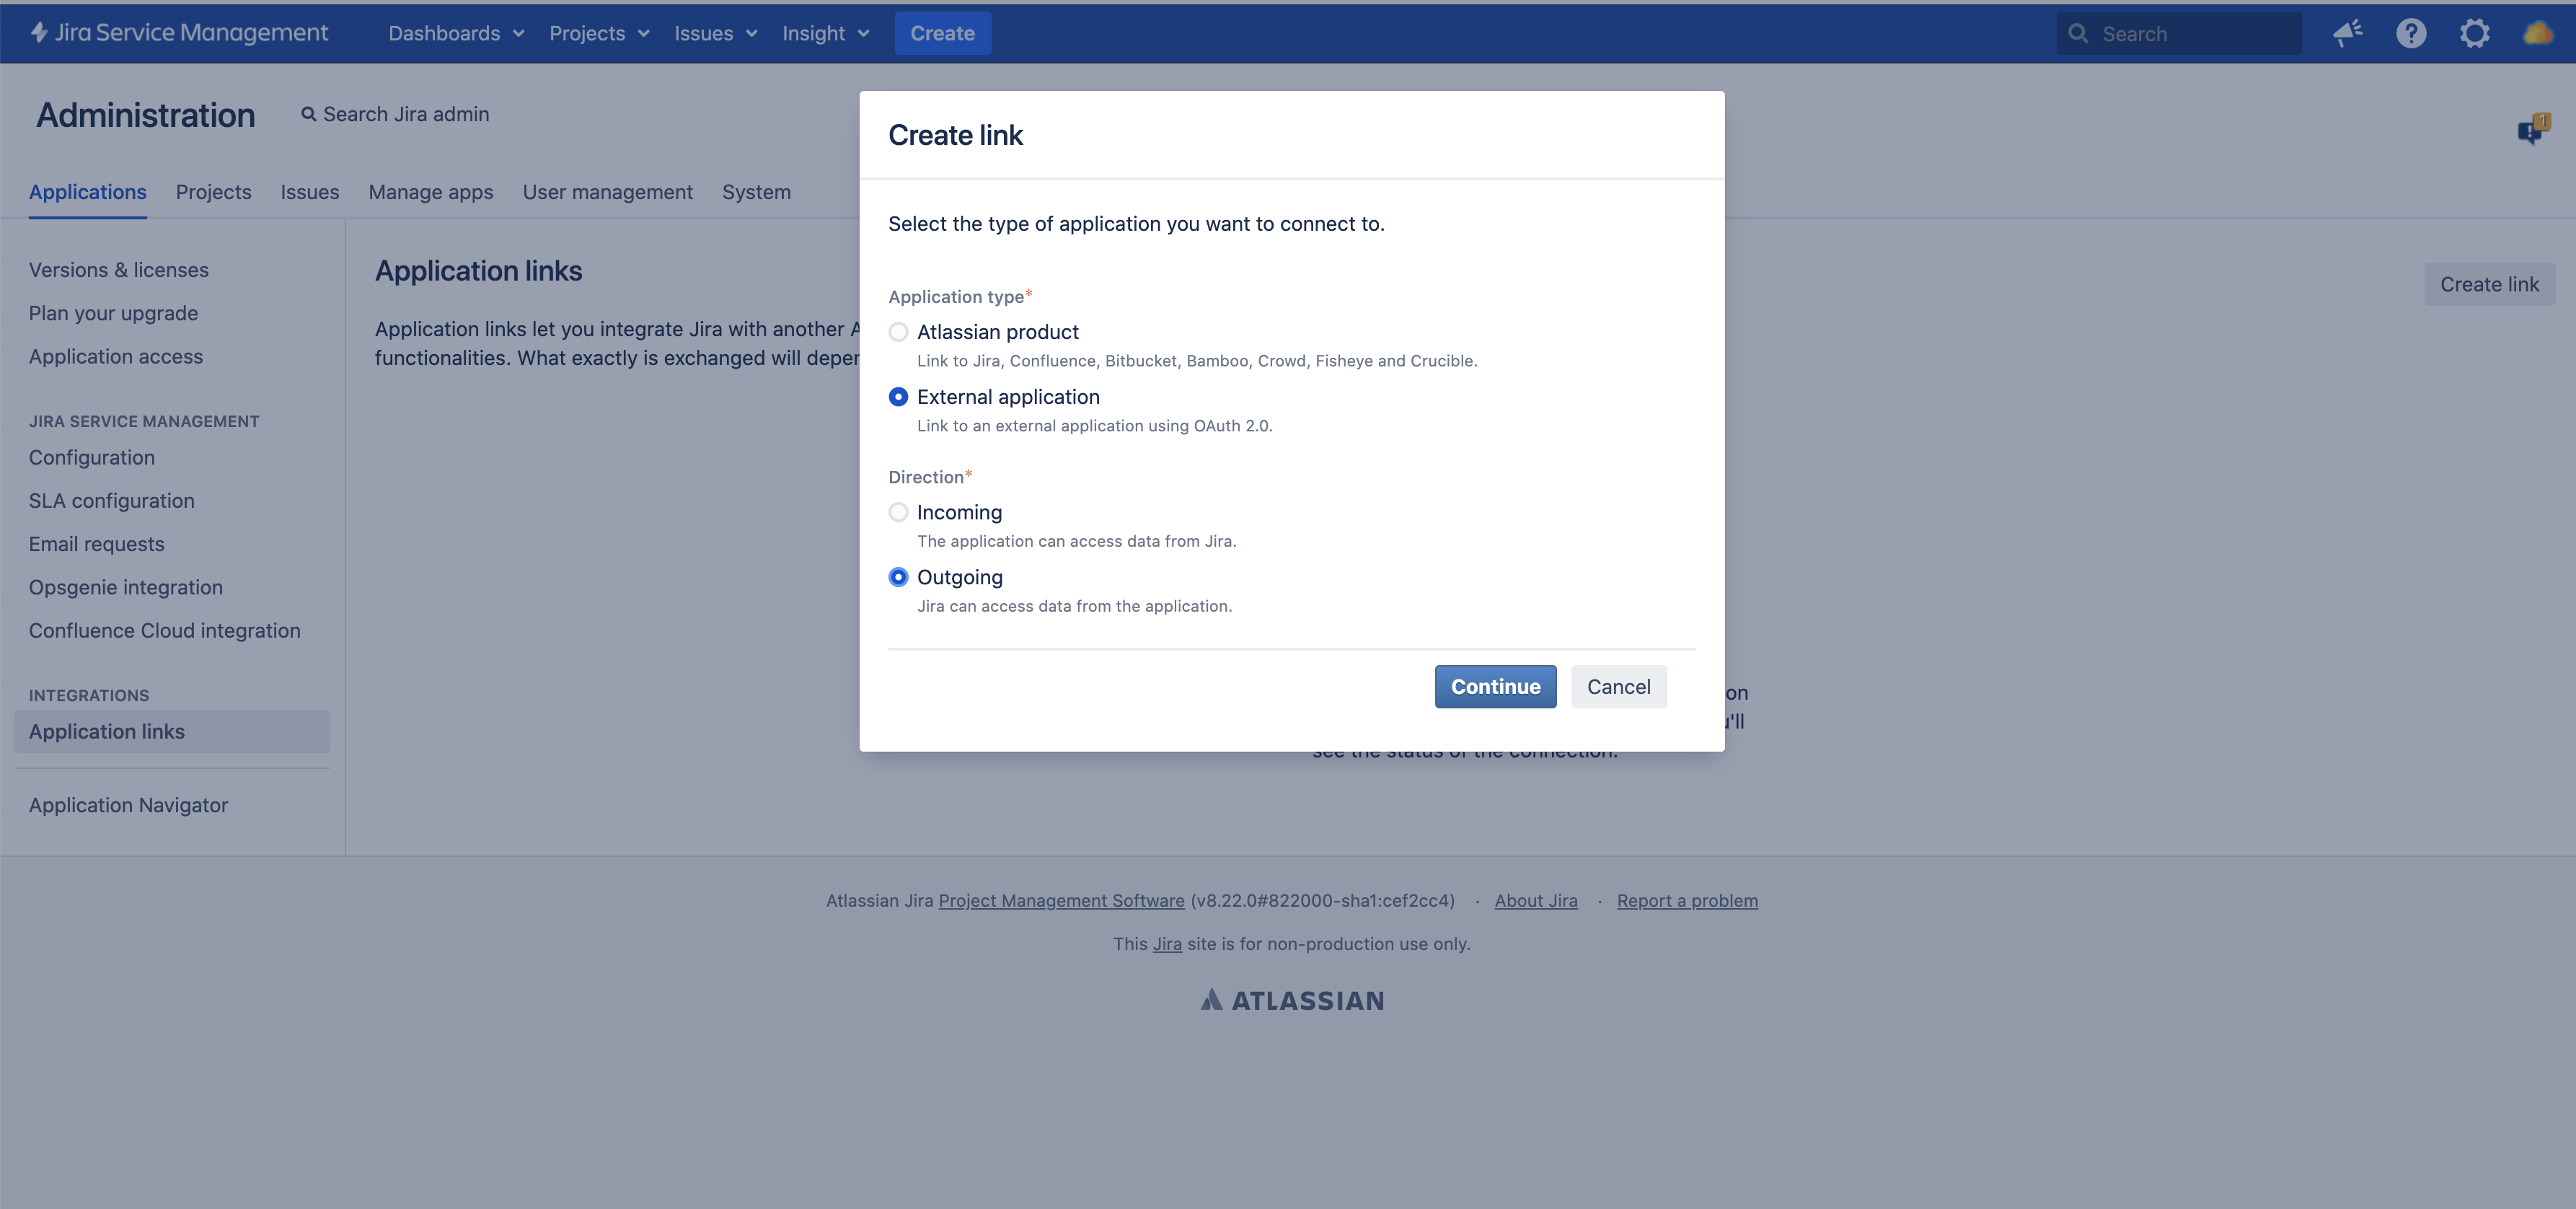
from Jira 8.22.0 (or from JSM 4.22.0), the configuration of the Oauth 2.0 integration was moved to ⚙ > Applications > Application Links.
From this page, click on Create link, and select External Application and Outgoing
In the Oauth 2.0 form, use the following settings:
For the Service Provider field, choose Custom.⚠️ It is important to choose Custom type, since the Microsoft type will not allow you to configure Microsoft US DoD / GCC High accounts.
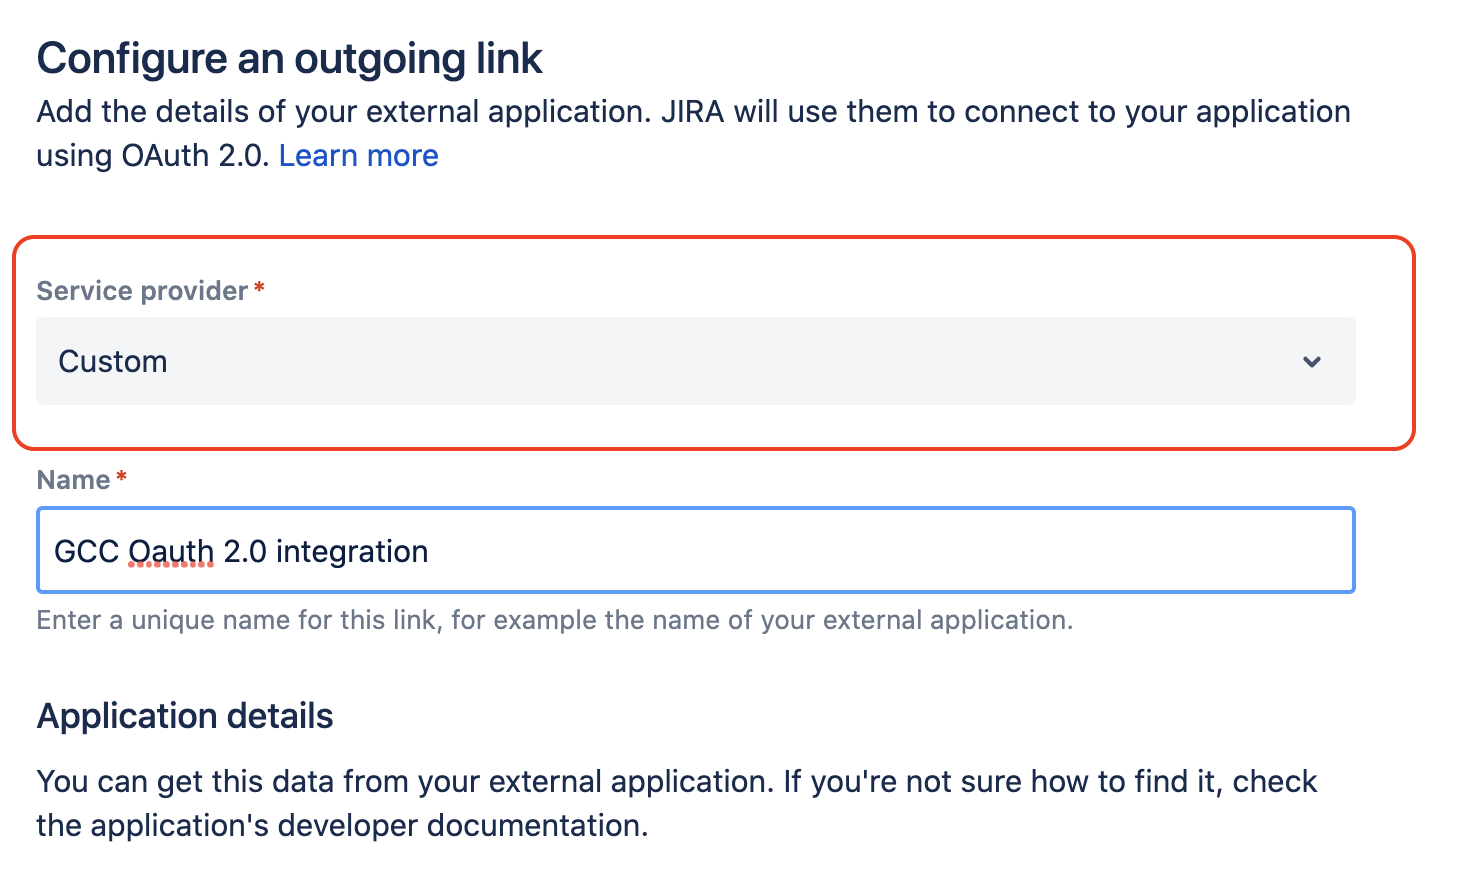
⚠️ It's essential that you select the 'Custom' type since the Microsoft type will not allow you to configure Microsoft US DoD/GCC High accounts.
For the Scopes field, make sure to add the following scopes (you can of course disregard the POP scope if you are planning to access the mailbox via the IMAP protocol, and vice versa):
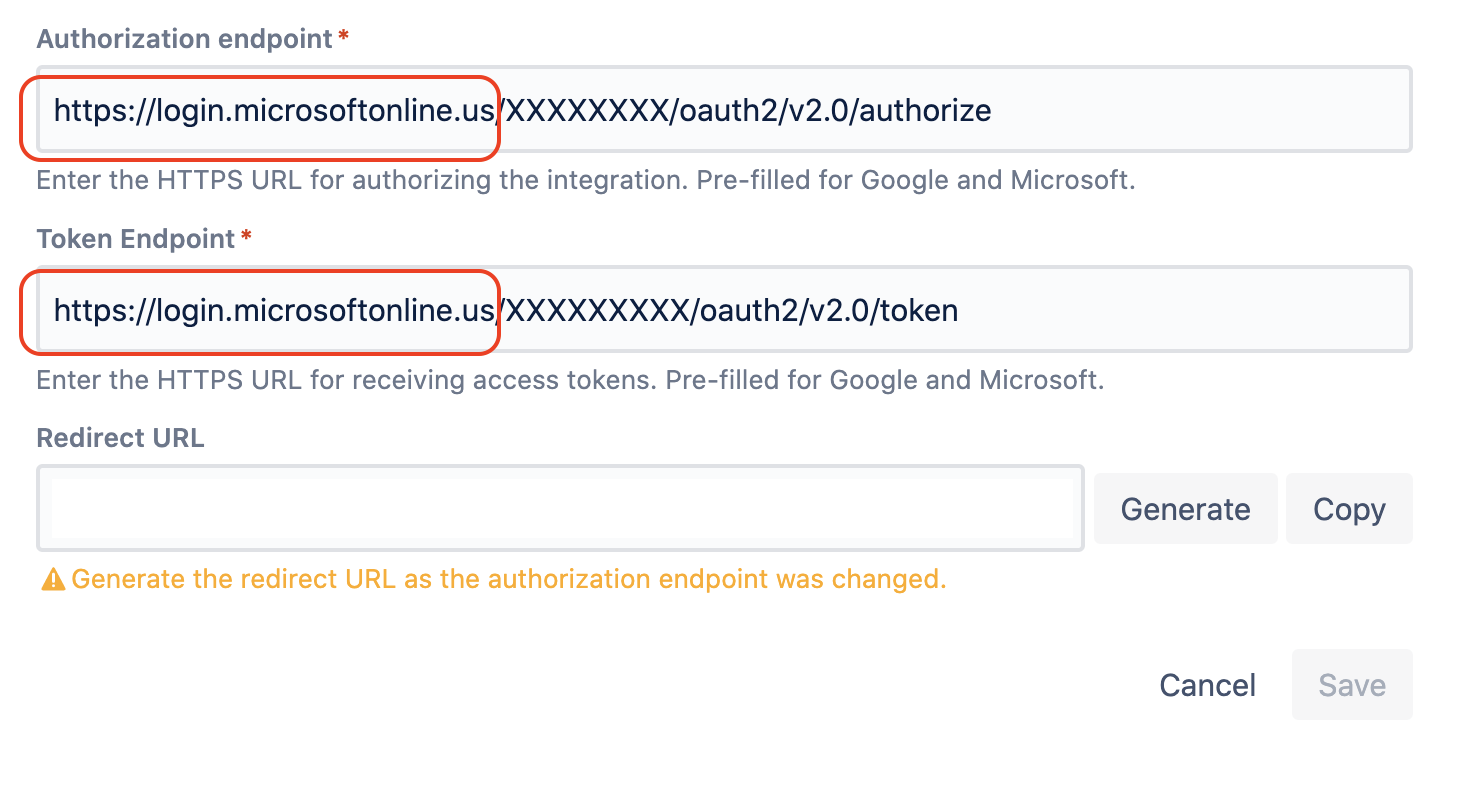
1
2
3
https://outlook.office365.us/IMAP.AccessAsUser.All https://outlook.office365.us/POP.AccessAsUser.All offline_accessFor the Autorization endpoint and Token endpoint fields, make sure that you are using the US domain (starting with https://login.microsoftonline.us/ instead of https://login.microsoftonline.com/):
After the configuration of the Oauth 2.0 integration is saved, click on the Test Connection button next to it, and make sure that this test is successful
Step 2 - Mail Handler configuration
Configuration steps for the Jira Mail Handler
Go to the page ⚙ > System > Incoming Mail
Click on Add Mail Server and use the following settings:
Service Provider: Custom
Hostname: outlook.office365.us
Protocol: depends on your Mail Server
Port: depends on the protocol that was selected (for example, SECURE_IMAP uses port 993)
Timeout: keep the default value
Username: the Microsoft email address
Authentication Method: select the custom Oauth 2.0 integration configured in the previous step
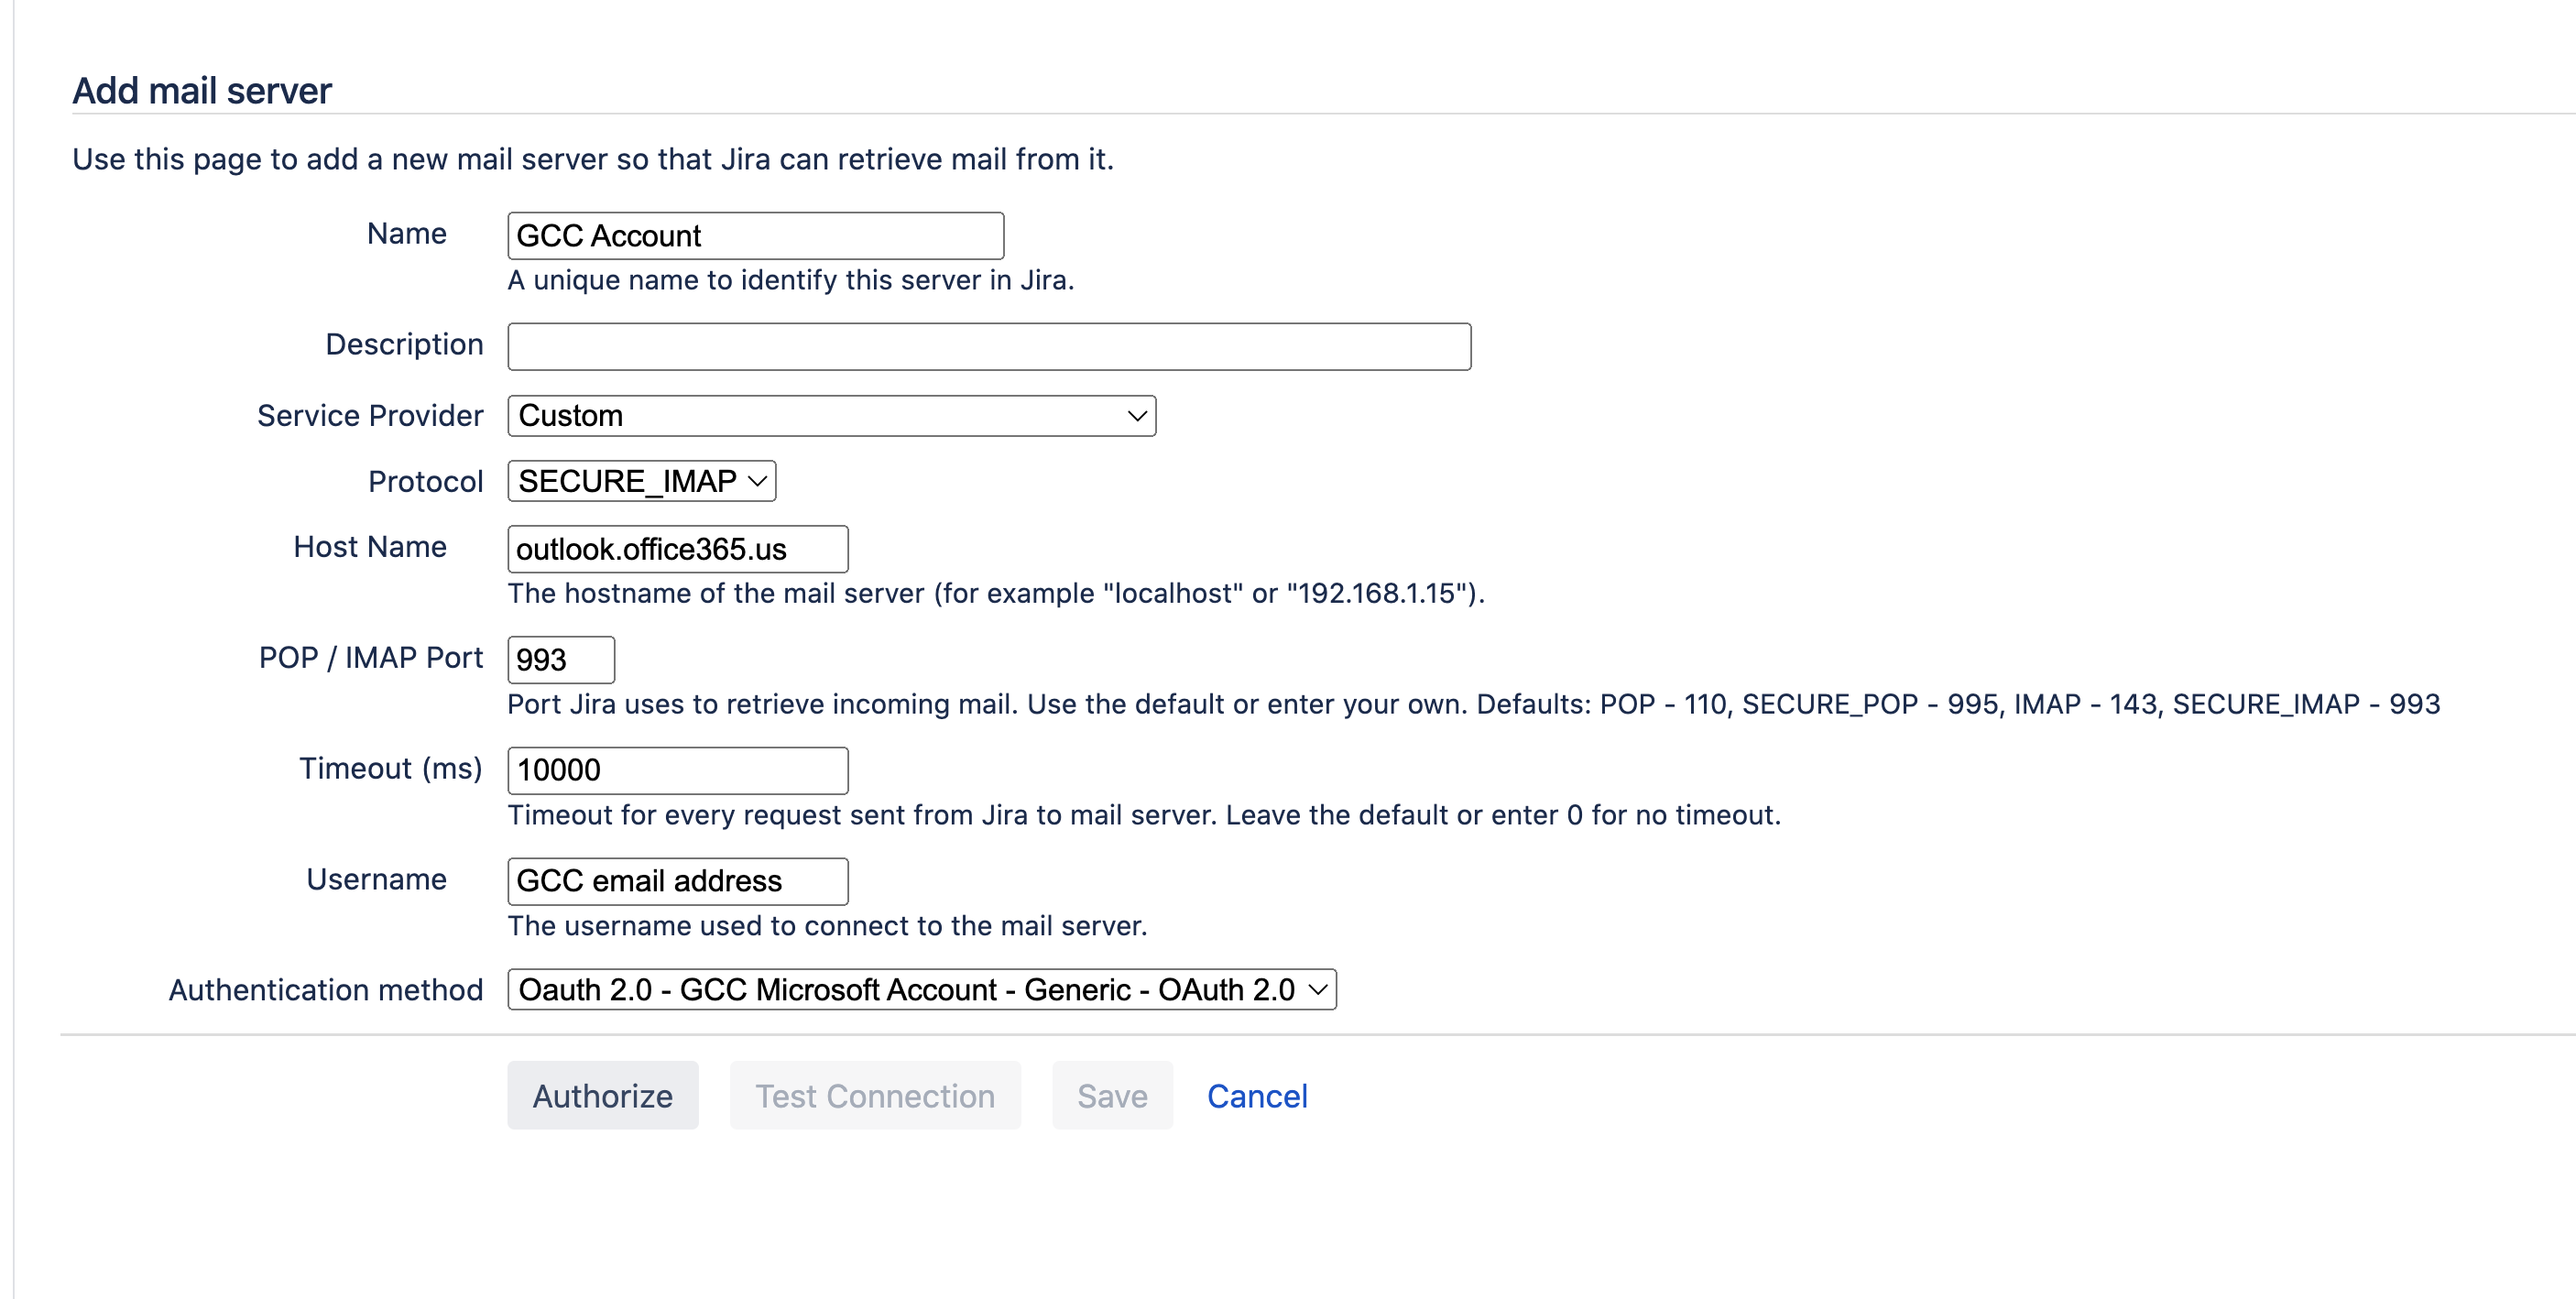
Click on Authorize and make sure this step is successful
Click on Test Connection and make sure this step is successful
Save the configuration
Once the Mail Server configuration is complete, click on Add incoming mail handler to configure a Jira Mail Handler, following the documentation Creating issues and comments from email
Configuration steps for the Jira Service Management (JSM) Mail Handler
Go to the JSM project configuration page
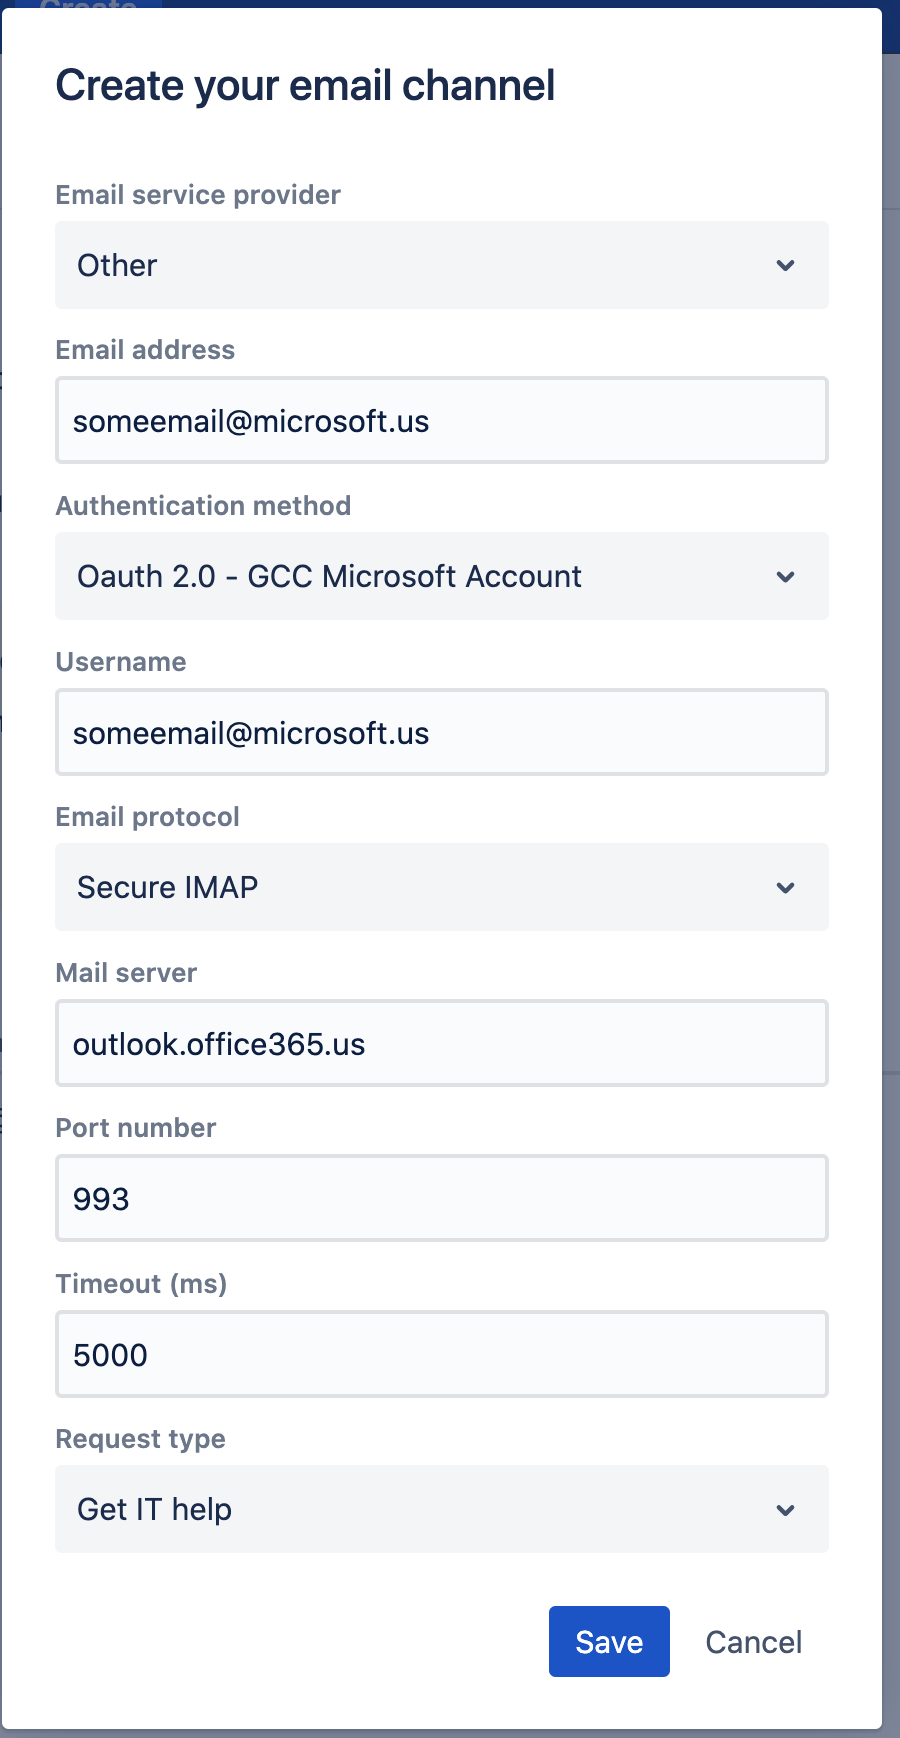
Go to the page Project Settings > Email Requests
Click on Create a channel and use the following settings:
Email Service Provider: Other
Email Address: the Microsoft email address
Authentication Method: select the custom Oauth 2.0 integration configured in the previous step
Email Protocol: depends on your Mail Server
Port: depends on the protocol that was selected (for example, SECURE_IMAP uses port 993)
Mail Server: outlook.office365.us
Timeout: keep the default value
Request Type: choose the request type of your choice
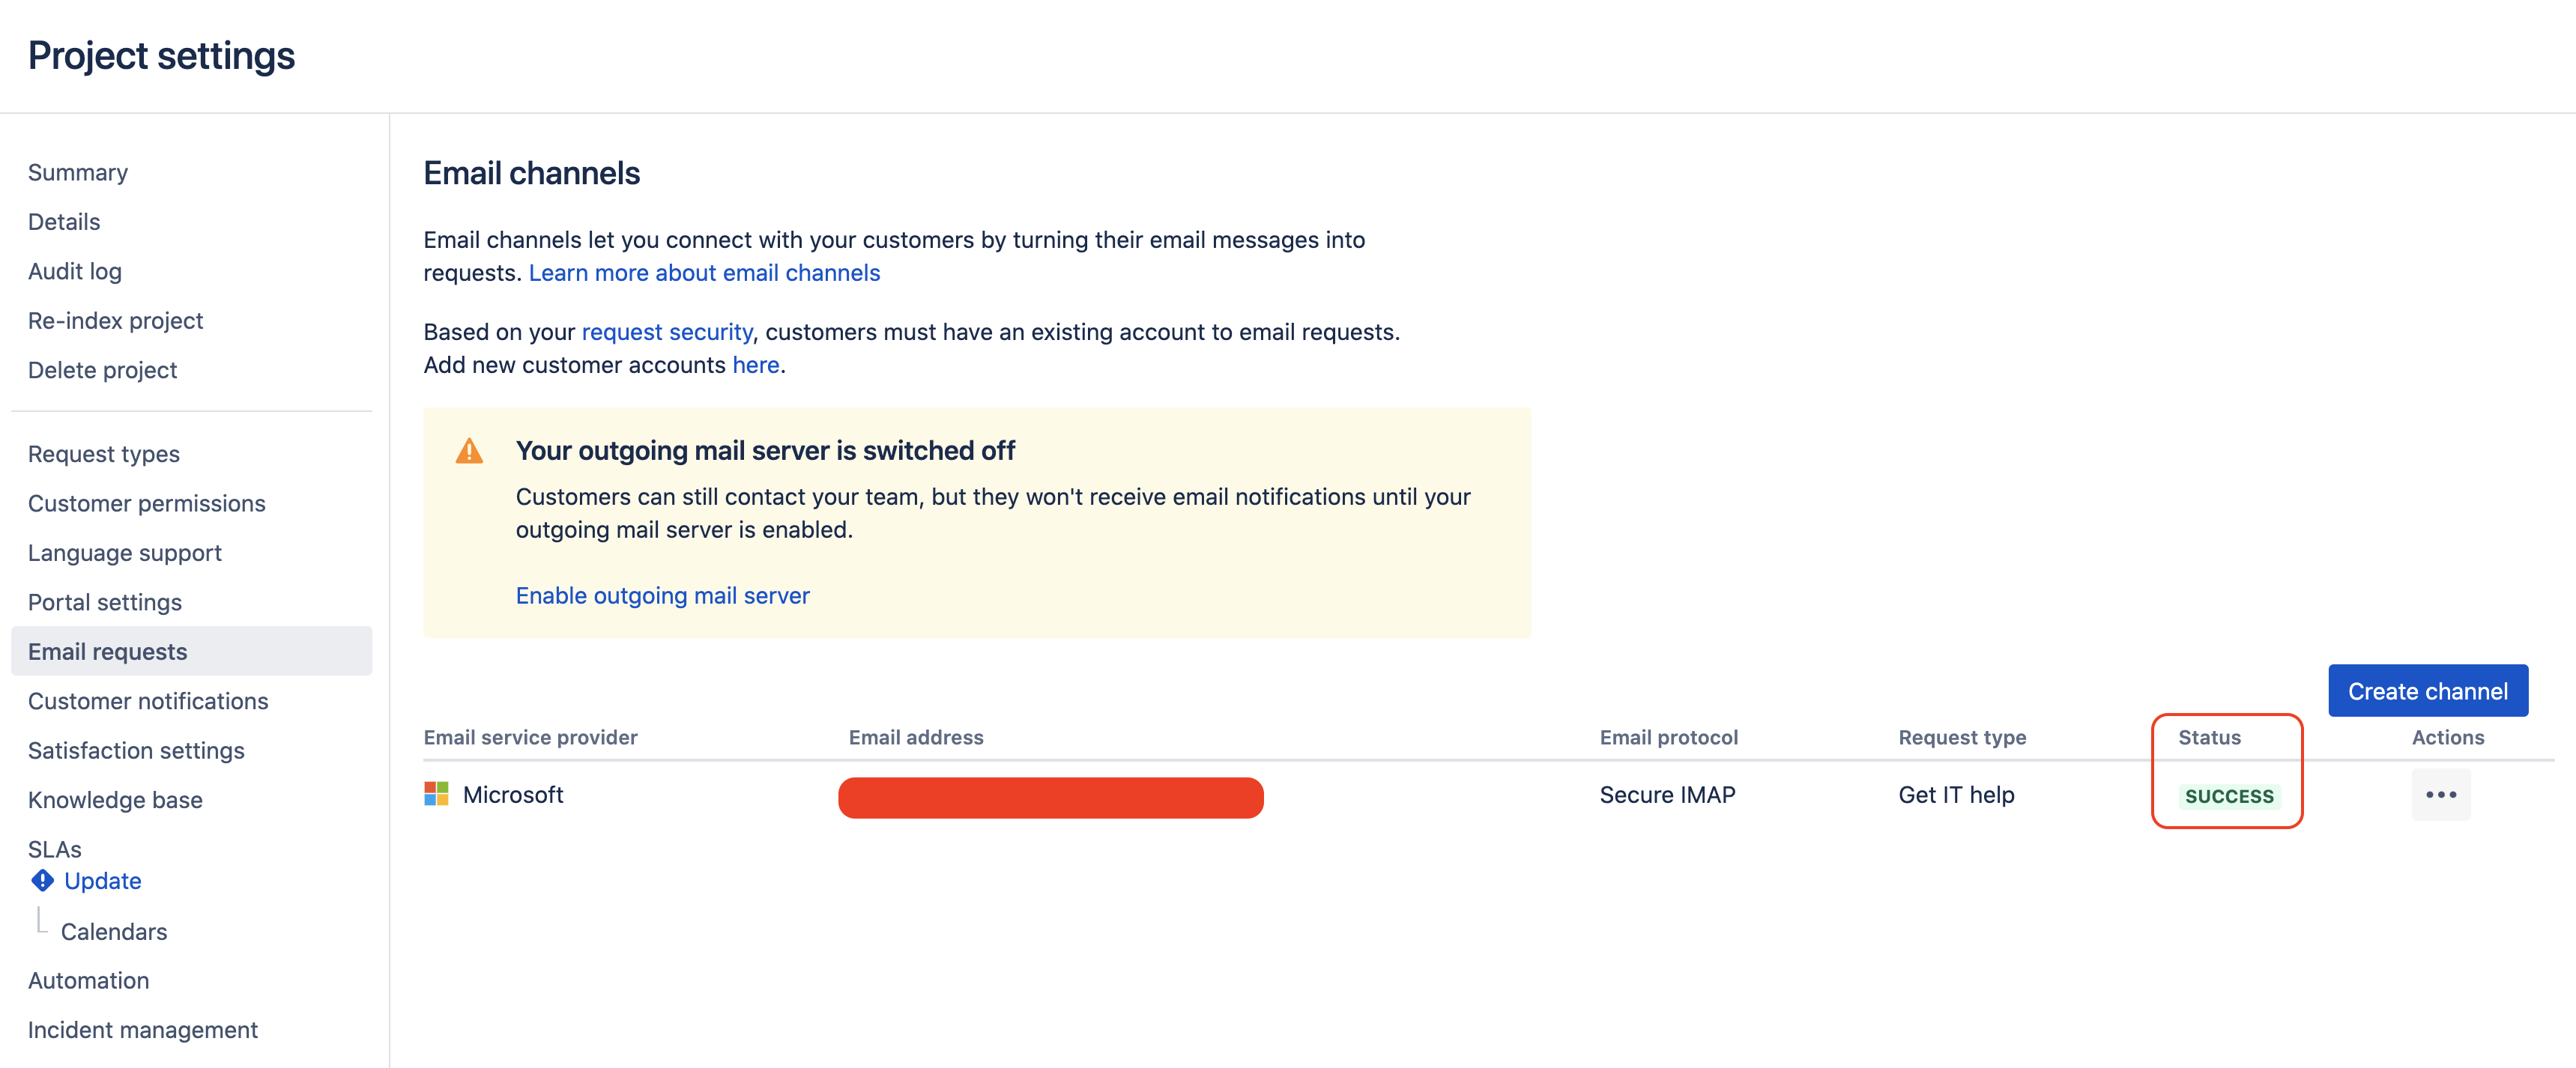
Once the mail channel (=mail handler) is saved, this mail channel will be automatically authorized and its connection will be automatically tested. If both steps (authorization and connection test) are successful, you will see SUCCESS in the status column:
Known issue
If you are trying to configure a JSM Mail Handler on version 4.22.0 or 4.22.1 using a JSM Server license:
you will not be able to complete this configuration because the Other option is missing from the Email Service Provider field due to the known bug JSDSERVER-11219 - 'Other' option for Email service provider missing when creating new email channel
it will be necessary to upgrade to JSM 4.22.2 which will include the fix for the bug
if upgrading to 4.22.2 is not an option, there is a temporary workaround that you can apply for now and which is explained in the bug ticket
⚠️ Note that this issue does not apply to JSM applications using a JSM Data Center license.
Was this helpful?