Configure your Jira instance to use a custom Agile framework
プラットフォームについて: Cloud のみ - この記事は クラウド プラットフォームのアトラシアン製品に適用されます。
This guide details how to configure your Jira instance to be able to use a new issue hierarchy that fits your organization’s way of working. In this example, we'll update the issue hierarchy to:
エピック
Capability
機能
ストーリー
サブタスク
More generally, this guide will show you how to create any number of hierarchy levels between the Epic and Story levels seen in the issue hierarchy that comes standard with Jira.
This ability to create and manage additional levels in your issue type hierarchy is only available as part of Jira Cloud Premium and Enterprise.
This changes outlined in this guide will only apply to your company-managed projects.
Changing your issue type hierarchy can break existing parent and child relationships between your issues. For more information on the impact of these changes, view the FAQs section below.
To configure Jira for a custom Agile framework, you’ll need to make updates to your:
Update your issue types
To view the issue types settings:
Select Settings > Issues.
In the left column, go to Issue types.
From the issue types settings screen, rename the default Epic issue type to Feature. To do this:
On the Epic issue type, select … > Edit.
Update the Name field, and click Update.
Now, add a new issue type named Epic. To do this:
Select Add issue type in the top right of the screen.
In the Name field, type Epic.
Make sure the Type field is set to Standard Issue Type (Level 0), then click Update.
Then, follow the same steps to add another new issue type named Capability.
Update your issue type hierarchy levels
Next, navigate to the Issue type hierarchy settings in the left column.
Click the Epic level name, and change to Feature.
Select + Create level at the bottom of the list of levels. A new level will be created at the top of the issue type hierarchy (level 2).
Name this new level Capability and select the corresponding issue type that you created on the previous screen.
Select + Create level to add another level to your hierarchy (level 3).
Name this level Epic and select the corresponding issue type that you created.
[変更を保存] を選択します。
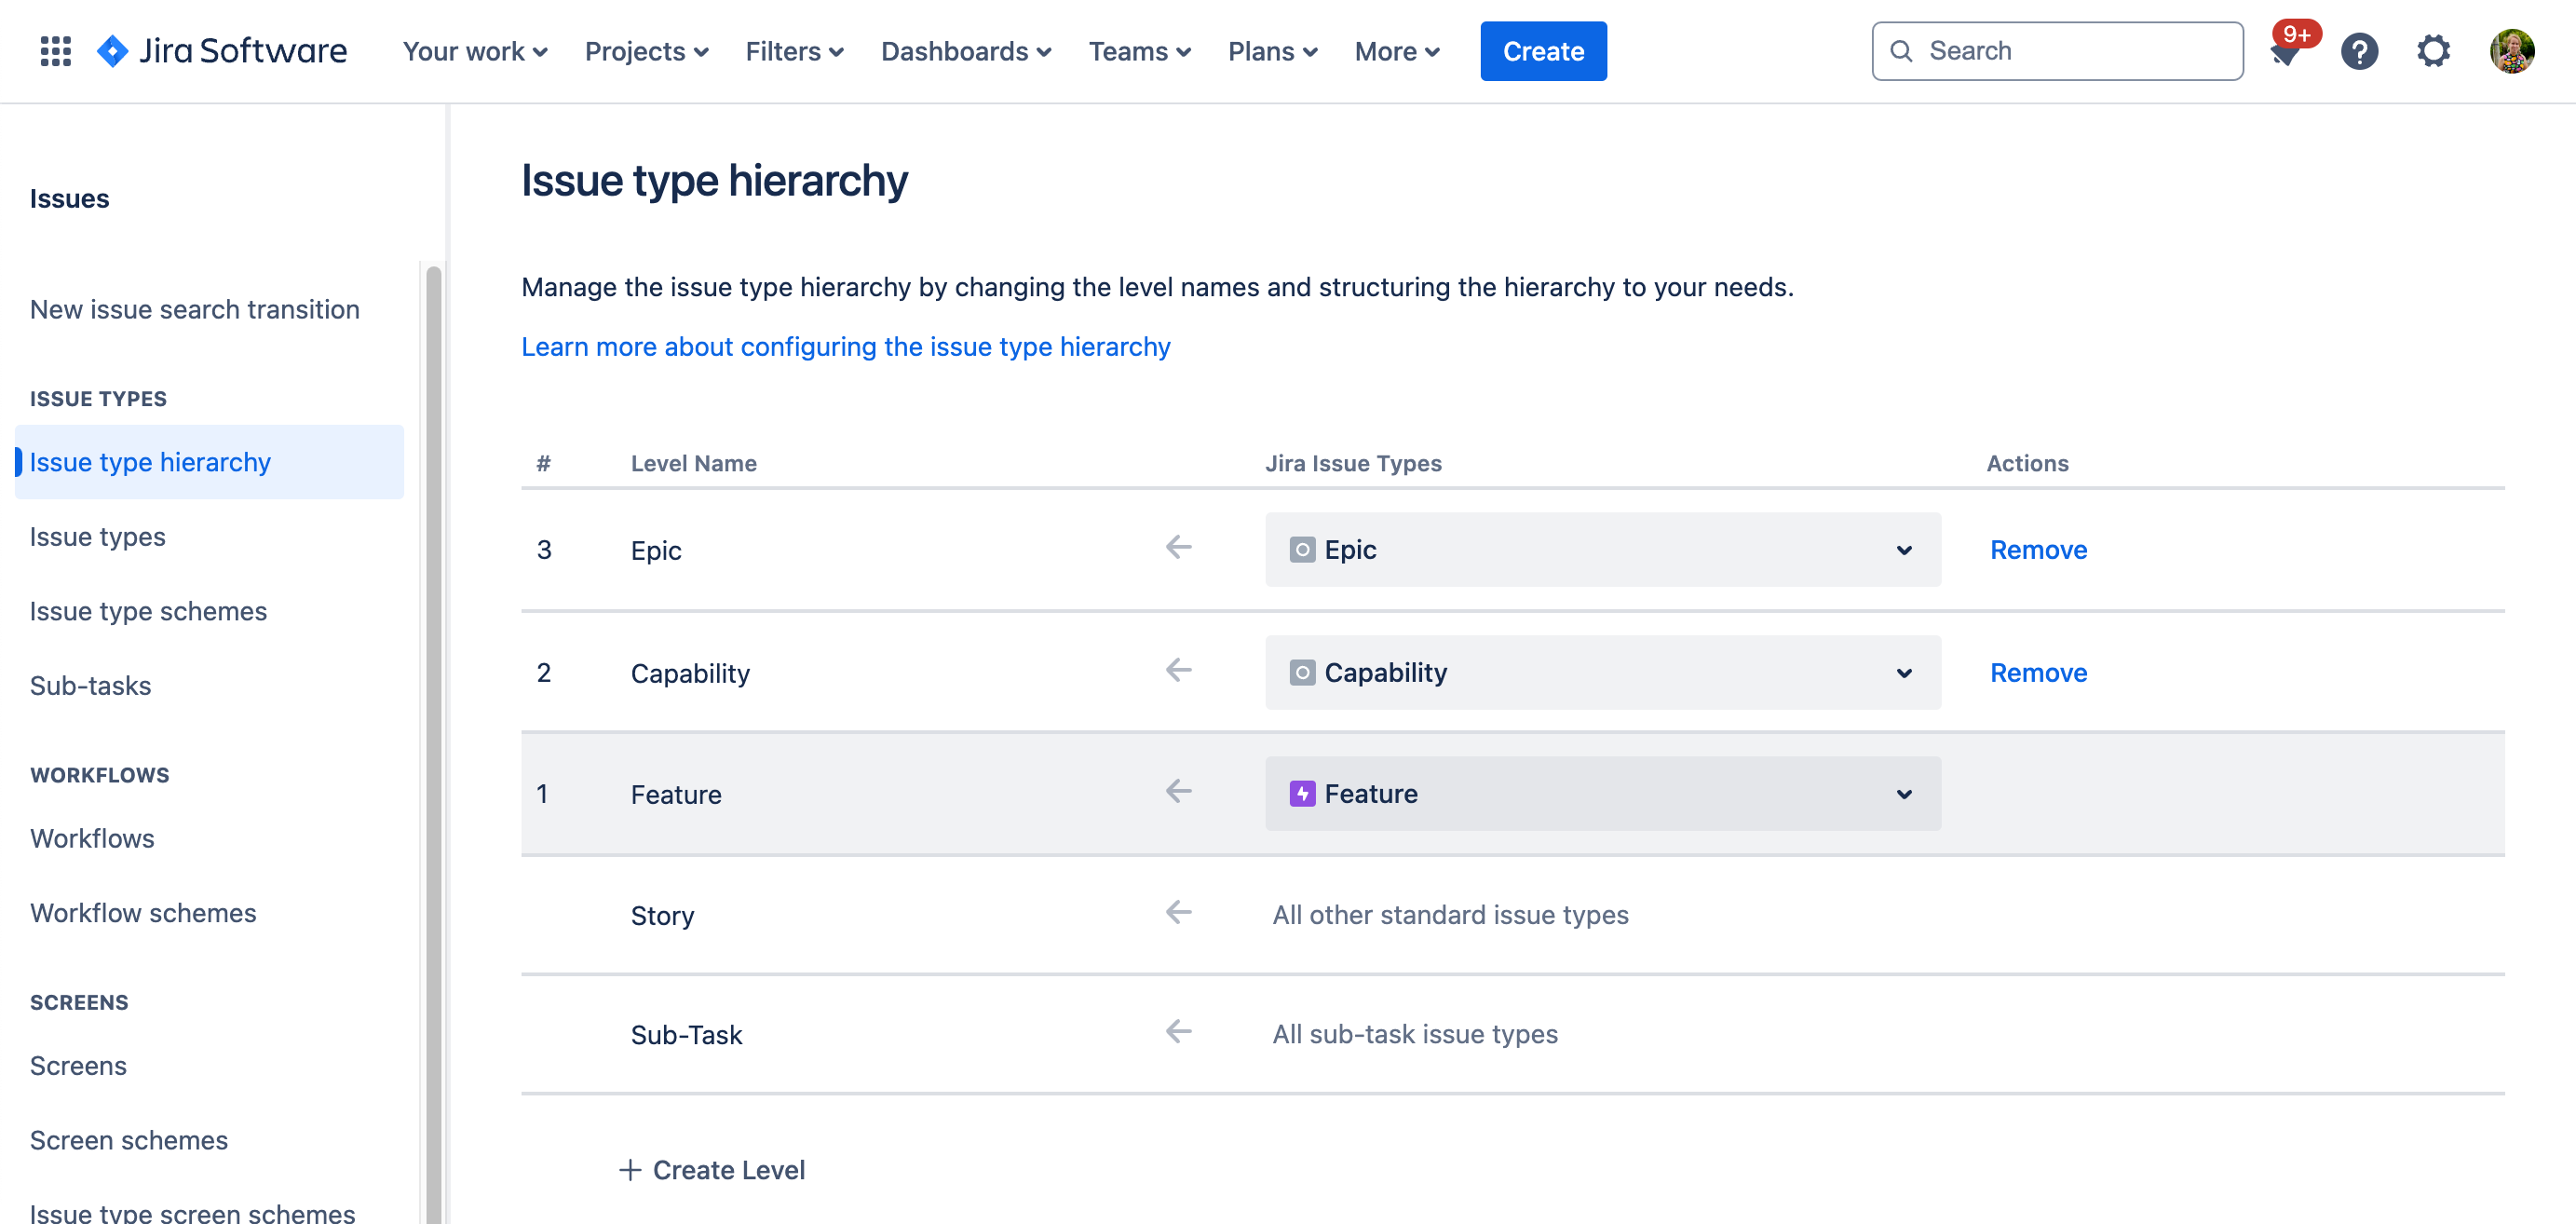
The Epic dropdown and Epic Panel in Backlog contain Level 1 issues, as determined by your issue type hierarchy. With the above changes, these will be renamed to Feature and Feature Panel and will list all Features in the project.
Update your issue type schemes
Next, navigate to the Issue type schemes settings in the left column.
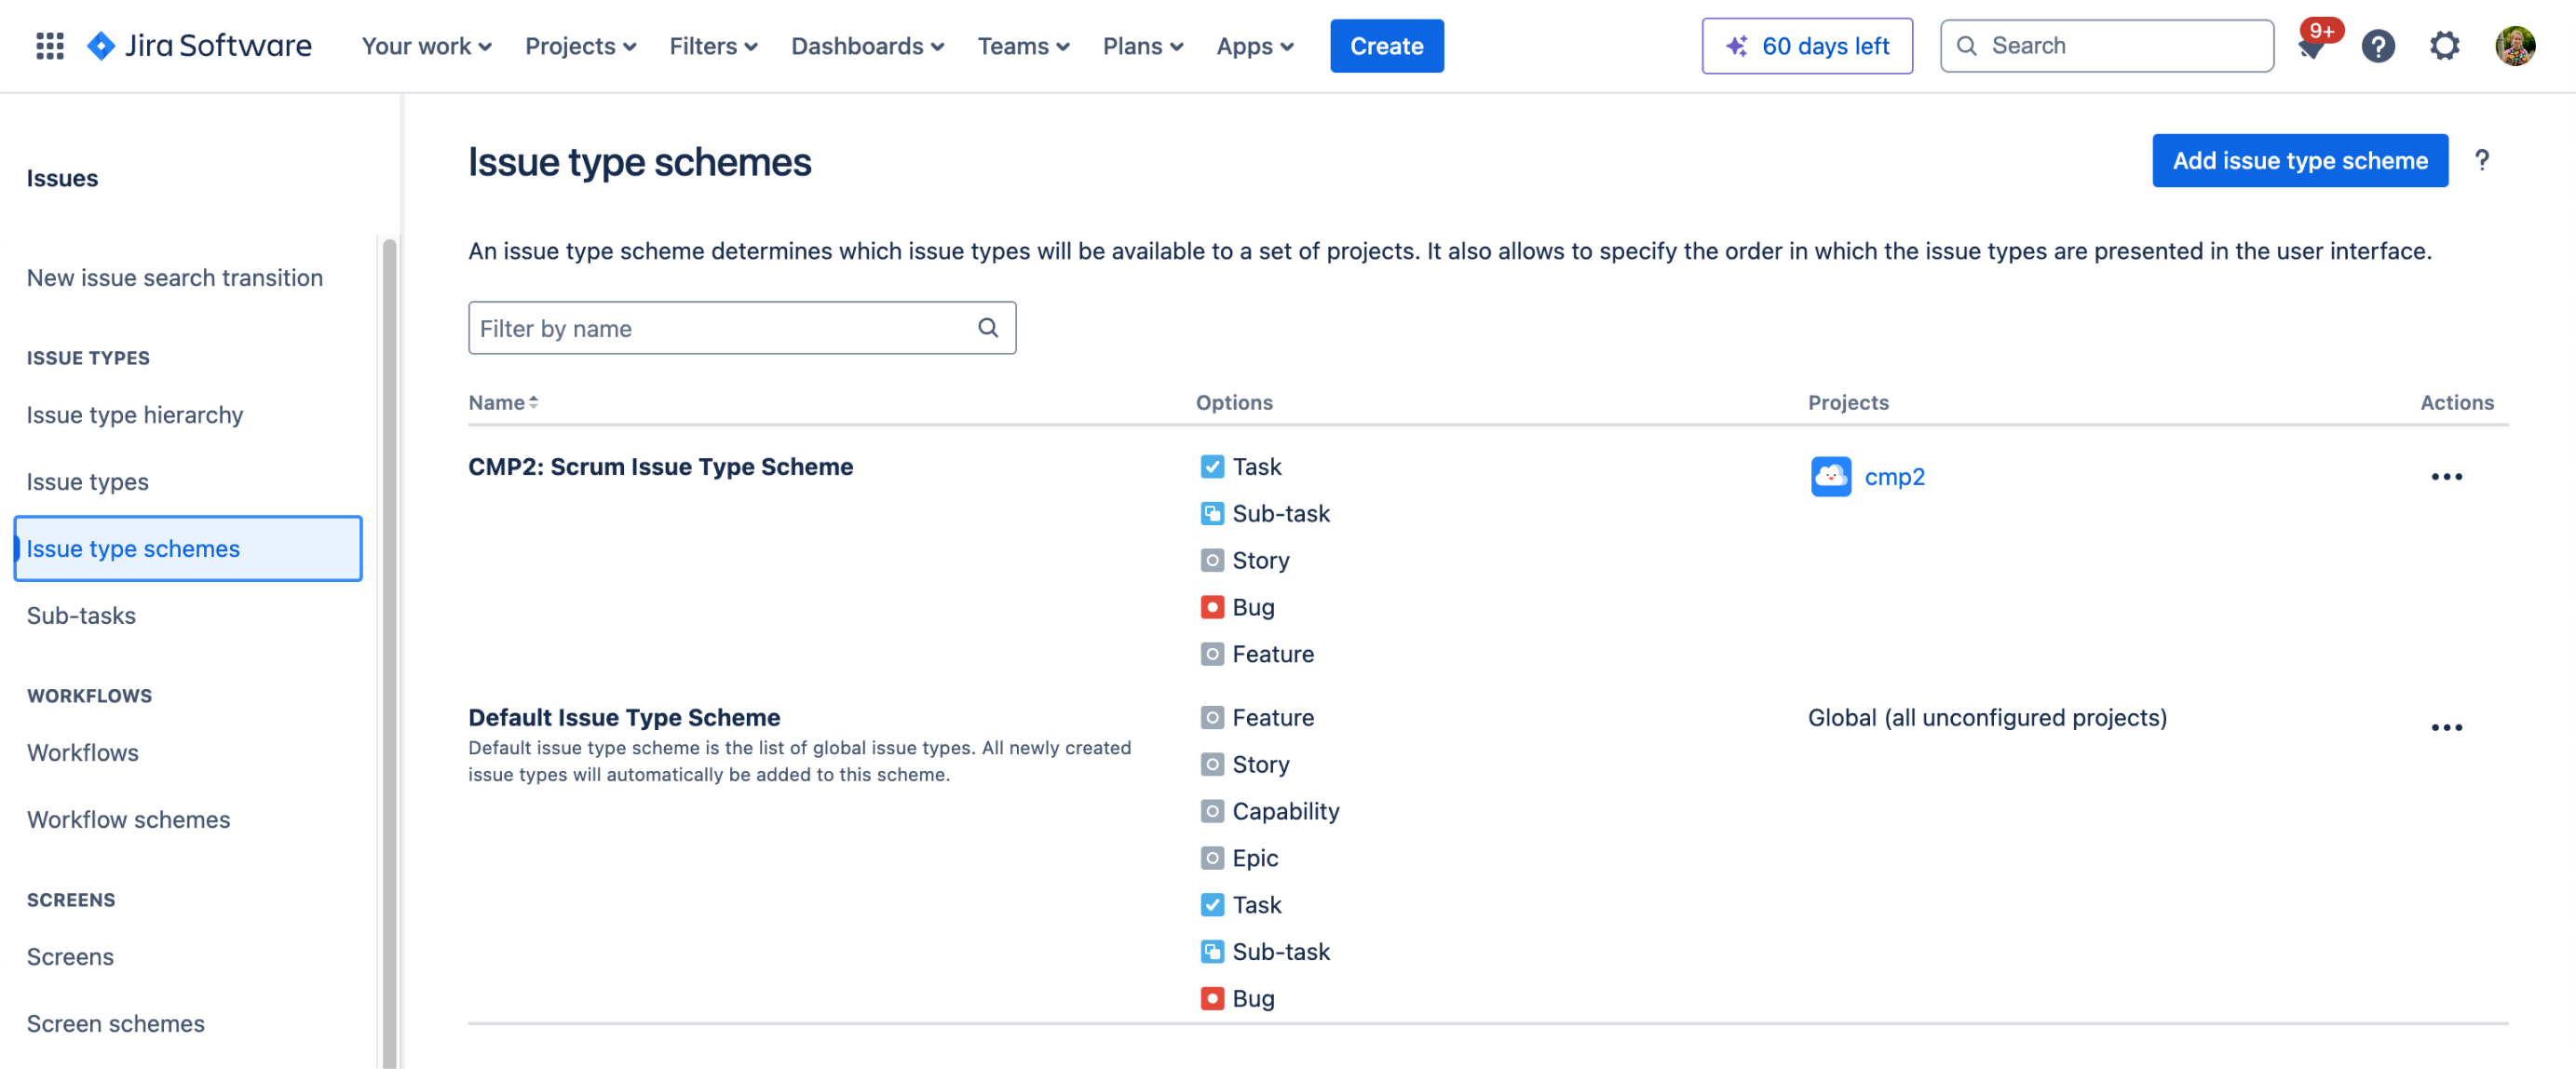
Locate the scheme associated with the project you’d like to apply the new issue hierarchy to, and select … > Edit.
Drag the Capability and Epic issue types into the Issue Types for Current Scheme.
保存をクリックします。
Repeat this process to update the schemes for each project you'd like to use the new issue hierarchy with.
Your Jira is now configured for your custom Agile framework. The changes you’ve made to your issue hierarchy will be reflected throughout Jira, such as in your plans and when editing an issue.


FAQ
Can I use an existing issue type for my custom hierarchy instead of creating a new one?
Yes, however, moving issue types in your issue type hierarchy will break existing parent and child relationships between your issues. This is because issues can only have parent and child relationships with issues that are adjacent to them in the hierarchy. For more information, see our documentation on issue types.
When you attempt to modify the existing structure of your issue type hierarchy, Jira will calculate the impact of these changes and require confirmation to proceed.
Please ensure that you understand the risks and impact of changing your issue type hierarchy before modifying its structure as once these changes are made, they cannot be undone.
If you are planning to modify your issue type hierarchy, consider first performing a bulk update to update any issues that may be affected. By changing the issue type of these issues to one that will remain on the same level, you will preserve any relationships that would otherwise be broken.
To do this, select Filters > View all issues and search for the issues you want to edit. You can use the following JQL syntaxes to help:
parentto find all issues that have a particular parent issue IDissueTypeto find all issues of a particular issue typekey in portfolioChildIssueOf(" ")to find all child issues and all descendant issues of a particular issue ID
Once you’ve found the issues to edit, select … > Bulk change all issues.
Select the issues to change, and choose the Edit Issues operation. In the fields list, select to either assign a new issue type, or assign a new parent.
