Administer Bitbucket in AWS
デプロイ方法としての AWS クイック スタート テンプレートはアトラシアンではサポートされなくなりました。テンプレートは今後も利用できますが、保守や更新は行われません。
より効率的で堅牢なインフラストラクチャと運用のセットアップのために、Helm チャートを使用して Data Center 製品を Kubernetes クラスターにデプロイすることをお勧めします。Kubernetes へのデプロイに関する詳細はこちらをご確認ください。
AWS は、現在、AWS クイック スタート テンプレートで使用される起動設定を起動テンプレートに切り替えることを推奨していますが、AWS クイック スタート テンプレートのサポートは終了しているため、アトラシアンではこの切り替えを行う予定はありません。そのため、このテンプレートを使用して起動設定を作成することはできません。
This page describes administering a single-node instance of Bitbucket Server on AWS. For a deployment that is better suited to the architectural principles of AWS, we recommend deploying a clustered Bitbucket Data Center instance, which offers greater performance at scale, high availability and elastic scalability.
The Bitbucket AMI
The Atlassian Bitbucket Server AMI provides a typical deployment of Bitbucket Server in AWS. It bundles all the components used in a typical Bitbucket Server deployment (reverse proxy, external database, backup tools, data volume, and temporary storage) pre-configured and ready to launch.
You can use the Atlassian Bitbucket Server AMI as a "turnkey" deployment of a Bitbucket Server instance in AWS, or use it as the starting point for customizing your own, more complex Bitbucket Server deployments.
このページの内容
Components of the Bitbucket Server AMI
An instance launched from the Atlassian Bitbucket Server AMI contains the following components:
- Bitbucket Server (either the latest version or a version of your choice),
- an external PostgreSQL database,
- nginx as a reverse proxy,
- the Bitbucket Server DIY Backup utilities pre-configured for native AWS snapshots,
- an EBS Volume and Instance Store to hold the data.
| Operating system | Amazon Linux 64-bit, 2016.09.0 |
|---|---|
| Bitbucket Server | Bitbucket Server (latest public version or a version of your choice) is downloaded and installed on launch. |
| Administrative tools | atlassian-bitbucket-diy-backup pre-installed and configured for AWS native backup, accessible over SSH. |
| リバース プロキシ | nginx, configured as follows:
|
| データベース | PostgreSQL 9.3 |
| Block devices |
|

Launching your instance
The Atlassian Bitbucket Server AMI can be launched by either
- using a CloudFormation template which automates creation of the associated Security Group and IAM Role. For more info, see Quick Start with Bitbucket Server and AWS.
- manually using the AWS Console, which gives finer control over the optional components in the instance and AWS-specific network, security, and block device settings. For more info, see Launch Bitbucket in AWS manually.
On first boot, the Atlassian Bitbucket Server AMI reads the file /etc/atl (if any), which can override variables that enable each of the installed components. So for example to enable a self-signed SSL certificate, you can supply user data to the instance at launch time like this:
#!/bin/bash
echo "ATL_SSL_SELF_CERT_ENABLED=true" >>/etc/atl
The following variables can be configured:
| 変数名 | 既定値 | 説明 |
|---|---|---|
ATL_NGINX_ENABLED | true | Set to false to disable the Nginx reverse proxy, and leave Bitbucket Server's server.xml configured to listen on port 7990 with no proxy. |
ATL_POSTGRES_ENABLED | true | Set to false to disable the PostgreSQL service, and leave Bitbucket Server configured with its internal H2 database. |
ATL_SSL_SELF_CERT_ENABLED | false | Set to Requires |
ATL_BITBUCKET_VERSION | latest | Must be a valid Bitbucket version number (for example, |
See Proxy and secure Bitbucket for more information about Bitbucket Server's server.xml configuration file.
Connecting to your instance using SSH
SSH 経由でインスタンスに接続する場合、ユーザー名として ec2-user を使用します。例:
ssh -i keyfile.pem ec2-user@ec2-xx-xxx-xxx-xxx.compute-1.amazonaws.comThe ec2-user has sudo access. The Atlassian Bitbucket Server AMI does not allow SSH access by root.
Installing an SSL certificate in your Bitbucket Server instance
If launched with a self-signed SSL certificate (you selected SSLCertificate > Generate a self-signed certificate in Quick Start with Bitbucket Server and AWS or you set ATL_SSL_SELF_CERT_ENABLED=true in Launch Bitbucket in AWS manually), Bitbucket Server will be configured to force HTTPS and redirect all plain HTTP requests to the equivalent https:// URL.
It's highly recommended to replace this self-signed SSL certificate with a proper one for your domain, obtained from a Certification Authority (CA), at the earliest opportunity. See Secure Bitbucket in AWS. Once you have a true SSL certificate, install it as soon as possible.
To replace the self-signed SSL certificate with a true SSL certificate
- 証明書ファイルを
/etc/nginx/ssl/my-ssl.crtなどにに配置します。 - password-less 証明書キー ファイルを
/etc/nginx/ssl/my-ssl.keyに配置します。 - Edit
/etc/nginx/nginx.confas follows:/etc/nginx/ssl/self-ssl.crtへの参照を/etc/nginx/ssl/my-ssl.crtに置き換えます。- Replace references to
/etc/nginx/ssl/self-ssl.keywith/etc/nginx/ssl/my-ssl.key
- Append the contents of
/etc/nginx/ssl/my-ssl.crtto the default system PKI bundle (/etc/pki/tls/certs/ca-bundle.crt) to ensure scripts on the instance (such as DIY backup) cancurlsuccessfully. - Restart nginx.
Backing up your instance
The Atlassian Bitbucket Server AMI includes a complete set of Bitbucket Server DIY Backup scripts which has been built specifically for AWS. For instructions on how to backup and restore your instance please refer to Using Bitbucket DIY Backup in AWS.
Upgrading your instance
To upgrade to a later version of Bitbucket Server in AWS you first must connect to your instance using SSH, then follow the steps in the Bitbucket Server upgrade guide.
Stopping and starting your EC2 instance
An EC2 instance launched from the Atlassian Bitbucket Server AMI can be stopped and started just as any machine can be powered off and on again.
When stopping your EC2 instance, it is important to first
- Stop the
atlbitbucket,atlbitbucket_search, andpostgresql93services. /media/atlファイルシステムをアンマウントします。
If your EC2 instance becomes unavailable after stopping and restarting
When starting your EC2 instance back up again, if you rely on Amazon's automatically assigned public IP address (rather than a fixed private IP address or Elastic IP address) to access your instance, your IP address may have changed. When this happens, your instance can become inaccessible and display a "The host name for your Atlassian instance has changed" page. To fix this you need to update the hostname for your Bitbucket Server instance.
To update the hostname for your Bitbucket Server instance
Restart the Bitbucket service on all application nodes by running this command, which will update the hostname
sudo service atlbitbucket restart- Wait for Bitbucket Server to restart.
- If you have also set up Bitbucket Server's Base URL to be the public DNS name or IP address be sure to also update Bitbucket Server's base URL in the administration screen to reflect the change.
Migrating your existing Bitbucket Server or Bitbucket Data Center instance into AWS
既存のインスタンスを AWS に移行する作業には、${BITBUCKET_HOME} とデータベースの一貫したバックアップを AWS インスタンスに移動する操作が含まれます。
To migrate your existing instance into AWS
- Bitbucket Data Center と Server ナレッジ ベースで、移行に関する既知の問題の存在を確認します。
- Alert users to the forthcoming service outage.
- Create a user in the Bitbucket Server Internal User Directory with
SYSADMINpermissions to the instance so you don't get locked out if the new server is unable to connect to your User Directory. - Take a backup of your instance with either the Bitbucket Server Backup Client (Bitbucket Server only) or the Bitbucket Server DIY Backup (Bitbucket Server or Data Center).
- Launch Bitbucket Server in AWS using the Quick Start instructions, which uses a CloudFormation template.
- Connect to your AWS EC2 instance with SSH and upload the backup file.
- Restore the backup with the same tool used to generate it.
- If necessary, update the JDBC configuration in the ${
BITBUCKET_HOME}/shared/bitbucket.propertiesfile.
Resizing the data volume in your Bitbucket Server instance
By default, the application data volume in an instance launched from the Atlassian Bitbucket Server AMI is a standard Linux ext4 filesystem, and can be resized using the standard Linux command line tools.
To resize the data volume in your Bitbucket Server instance
atlbitbucket、atlbitbucket_search、postgresql93サービスを停止します。- Unmount the
/media/atlfilesystem. - Create a snapshot of the volume to resize.
- Create a new volume from the snapshot with the desired size, in the same availability zone as your EC2 instance.
- 古いボリュームを接続解除し、新しくリサイズされたボリュームを
/dev/sdfとして接続します。 - Resize
/dev/sdfusingresize2fs, verify that its size has changed, and remount it on/media/atl. atlbitbucket、atlbitbucket_search、postgresql93サービスを開始します。
For more information, see Expanding the Storage Space of an EBS Volume on Linux, Expanding a Linux Partition, and the Linux manual pages for resize2fs and related commands.
Moving your Bitbucket Server data volume between instances
Occasionally, you may need to move your Bitbucket Server data volume to another instance–for example, when setting up staging or production instances, or when moving to an instance to a different availability zone.
There are two approaches to move your Bitbucket Server data volume to another instance
- Take a backup of your data volume with Bitbucket Server DIY Backup, and restore it on your new instance. See Using Bitbucket DIY Backup in AWS for this option.
Launch a new instance from the Atlassian Bitbucket Server AMI with a snapshot of your existing data volume.
A Bitbucket Server data volume may only be moved to a Bitbucket Server instance of the same or higher version than the original.
To launch a new instance from the Bitbucket Server AMI using a snapshot of your existing Bitbucket Server data volume
- 既存の Bitbucket Server インスタンス上で
atlbitbucket、atlbitbucket_search、postgresql93サービスを停止します。 /media/atlファイルシステムをアンマウントします。- Create a snapshot of the Bitbucket Server data volume (the one attached to the instance as
/dev/sdf). - Once the snapshot generation has completed, launch a new instance from the Atlassian Bitbucket Server AMI as described in Launch Bitbucket in AWS manually. When adding storage, change the EBS volume device to
/dev/sdfas seen below and enter the id of the created snapshot.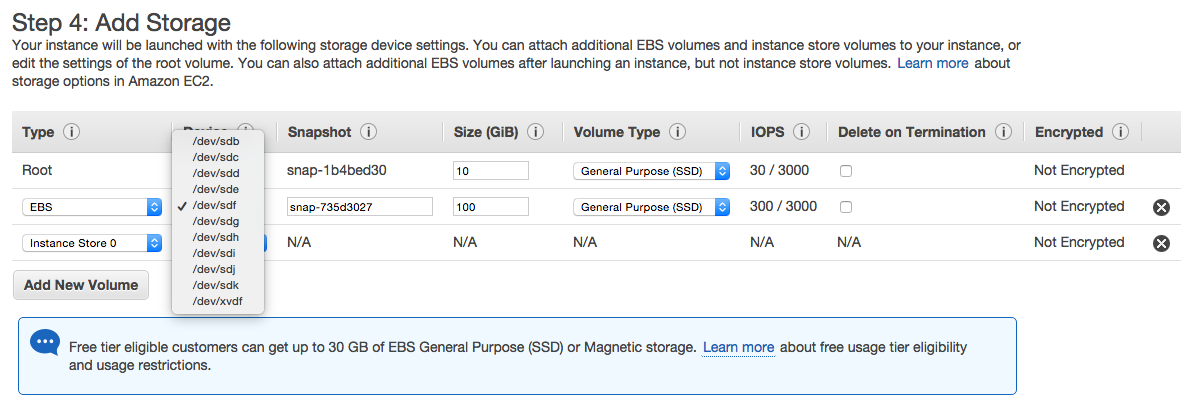
- If the host name (private or public) that users use to reach your Bitbucket Server instance has changed as a result of moving availability zones (or as a result of stopping an instance and starting a new one) you will need to SSH in and run
sudo /opt/atlassian/bin/atl-update-host-name.sh<newhostname>
where <newhostname> is the new host name. - Once Bitbucket Server has restarted your new instance should be fully available.
- If the host name has changed you should also update the JDBC URL configuration in the
bitbucket.propertiesfile (typically located in/var/atlassian/application-data/bitbucket/shared/), as well as Bitbucket Server's base URL in the administration screen to reflect this.