Bitbucket を AWS で、手動で起動する
デプロイ方法としての AWS クイック スタート テンプレートはアトラシアンではサポートされなくなりました。テンプレートは今後も利用できますが、保守や更新は行われません。
より効率的で堅牢なインフラストラクチャと運用のセットアップのために、Helm チャートを使用して Data Center 製品を Kubernetes クラスターにデプロイすることをお勧めします。Kubernetes へのデプロイに関する詳細はこちらをご確認ください。
AWS は、現在、AWS クイック スタート テンプレートで使用される起動設定を起動テンプレートに切り替えることを推奨していますが、AWS クイック スタート テンプレートのサポートは終了しているため、アトラシアンではこの切り替えを行う予定はありません。そのため、このテンプレートを使用して起動設定を作成することはできません。
このページでは、Bitbucket の Amazon Machine Image (AMI) を手動で起動する方法について説明します。AMI で有効化されるコンポーネント、AWS 固有の設定、ネットワークおよびセキュリティ設定を完全に制御できます。
Bitbucket を自動的に起動するには、Helm チャートを使用して Data Center 製品を Kubernetes クラスターにデプロイすることをお勧めします。 Kubernetes へのデプロイに関する詳細をご確認ください。
AWS クイックスタート ガイドを使用して複数ノードの Bitbucket Data Center インスタンスをデプロイすることは可能ですが、デプロイ方法としてのクイック スタート テンプレートのサポートと保守を終了しました。
You can launch the Atlassian Bitbucket Server AMI directly from the AWS Console, or by running the EC2 launch wizard. See Launching EC2 Instances for detailed instructions.
The Bitbucket AMI
The Atlassian Bitbucket Server AMI provides a typical deployment of Bitbucket Server in AWS. It bundles all the components used in a typical Bitbucket Server deployment (reverse proxy, external database, backup tools, data volume, and temporary storage) pre-configured and ready to launch.
You can use the Atlassian Bitbucket Server AMI as a "turnkey" deployment of a Bitbucket Server instance in AWS, or use it as the starting point for customizing your own, more complex Bitbucket Server deployments.
Finding the Atlassian Bitbucket Server AMI
You can find the Atlassian Bitbucket Server AMI by clicking Community AMIs and searching for Atlassian Bitbucket.
Be sure to use the correct AMI ID for your specific region.
To find the latest AMI using the Amazon CLI you can use the following command:
aws ec2 describe-images --owners 098706035825 --filters "Name=name,Values=Atlassian Bitbucket*" --query 'sort_by(Images, &CreationDate)[-1].{ID:ImageId, "AMI Name":Name}' --output table The Bitbucket AMI is not currently available in some regions, such as govcloud-us (AWS GovCloud (US)) and cn-north-1 (China (Beijing)).
Components of the Bitbucket Server AMI
An instance launched from the Atlassian Bitbucket Server AMI contains the following components:
- Bitbucket Server (either the latest version or a version of your choice),
- an external PostgreSQL database,
- nginx as a reverse proxy,
- the Bitbucket Server DIY Backup utilities pre-configured for native AWS snapshots,
- an EBS Volume and Instance Store to hold the data.
| Operating system | Amazon Linux 64-bit, 2016.09.0 |
|---|---|
| Bitbucket Server | Bitbucket Server (latest public version or a version of your choice) is downloaded and installed on launch. |
| Administrative tools | atlassian-bitbucket-diy-backup pre-installed and configured for AWS native backup, accessible over SSH. |
| リバース プロキシ | nginx, configured as follows:
|
| データベース | PostgreSQL 9.3 |
| Block devices |
|

Choosing an instance type
EC2 インスタンス タイプを選択する際は、推奨されるインスタンス サイズについて「AWS でのエンタープライズ Bitbucket インスタンスの推奨インフラストラクチャ」をご参照ください。
 ハードウェアの最小要件
既定の t2.micro (無料利用枠)、small、および medium インスタンス タイプは、Bitbucket Server の最小ハードウェア要件に適合しておらず、本番環境での使用はサポートされません。Bitbucket Server でサポートされる EC2 インスタンス タイプについては「AWS でのエンタープライズ Bitbucket インスタンスの推奨インフラストラクチャ」をご参照ください。
Configure instance details
When configuring your EC2 instance there are some important details to consider:
Identity and Access Management (IAM) Role
IAM Role must be configured at launch time
An IAM Role can only be configured for your EC2 instance during initial launch. You can't associate an IAM role with a running EC2 instance after launch. See IAM Roles for more information.
It is recommended to launch your instance with an IAM Role that allows native AWS DIY Backup to run without explicit credentials. See IAM Roles for Amazon EC2 for more information.
While configuring instance details in the EC2 Launch wizard, you can create a new IAM Role by clicking Create new IAM role. The role should contain at least the following policy:
{
    "Statement": [
        {
            "Resource": [
                "*"
            ],
            "Action": [
                "ec2:AttachVolume",
                "ec2:CreateSnapshot",
                "ec2:CreateTags",
                "ec2:CreateVolume",
                "ec2:DescribeSnapshots",
                "ec2:DescribeVolumes",
                "ec2:DetachVolume"
            ],
            "Effect": "Allow"
        }
    ],
    "Version": "2012-10-17"
}
Advanced Details
The Atlassian Bitbucket Server AMI can be configured in a number of different ways at launch time:
- The built-in PostgreSQL and Nginx components (enabled by default) can be disabled
- Self-signed SSL certificate generation (disabled by default) can be enabled
You can control these options supplying User Data to your instance under Advanced Details in Step 3: Configure Instance Details of the EC2 launch wizard. All user-configurable behavior in the Atlassian Bitbucket Server AMI can be controlled by creating a file /etc/atl containing shell variable definitions. On first boot, the Atlassian Bitbucket Server AMI will source the file /etc/atl (if it exists), allowing its built-in default variable definitions to be overridden.
For example, to enable self-signed SSL certificate generation (and force all Web access to Bitbucket Server to use HTTPS), you can add User Data (As text) as follows:
#!/bin/bash
echo "ATL_SSL_SELF_CERT_ENABLED=true" >>/etc/atl
起動時にユーザー データでオーバーライド可能な変数の完全な一覧については、「AWS での Bitbucket の管理」を参照してください。
User Data is flexible and allows you to run arbitrary BASH commands on your instance at launch time, in addition to overriding variables in /etc/atl. See Running Commands on Your Linux Instance at Launch for more information.
Security considerations
See Securing Bitbucket in AWS for more details about enabling HTTPS and self-signed certificates in the Atlassian Bitbucket Server AMI.
Add storage
When attaching EBS volumes, use these storage device settings for your instance.
| タイプ | Device | 目的 | Size (GiB) | Volume Type | IOPS | Delete on Termination |
|---|---|---|---|---|---|---|
| Root | /dev/xvda | Linux root volume | 50 | General Purpose (SSD) | N/A | はい |
| EBS | /dev/xvdf | Bitbucket Server data: repositories, attachments, avatars, etc. | 100+ | General Purpose (SSD) / Provisioned IOPS * | 300+ * | はい |
| Instance Store | /dev/xvdb | Bitbucket Server temporary files and caches | N/A | N/A | N/A | N/A |
* 最小 500 ~ 1000 の IOPS を実現するプロビジョンド IOPS は、500 以上のアクティブ ユーザーを持つインスタンスで推奨されます。詳細については、「AWS でのエンタープライズ Bitbucket インスタンスの推奨インフラストラクチャ」をご参照ください。
The Atlassian Bitbucket Server AMI won't use any other block devices attached to the instance. The EBS volume for /dev/xvdf will be initialized and formatted at launch time, unless a snapshot id is provided (see the screen capture below), in which case it will only format it if it's not already formatted. See Managing EBS Volumes for more information about storage options in Amazon EC2.
Attach an existing EBS snapshot
起動時に、スナップショットに基づいた既存の EBS ボリュームを添付することもできます。既存の EBS ボリュームを添付するには、[Device] フィールドで、EBS ボリューム デバイスを /dev/sdf に変更し、スナップショットのスナップショット ID を入力します。

See Administering Bitbucket Server in AWS - Moving your Bitbucket Server data volume between instances for more details.
Configure your Security Group
When configuring your Security Group, you must allow allow incoming traffic to all the following ports. For more information, see Using Security Groups.
| タイプ | プロトコル | ポート | 説明 |
|---|---|---|---|
| ssh | TCP | 22 | SSH port, allowing access to administrative functions |
| http | TCP | 80 | |
| HTTPS | TCP | 443 | |
| Custom TCP Rule | TCP | 7999 | Bitbucket Server SSH port for Git hosting operations |
次のステップ
Now you're ready to configure your AWS version of Bitbucket Server.
View your new instance
Once your new EC2 instance has launched, find it within the EC2 console and navigate to the URL provided so you can continue configuring Bitbucket Server.
To find the URL of your new EC2 instance
- From within the EC2 Console, in the Description tab of your new instance, copy the Public DNS.
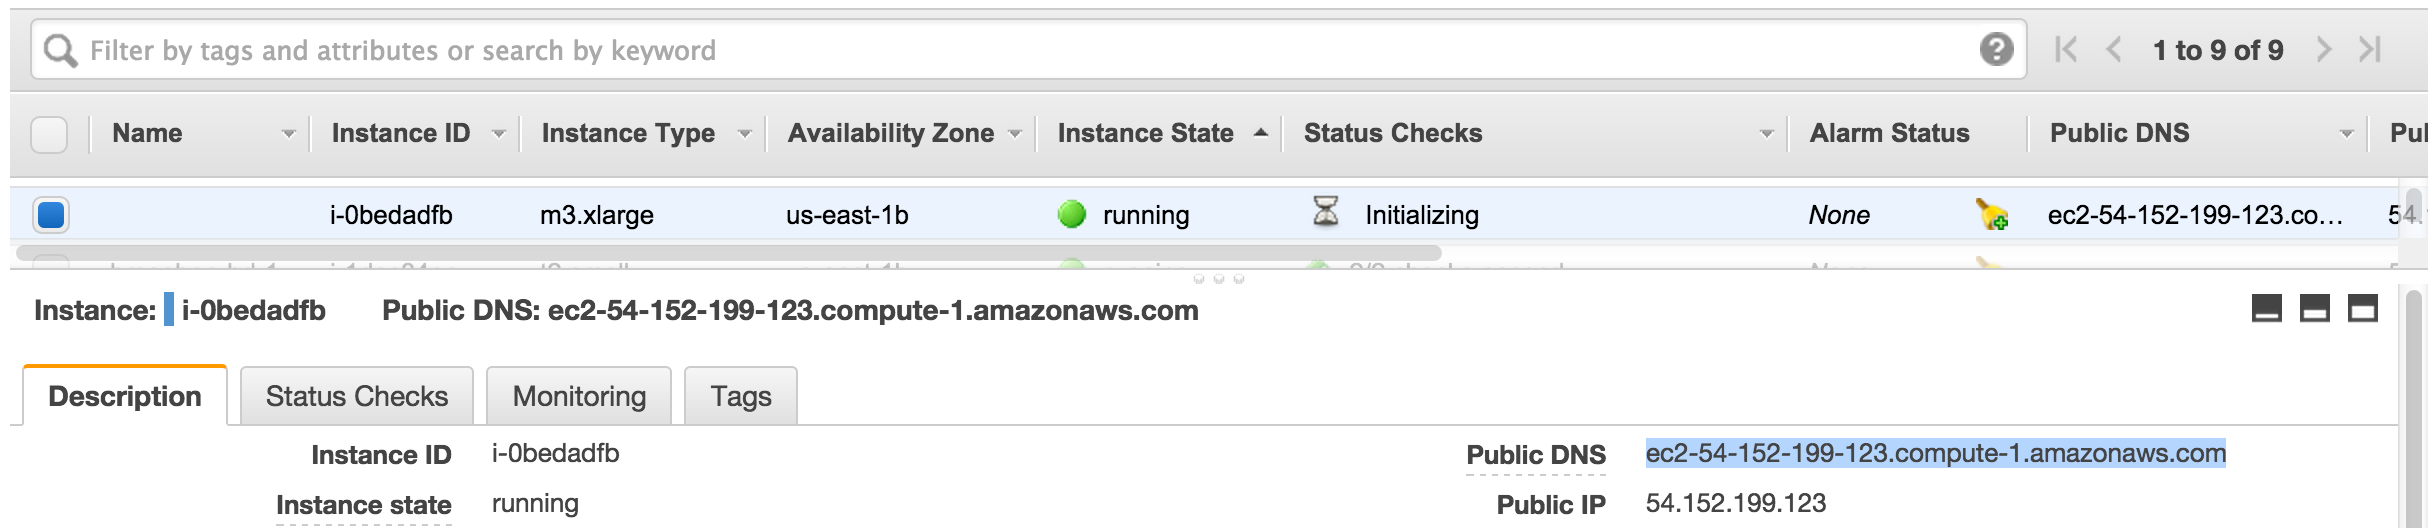
- Paste the URL into a browser window to view start using Bitbucket Server.
Set up your AWS deployment of Bitbucket Server
Once you've followed the URL of the EC2 instance you are presented with the Bitbucket Server Setup Wizard. When you've completed the setup, you can use your instance like any other Bitbucket Server instance. So be sure to check out the rest of the Getting Started with Bitbucket Server documentation.