Azure で Bitbucket Data Center の使用を開始する
Bitbucket Data Center は Microsoft Azure 環境に最適です。Azure は、Bitbucket Data Center インスタンスですぐに動作する多数のマネージド サービスを提供し、あらゆる設定とメンテナンスを自動で処理します。管理者は組織のニーズに合わせてノードの数とサイズを選択し、必要に応じて拡張 / 縮小できます。
Microsoft Azure で Bitbucket Data Center をデプロイできる、参照用テンプレートを提供しています。ユーザーは組織の Azure ベスト プラクティスに応じてテンプレートを構成できます。独自のハードウェアで Bitbucket Data Center インストールを行う場合と同じように、ユーザー管理、中央ログ ストレージ、バックアップ戦略および監視を設定することを強くお勧めします。
動作の仕組み
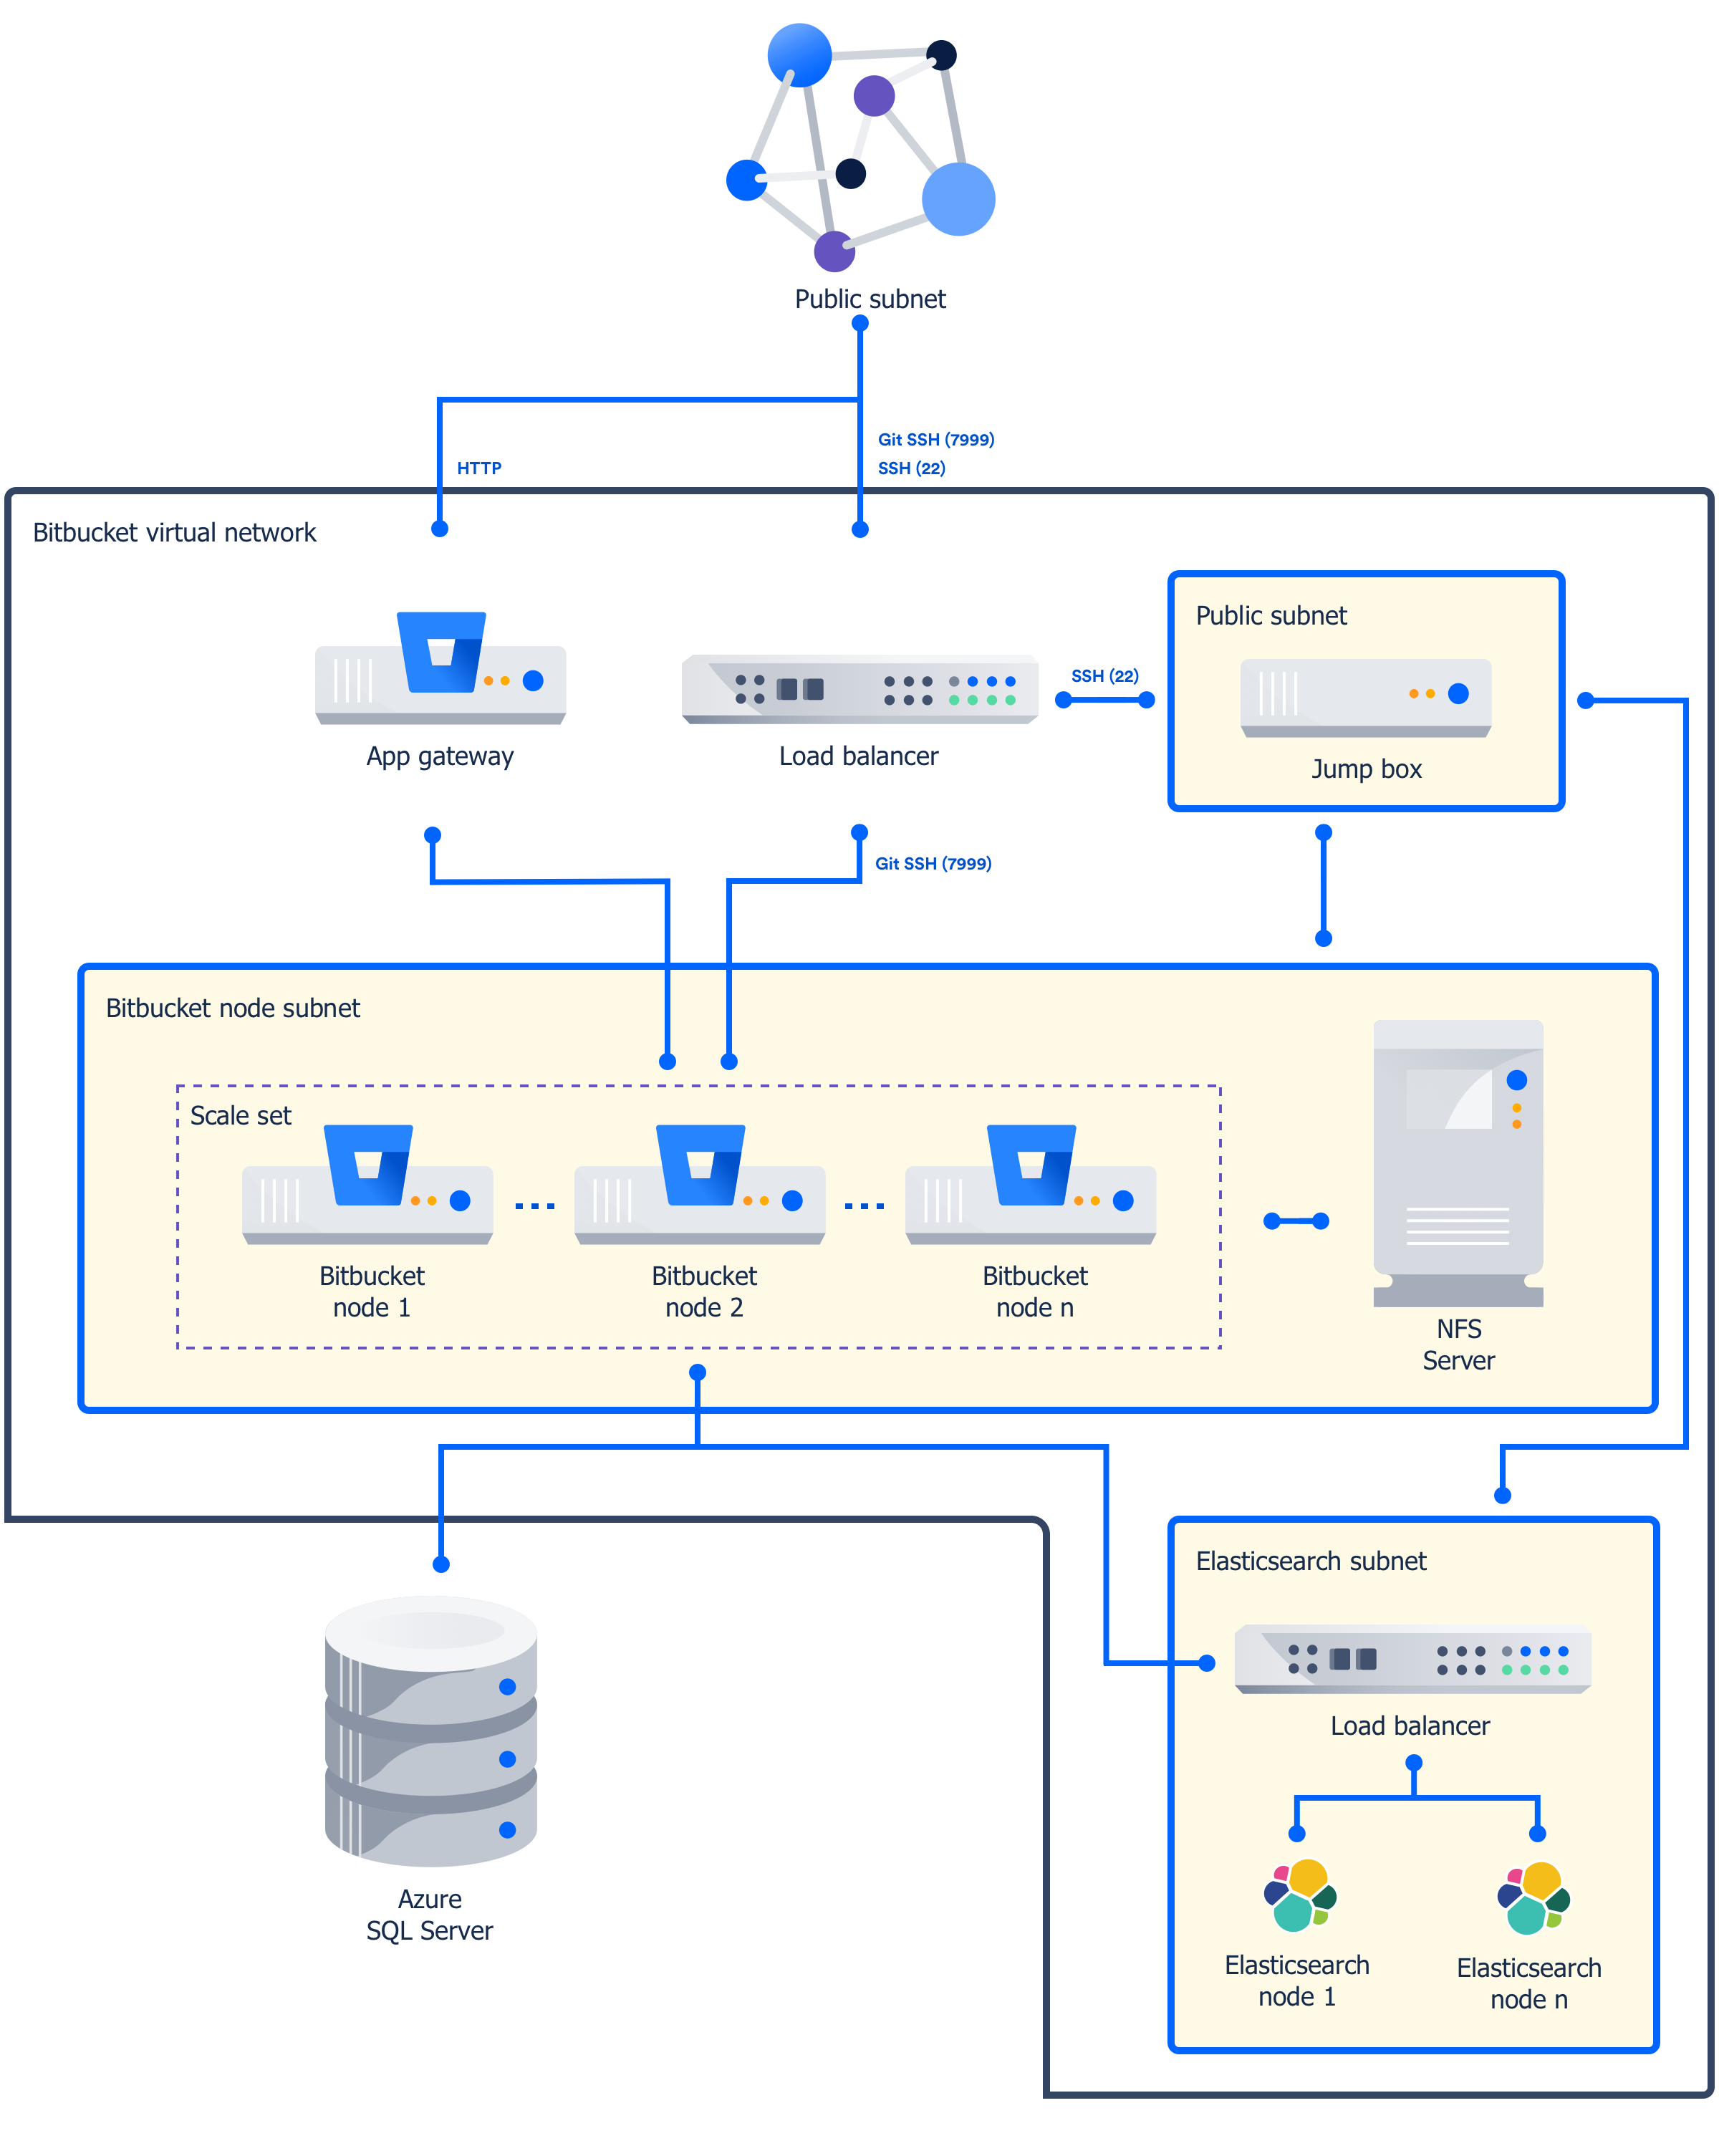
テンプレートを使用して Bitbucket Data Center をデプロイする際のアーキテクチャの概要は次のとおりです。
デプロイメントは、以下のコンポーネントで構成されています。
- One or more Azure standard Linux VM instances as cluster nodes, running Bitbucket, in a scale set.
- A NFS server deployed on a Linux VM, hosting the Bitbucket home directory.
- Elasticsearch を実行する、クラスタ ノードとしての 1 つ以上の Azure 標準 Linux VM インスタンス
- Azure SQL server database.
- ジャンプボックス
- ロード バランサとアプリケーション ゲートウェイ
アプリケーション ゲートウェイはすべての HTTP トラフィックを受信し、ロード バランサはすべての SSH トラフィックを受信して Bitbucket ノードに負荷分散します。
制限事項
Azure へのデプロイについて、次の制限事項をご確認ください。
- 追加のノード監視は提供していません。Azure では、CPU の使用量やネットワーク / ディスク レートを含めた、いくつかの基本的な監視を提供しています。
- ログ集約は行われません。ログはセットアップ時にプロビジョニングされた VM 上のローカル ホーム ディレクトリにのみ保存されます。VM が失われると、ログも失われます。
- You can't use the deployment template to upgrade an existing Bitbucket deployment, or to provision new nodes running a different version to the rest of your cluster.
- SSL is not enabled. You'll need to manually configure your application gateway. See the 'Additional steps required for SSL' section below for more information.
Azure Marketplace 経由で Bitbucket Data Center を Azure にデプロイ
この方法では、Azure Marketplace でデプロイメント テンプレートをリファレンスとして使用して Bitbucket Data Center をデプロイします。
You will need Owner permissions on the resource group into which the deployment is planned.
Marketplace アプリを使用して Azure に Confluence Data Center をデプロイするには、次の手順を実行します。
- Azure ポータルにログインします。
- [リソースの作成] を選択して、[新規] メニューから新しいデプロイを開始します。
- [新規] で「Atlassian」を検索し、Marketplace アプリのリストから「Bitbucket Data Center」を選択します。
- [作成] を選択してデプロイの構成を開始します。
- ウィザードの指示に従ってデプロイを構成します。詳細は、以下のパラメーター テーブルを参照してください。
- すべての情報が正しいことを確認し、[作成] をクリックしてサブスクリプションを購入します。デプロイメントには約 30 分かかります。
- デプロイメントが完了したら、デプロイメント出力に記載されている Bitbucket URL に移動して、Bitbucket Data Center を使い始めます。
パラメーター
| パラメーター | 説明 |
|---|---|
| サブスクリプション | Microsoft Azure サブスクリプション タイプ。 |
| リソース グループ | 既存のリソース グループがある場合は、それを使用するか、新しく作成できます。 |
| 場所 | Azure がデプロイメントを格納する領域です。 |
| Bitbucket administrator details | Provide administrator account details. |
| Number and size of Bitbucket nodes | ノードの最初の数と、各ノードのサイズを指定します。これらは、後で再設定することもできます。 |
| ファイル サーバー | Specify the size of the file server and the disk size |
| Database credentials and size | Specify a Azure SQL tier and optionally username and password for the database |
| Elasticsearch の詳細 | Elasticsearch node size and disk size |
| Jumpbox 資格情報 | ジャンプボックスのユーザー名と SSH パブリック キーを提供します。 |
A full and current list of parameters is available here.
CLI を使用して Bitbucket Data Center を Azure にデプロイする
この方法では、Azure コマンドライン インターフェイスでアトラシアンのデプロイメント テンプレートをリファレンスとして使用し、Bitbucket Data Center をデプロイします。これを行うには、Azure CLI をインストールする必要があります。
To deploy Bitbucket Data Center to Azure using the command line interface:
Download the
azuredeploy.jsontemplate file andazuredeploy.parameters.jsonparameters file from the bitbucket directory on https://bitbucket.org/atlassian/atlassian-azure-deployment.- Edit the
azuredeploy.parameters.jsonparameters file, and insert values for the following required parameters:- Bitbucket admin password, the default username is bbsadmin
- SSH key used for the jumpbox
The template applies sensible defaults for a number of other parameters, including the size of your VMs and database instance. You can choose to override these defaults if you want to specify particular values. - Log in to Azure via the command line interface.
リソース グループを作成します。展開する Confluence リソースのコンテナとなります。
az group create --name BitbucketDataCenter --location "Central US"新しいデプロイメントを作成し、Confluence Data Center テンプレート ファイルとパラメーター ファイルを指定します。
az group deployment create \ --name BitbucketDataCenterDeployment \ --resource-group BitbucketDataCenter \ --template-file azuredeploy.json \ --parameters azuredeploy.parameters.json- Log in to the Azure Portal to see the deployment outputs. The Application URL is the URL for your new Bitbucket site.
- Go to the Application URL in your browser to start using Bitbucket.
必須パラメーター
The deployment template requires a number of values to be provided in order to deploy your Bitbucket Data Center instance.
| パラメーター | 説明 |
|---|---|
sshKey | This is the SSH Key you'll use to access the jumpbox. The default username is bbsadmin |
bitbucketAdminPassword | This is the password for your Bitbucket administrator's account. The default username is bbsadmin |
A full and current list of parameters is available here.
SSL に必要な追加手順
As noted in limitations above, you'll need to manually configure your application gateway. See Application Gateway with SSL termination in the Microsoft Azure documentation for more information.
