Bitbucket Data Center にクラスタ ノードを追加する
You can rapidly scale the capacity of Bitbucket Data Center, with no downtime, by provisioning extra cluster nodes. This page describes how to add another cluster node to an existing instance of Bitbucket Data Center.
If you are moving to Bitbucket Data Center from a single instance of Bitbucket Server, go straight to Installing Bitbucket Data Center, instead.
If you are new to Bitbucket Data Center, we suggest you take a look at Clustering with Bitbucket Data Center.
On this page
Things to consider before provisioning a cluster node
We highly recommend provisioning cluster nodes using an automated configuration management tool such as Chef, Puppet, or Vagrant, or by spinning up identical virtual machine snapshots.
Minimum requirements for cluster nodes
Each Bitbucket cluster node runs the Bitbucket Data Center web application, and each should meet these minimum requirements:
- Each Bitbucket cluster node must be a dedicated machine, although machines may be physical or virtual.
- Cluster nodes must be connected in a high speed LAN (that is, they must be physically in the same data center).
- Bitbucket Server supported platforms requirements, including those for Java and Git, apply to each cluster node.
- For consistent performance, each cluster node should be nearly identical, or as similar as possible.
- All cluster nodes must run the same version of Bitbucket Data Center.
- All cluster nodes must have synchronized clocks (for example, using NTP) and be configured with the identical timezone.
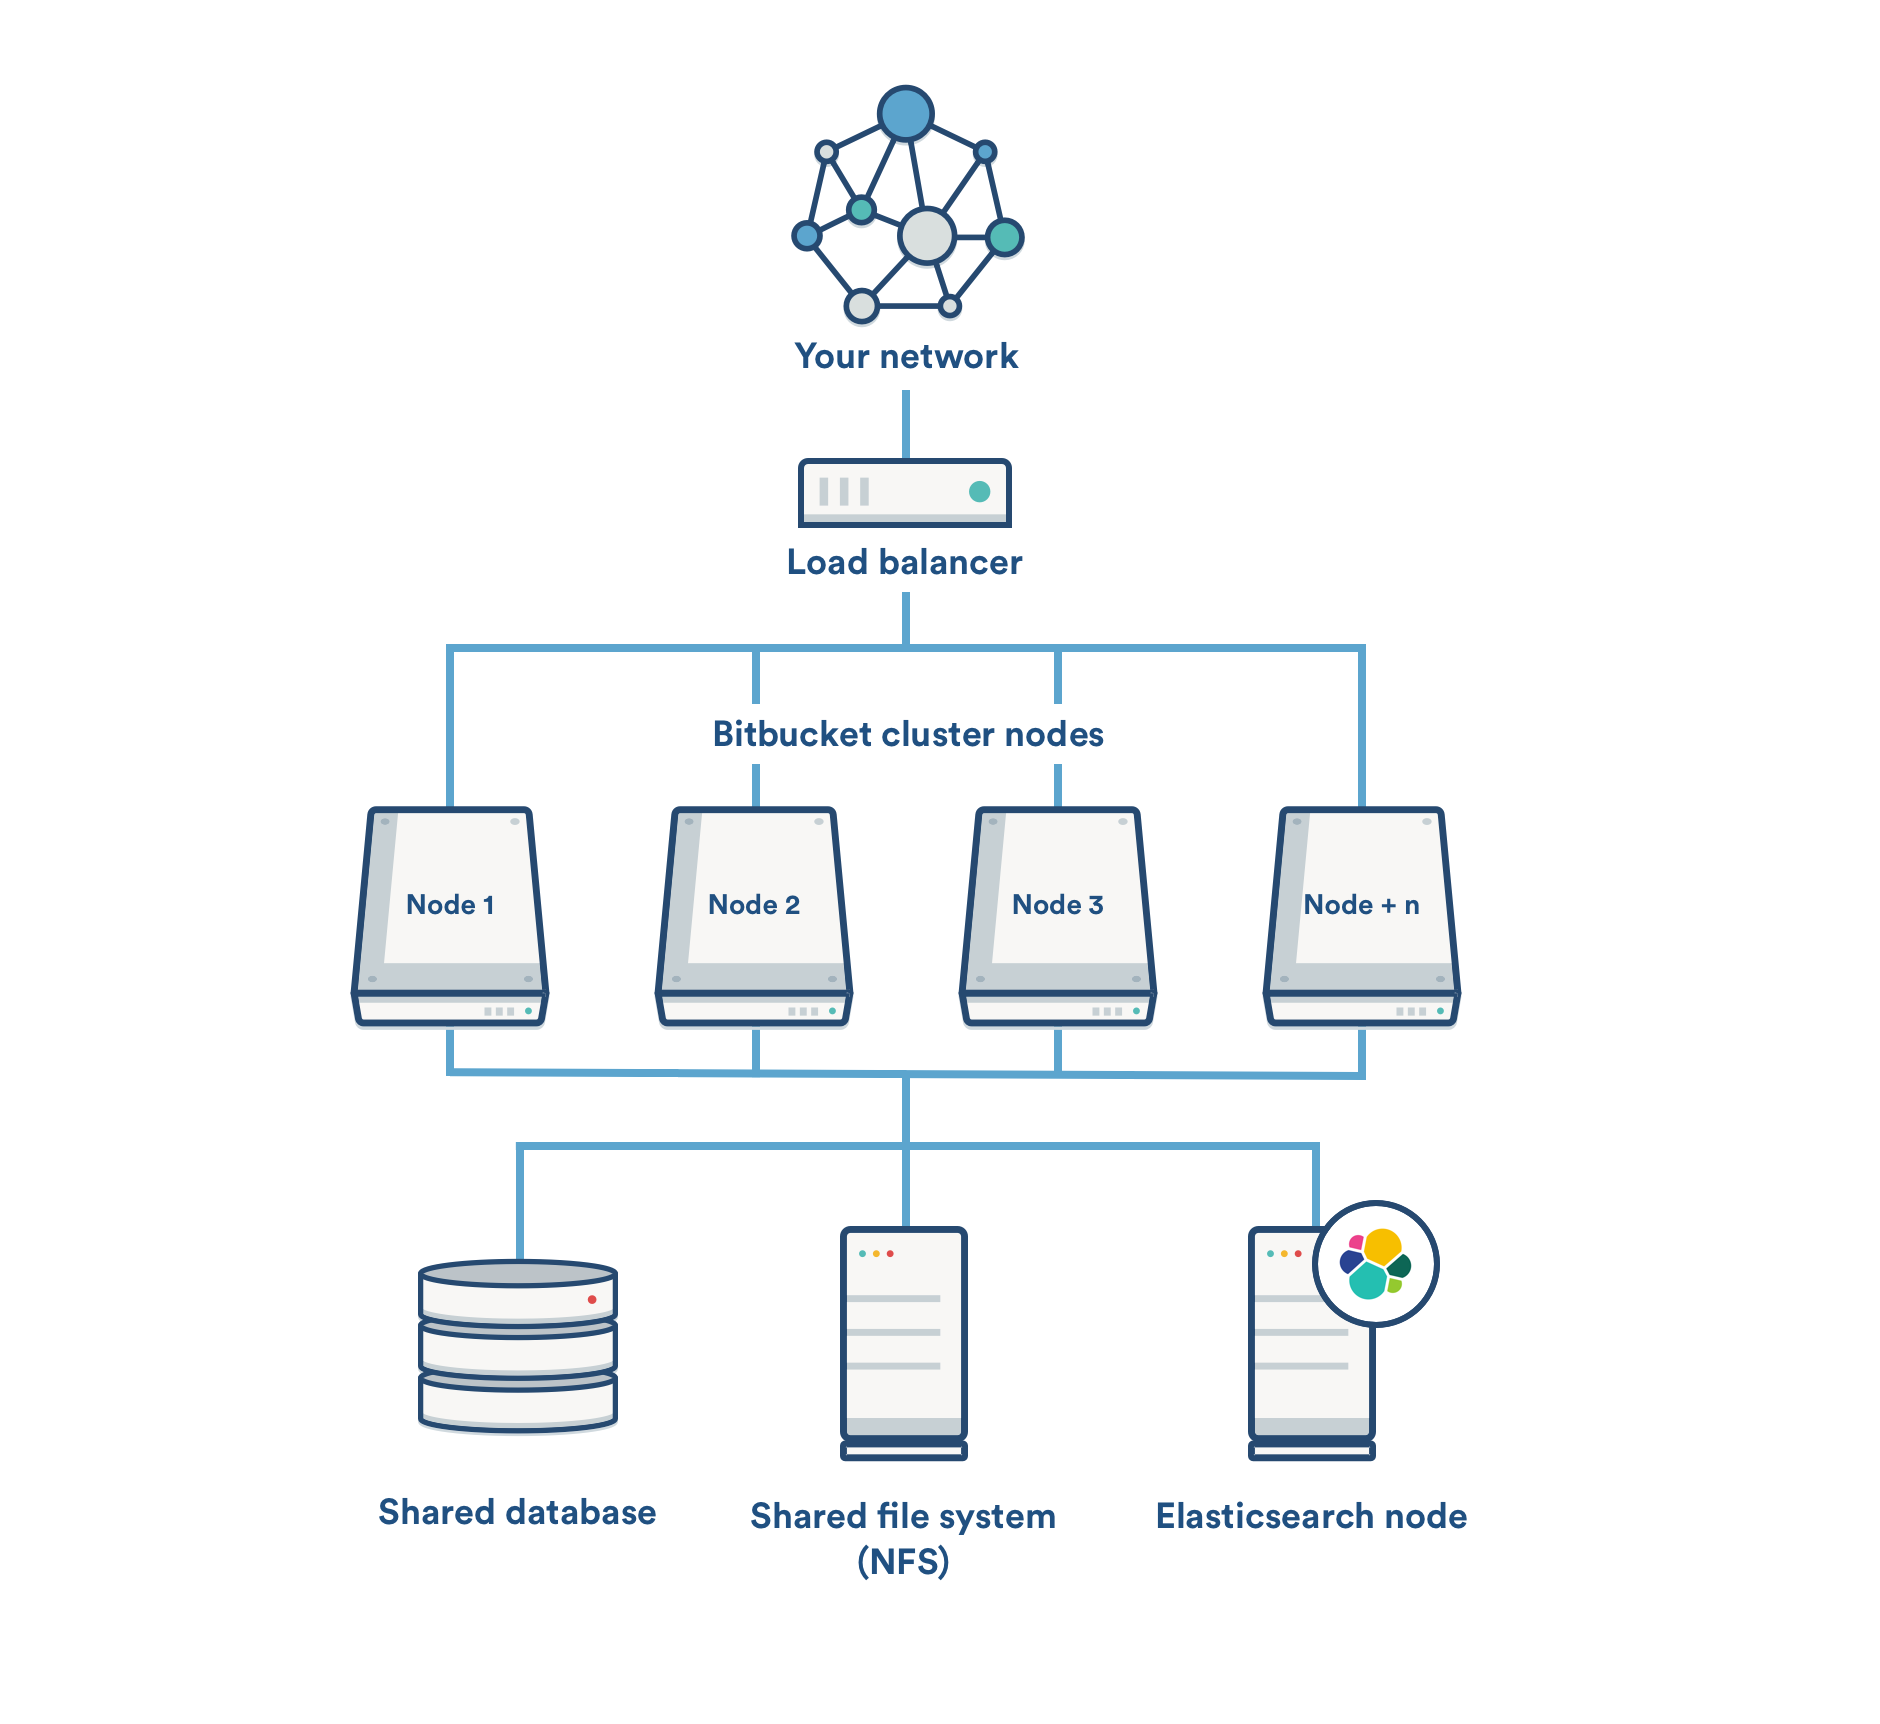
Architecture overview
This is component diagram of Bitbucket Data Center.
1. Mount the shared home directory on the node
Bitbucket Data Center makes use of a shared file system that lives on a dedicated machine and is accessible using NFS. See Installing Bitbucket Data Center for more information.
Mount the shared home directory as ${BITBUCKET_HOME}/shared. For example, suppose your Bitbucket home directory is /var/atlassian/application-data/bitbucket, and your shared home directory is available as an NFS export called bitbucket-san:/bitbucket-shared. Add the following line to /etc/fstab on the cluster node:
bitbucket-san:/bitbucket-shared /var/atlassian/application-data/bitbucket/shared nfs nfsvers=3,lookupcache=pos,noatime,intr,rsize=32768,wsize=32768 0 0Then mount it:
mkdir -p /var/atlassian/application-data/bitbucket/shared
sudo mount -a
2. Install Bitbucket Data Center on the node
Download the latest Bitbucket Data Center distribution from https://www.atlassian.com/software/bitbucket/download, and install Bitbucket Server on the cluster node by either using the installer or by installing the application manually from an archive file.
3. Add the node to the cluster
Start Bitbucket Server on the new node. See Starting and stopping Bitbucket Server. You can optionally give the node a persistent, human readable name by setting a node.name
system property under JVM_SUPPORT_RECOMMENDED_ARGS in _start-webapp.sh For example:
-Dcluster.node.name=bitbucket-1Once Bitbucket Server starts, go to http://<load-balancer>/admin/clustering. You should see the new node listed, which would look similar to this:
Verify that the new node you have started up has successfully joined the cluster. If it does not, check your network configuration and the ${BITBUCKET_HOME}/log/atlassian-bitbucket.log files on all nodes. If you are unable to find a reason for the node failing to join successfully, contact Atlassian Support .
4. Connect the node to the load balancer
Bitbucket Data Center makes use of a load balancer to distribute requests from your users to the cluster nodes. If a cluster node goes down, the load balancer immediately detects the failure and automatically directs requests to the other nodes within seconds. See Installing Bitbucket Data Center for more information.
If you are using a hardware or software load balancer other than HAProxy, consult your vendor's documentation on how to add the new Bitbucket cluster node to the load balancer.
If you are using HAProxy, simply add the following lines to your haproxy.cfg file:
# In the backend bitbucket_http_backend section, add:
server bitbucket<xx> 192.168.0.<x>:7990 check inter 10000 rise 2 fall 5
# In the backend bitbucket_ssh_backend section, add:
server bitbucket<xx> 192.168.0.<x>:7999 check port 7999
where the values for <x> and <xx> don't conflict with an existing node.
Now restart HAProxy :
sudo service haproxy restart
Verify that the new node is in the cluster and receiving requests by checking the logs on each node to ensure that all are receiving traffic. Also check that updates done on one node are visible on the other nodes.
You can monitor the health of your cluster by navigating to HAProxy's statistics page at http://<load-balancer>:8090/. You should see a page similar to this:
For any issues please raise a support ticket and mention that you are following the 'Adding cluster nodes to Bitbucket Data Center' page.


