サービス プロジェクト チームのキューを作成する
- サービス プロジェクトのセットアップ
- サービス プロジェクトのリクエスト タイプを作成する
- サービス プロジェクト チームのキューを作成する
- サービス プロジェクトのエージェントを追加する
- サービス プロジェクト チャンネルのカスタマイズ
- サービス プロジェクトのレベルアップ
- 顧客にサービス プロジェクトを紹介する
- サンプル プロジェクトの確認
Your teams will spend the majority of their time working out of the queues you set up. Agents do not have the permissions to add new queues or configure existing ones; however, Jira Service Management queues allow you to automatically triage and prioritize issues for them. If you want your team to focus on requests that must be completed by next week, for example, you can set up a queue that only contains requests with a set due date in that week.
サイトには事前にキューが設定されていますが (例: 「未割当の課題」)、チーム用に新しいキューを 3 つ作成してみましょう。
- サービス プロジェクトのサイドバーから [キュー] () を選択します。
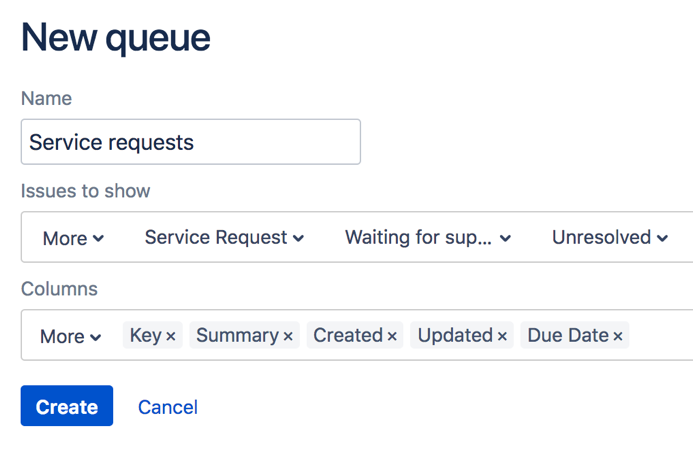
- [新規キュー] を選択し、最初のキューに「Service requests」と名前をつけます。
- 次のドロップダウン メニューを選択して、このキューに表示したい課題を定義します。[タイプ] ([サービス リクエスト] を選択)、[ステータス] ([サポートを待機中] を選択) および [解決策] ([未解決] を選択)。
- このキューに表示する次の列名を [詳細] メニューから選択します: 「キー」、「概要」、「作成日」、「更新日」、および「期限」。列間で名前 (「キー」など) をドラッグして列の順序を並び替えることができます。
- 「作成」をクリックして、このキューをチームのワークスペースに追加します。
- 次の 2 つの検索クエリで新規に 2 つのキューを作成します。
「Completed requests」は解決されたサービス リクエストを検索します。
リクエストの「Due this week」は、次週に完了しなければいけないリクエストを表します。 - 保存したキューを新しい場所にクリック アンド ドラッグして並べ替えます。
You now have three new queues in your project! You will next learn how to add agents to your site so you can get your teams up and running with Jira Service Management.


