JSON を使用した詳細なフィールド編集
ヒント
[設定するフィールドを選択...] ドロップダウンでフィールドを編集できない場合にのみご利用ください。これは、他のアプリによって提供されるカスタム フィールドで必要になる場合があります。
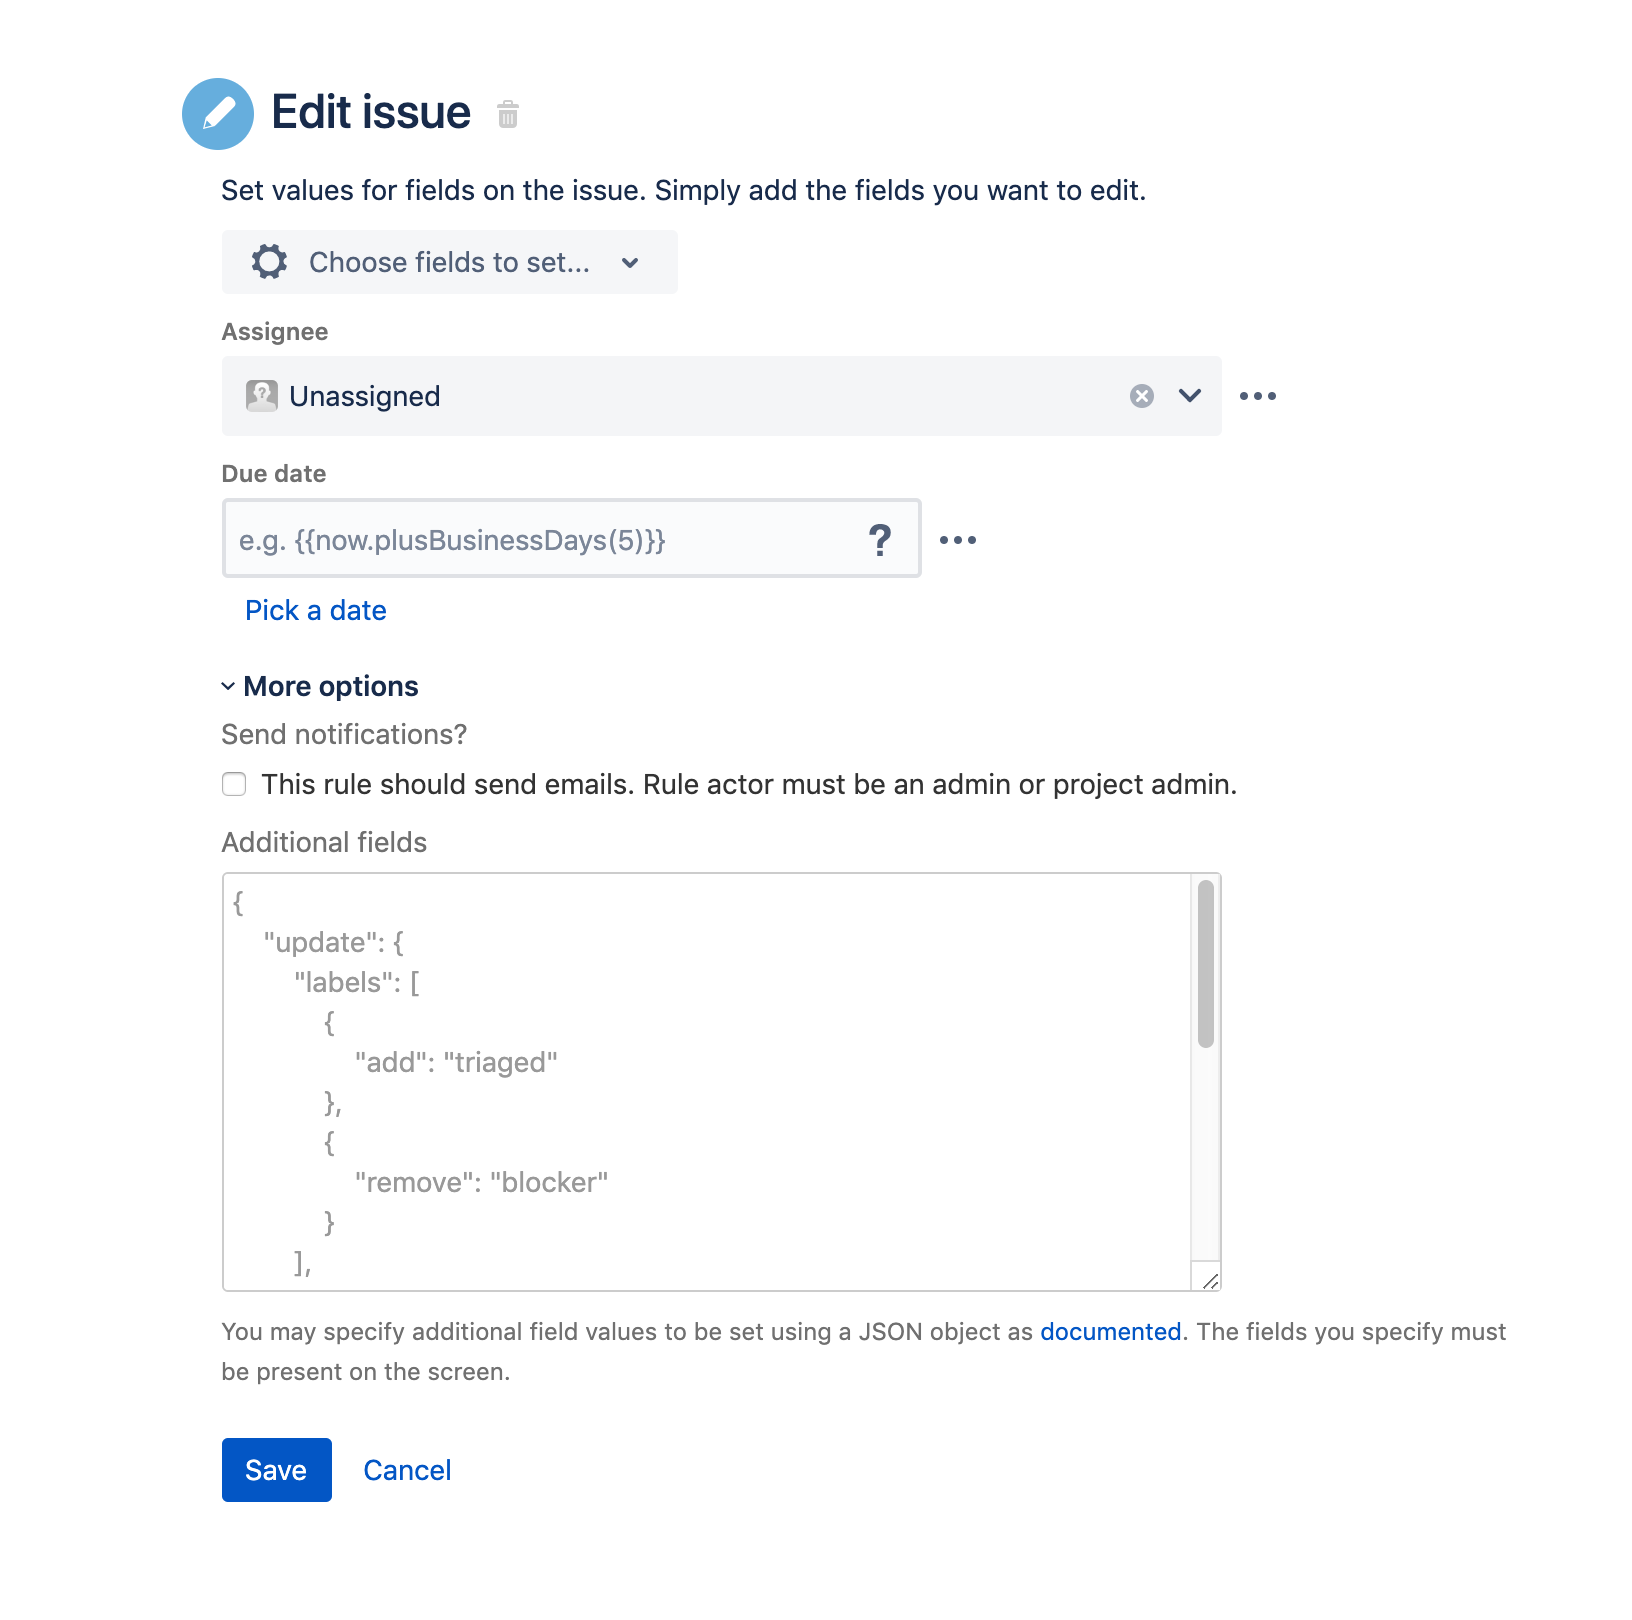
次のアクションの [その他のオプション] の下にあるセクションで、フィールドを編集できます。
これらの追加フィールドには、Jira の REST API で規定された形式を使用して有効な JSON オブジェクトを指定する必要があります。
ここでは、このセクションで [課題を編集] アクションが表示される例を示します。
JSON のフォーマット
JSON オブジェクトには、次のように属性「update」または「fields」などを含められます。
{
    "update": {
        "description": [{
            "set": "a new description"
        }],
        "labels": [{
                "add": "test-label"
        }]
    },
    "fields": {
        "summary": "woohoo! a new summary"
    }
}
update と fields の違い
fieldsはショートカットで、updateをset操作によって呼び出します。上記の例では、setを説明フィールドとして呼び出すことはdescriptionをfieldsセクションに含めることと等しくなります (例:{"fields": {"description":"a new description"}})。updateは、複数の値を持つフィールドの既存のセットに値を追加、既存のセットから値を削除する場合に役立ちます。たとえば上記スクリーンショットのラベルの例では「test-label」を課題の既存ラベルに追加できます。set操作を使用した場合は、すべての既存ラベルが「test-label」で上書きされます。updateによって、新しいラベルが既存のラベルに追加されます。
警告
JSON の update セクションと fields の両方に同じフィールドが同時に表示されることはありません。
課題フィールドを参照する
カスタム フィールドは ID でなく名前で参照できます。次の例では、同じフィールドが ID と名前で参照されています。
{
    "fields": {
        "customfield_10003": "the value I want to set",
        "My Text Customfield": "this is the same field as above and using both causes an error"
    }
}
ご覧のとおり、名前を使用する方がはるかに簡単です (そして読みやすくなります)。フィールドは大小文字を区別せず、スペースはアンダースコアで置き換えられます。同名のカスタム フィールドがある、またはカスタム フィールドがシステム フィールドと同名の場合は、カスタム フィールド ID を使用する必要があります。
サポートされているフィールドとオペレーション
Jira の REST API がここで役に立ちます。課題を作成中か編集中かに応じて、プロジェクトの createmeta、または課題の editmeta の各情報を照会できます。
この 2 つのオペレーションのメタデータは、以下より取得できます。
https://yourinstance/rest/api/2/issue/createmeta?projectKeys=JRA&expand=projects.issuetypes.fieldshttps://yourinstance/rest/api/2/issue/YOURISSUEKEY/editmeta
「createmeta」の応答として次が出力されます。
{
  "expand": "projects",
  "projects": [
    {
      "expand": "issuetypes",
      "self": "https://jira.atlassian.com/rest/api/2/project/10240",
      "id": "10240",
      "key": "JRA",
      "name": "Jira (including Jira Core)",
      "avatarUrls": {
        "48x48": "https://jira.atlassian.com/secure/projectavatar?pid=10240&avatarId=17294",
        "24x24": "https://jira.atlassian.com/secure/projectavatar?size=small&pid=10240&avatarId=17294",
        "16x16": "https://jira.atlassian.com/secure/projectavatar?size=xsmall&pid=10240&avatarId=17294",
        "32x32": "https://jira.atlassian.com/secure/projectavatar?size=medium&pid=10240&avatarId=17294"
      },
      "issuetypes": [
        {
          "self": "https://jira.atlassian.com/rest/api/2/issuetype/10000",
          "id": "10000",
          "description": "",
          "iconUrl": "https://jira.atlassian.com/secure/viewavatar?size=xsmall&avatarId=51505&avatarType=issuetype",
          "name": "Suggestion",
          "subtask": false,
          "expand": "fields",
          "fields": {
            "summary": {
              "required": true,
              "schema": {
                "type": "string",
                "system": "summary"
              },
              "name": "Summary",
              "hasDefaultValue": false,
              "operations": [
                "set"
              ]
            },
            // other fields removed for brevity...
            "components": {
              "required": false,
              "schema": {
                "type": "array",
                "items": "component",
                "system": "components"
              },
              "name": "Component/s",
              "hasDefaultValue": false,
              "operations": [
                "add",
                "set",
                "remove"
              ],
              "allowedValues": [
                {
                  "self": "https://jira.atlassian.com/rest/api/2/component/36920",
                  "id": "36920",
                  "name": "System Administration - Support Tools"
                },
                {
                  "self": "https://jira.atlassian.com/rest/api/2/component/43995",
                  "id": "43995",
                  "name": "User Management - Delete User"
                }
              ]
            }
            // other fields removed for brevity...
          }
        }
      ]
    }
  ]
}
この JSON は上記で可能な操作と値を含む Additional fields に含められるすべてのフィールドを返します。
たとえば、上記の editmeta オブジェクトによって、「単一選択」カスタム フィールドを検索してその操作と値を検索できます (「設定」と「赤」、「青」、「緑」のみ)。たとえば、編集中に「単一選択」フィールドを「緑」に設定するには、次の JSON を使用します。
{
    "update": {
        "Single Select": [
            {
                "set": {"value": "green"}
            }
        ]
    }
}
また、特定のカスタム フィールドのカスタム フィールド ID を確認するために、これを使用できます。
フィールドを編集できない理由
プロジェクトまたは課題の createmeta または editmeta を取得した場合は、編集対象のフィールドが結果として返される JSON に含まれていないことがあります。つまり、Automation for Jira が課題を編集または作成しようとすると、監査ログのエラーとなって実行できません。これは多くの場合は、プロジェクトの適切な編集または作成画面にフィールドがないことが原因です。この問題を解決するには、プロジェクトのプロジェクト管理者にある「画面」セクションに移動して、適切な編集または作成の各画面に更新しようとしているフィールドがあることを確認するだけです。
さらに、自動化アドオンのユーザーがプロジェクトの課題を編集または作成するための適切な権限を持っているかどうかもご確認ください。最後に、ワークフローによって課題の編集が妨げられている可能性もあります。
スマート バリューを使用する
詳細なフィールド値でもスマート バリューがサポートされています。構文の詳細は「Jira スマート バリュー - JSON 関数」をご参照ください。
たとえば、現在の担当者をイベントを開始したユーザーに変更する方法は、次のとおりです。
{
    "fields": {
        "assignee": { "name": "{{initiator.name}}" }
    }
}
また、他のフィールドをより簡単に参照できる便利な方法をいくつか作成しました。たとえば、上記を次のように記述できます。
{
    "fields": {
        "assignee": {{initiator.name.asJsonObject("name")}}
    }
}
これによって、JSON が正しいフォーマットで作成されるだけでなく、テキストも正しくエンコードされます。次によって、テキストを単独でエンコードできます。
{
    "fields": {
        "assignee": { "name": {{initiator.name.asJsonString}} }
    }
}
値をキー付きの JSON オブジェクトに変換するには、次を使用します。
{
    "fields": {
        "assignee": {{initiator.name.asJsonObject("key")}}
    }
}
結果は次のようになります。
{
    "fields": {
        "assignee": { "key": "username" }
    }
}
テキストの配列を受け入れるフィールドの場合は、次を使用できます。
{
    "fields": {
        "labels": {{issue.parent.labels.asJsonStringArray}}
    }
}
1 つのフィールド オブジェクトの配列を受け入れるフィールドの場合は、次を使用できます。
{
    "fields": {
        "Multi User Customfield": {{issue.parent.Multi User Customfield.asJsonObjectArray("name")}}
    }
}
フィールドの構文の例
その他の例については Jira が提供するフィールド形式のドキュメントをご参照ください。
要約
1 行のテキストからなるシステム フィールド
"summary": "A summary is one line of text"説明
複数の行のテキストからなるシステム フィールド。
"description": "A description is many lines of text\n separated by\n line feeds"時間トラッキングと作業の記録
Jira でタイム トラッキング機能を使用している場合は、Automation for Jira によって関連フィールドを更新することをお勧めします。タイム トラッキングは複数の値を表すため、この設定は他のフィールドの設定ほど単純ではありません。つまり、originalEstimate と remainingEstimate は親フィールドの一部にすぎません。
課題に対する作業を記録できます。
{
  "update": {
    "worklog" : [
      {
        "add": {
          "timeSpent" : "6m"
        }
      }
    ]
  }
}
または、作業を記録すると同時に残余見積もりを設定する場合は、以下の手順で行います。
{
"update": {
    "worklog" : [
      {
        "add": {
          "timeSpent" : "6m"
        }
      }
    ]
  },
    "fields": {
        "timetracking": {
              "originalEstimate": "10",
              "remainingEstimate": "5"
        }
    }
}これをスマート値と組み合わせると、計算した値で作業を記録できます。
{
  "update": {
    "worklog" : [
      {
        "add": {
          "timeSpent" : "{{now.diff(issue.created).businessDays}}d"
        }
      }
    ]
  }
}
別の課題から時間トラッキングのフィールドをコピーするには、次のようにします。
{
    "fields": {
        "timetracking": {
              "originalEstimate": "{{issue.timetracking.originalEstimate}}",
              "remainingEstimate": "{{issue.timetracking.remainingEstimate}}"
        }
    }
}
コンポーネント
「name」で処理される、複数の値からなるシステム フィールド。
"components" : [ { "name": "Active Directory"} , { "name": "Network Switch" } ]影響バージョン
「name」で処理される、複数の値からなるシステム フィールド。
"versions" : [ { "name": "Version 1.0"} , { "Version": "1.1" } ]修正バージョン
「name」で処理される、複数の値からなるシステム フィールド。
"fixVersions" : [ { "name": "2.0"} , { "name": "Network Switch" } ]期限
「YYYY-MM-DD」フォーマットの日付のシステムフィールド。
"duedate" : "2015-11-18"ラベル
テキスト値の配列のシステム フィールド。
"labels" : ["examplelabelnumber1", "examplelabelnumber2"]ラベルを追加する
既存のラベル セットにラベルを追加します。
{
    "update": {
        "labels": [
            {
                "add": "my-new-label"
            }
        ]
    }
}必要に応じて、add ではなく remove または set を演算子として代用できます。
課題のセキュリティ レベルを設定する
{
    "update": {
        "security": [
            {
                "set": {"name": "Public"}
            }
        ]
    }
}
この場合の "Public" は、セキュリティ レベルの名前です。この名前ではなく、プロジェクトの有効なセキュリティ レベルを代用できます。
課題をリンクする
課題リンクも作成できます。たとえば、初期設定の課題を編集して新規の課題を作成後、編集した課題に戻るリンクを作成します。
{"update": {
        "issuelinks": [
            {
                "add": {
                    "type": {
                        "name": "Relates"
                    },
                    "outwardIssue": {
                        "key": "{{issue.key}}"
                    }
                }
            }
        ]
    }
}
リンクのタイプ名 (上記の例では「Relates」) を検索するには、インスタンスの https://<yourinstance>/secure/admin/ViewLinkTypes!default.jspa をご参照ください。{{issue.key}} スマート バリューはトリガー課題のキーと置き換えられます。
リクエスト参加者
Jira Service Desk の [リクエスト参加者] フィールドは、特定の構造になっている必要があります。たとえば、課題の最後のコメント者を参加者に加えるには、以下のように設定します。
{
  "update": {
    "Request participants" : [
      {
        "add": {
          "name":"{{issue.comments.last.author.name}}"
        }
      }
    ]
  }
}
チェックボックス型カスタム フィールド
値の定義リストから複数の値を選択します。'value' または 'id' で指定できます。
"customfield_11440" : [{ "value" : "option1"}, {"value" : "option2"}]

or

"customfield_11440" : [{ "id" : 10112}, {"id" : 10115}]
日付ピッカー カスタム フィールド
"YYYY-MM-DD" 形式の日付。
"customfield_11441" : "2015-11-18"日時ピッカー カスタム フィールド
ISO 8601 "YYYY-MM-DDThh:mm:ss.sTZD" 形式の日時。
"customfield_11442" : "2015-11-18T14:39:00.000+1100"ラベル カスタム フィールド
テキストの配列です。
"customfield_11443" : [ "rest_label1", "rest_label2" ]数値型カスタム フィールド
数字を含みます。
"customfield_11444" : 666ラジオ ボタン型カスタム フィールド
値の定義リストから、単一の値を選択します。「value」または「id」で指定できます。
"customfield_11445" : { "value": "option2" }

or

"customfield_11445" : { "id": 10112 }
カスケード選択カスタム フィールド
1 つの親の値とそれに関連する子の値を選択します。「value」または「id」で指定できます。
"customfield_11447" : { "value": "parent_option1", "child": { "value" : "p1_child1"} }

or

"customfield_11447" : { "id": 10112, "child": { "id" : 10115 } }
複数選択カスタム フィールド
値の定義リストから複数の値を選択します。'value' または 'id' で指定できます。
"customfield_11448" : [ { "value": "option1" }, { "value": "option2" } ]

or

"customfield_11448" : [ { "id": 10112 }, { "id": 10115 } ]
単一選択カスタム フィールド
値の定義リストから、単一の値を選択します。「value」または「id」で指定できます。
"customfield_11449" : { "value": "option3" }

or

"customfield_11449" : { "id": 10112 }
複数行テキスト カスタム フィールド
複数行のテキスト。
"customfield_11450": "Multiples lines of text\n separated by\n line feeds"テキスト カスタム フィールド
1 行のテキスト。
"customfield_11450": "a single line of text"URL カスタム フィールド
URL を入力できます。
"customfield_11452" : "http://www.atlassian.com",シングルユーザー ピッカー カスタム フィールド
1 人のユーザーを選択できます。
"customfield_11453" : { "name":"tommytomtomahawk" },マルチユーザー ピッカー カスタム フィールド
複数のユーザーを選択できます。
"customfield_11458" : [ { "name":"inigomontoya" }, { "name":"tommytomtomahawk" }]Elements Connect (旧 nFeed) カスタム フィールド
文字列識別子の配列。
"customfield_10700" : [ "10300", "10400" ]次は、Elements Connect フィールドの値をコピーする例です。
"customfield_10700" : {{ issue.customfield_10700.asJsonStringArray }}アセット オブジェクト カスタム フィールド
次の JSON を使用して、アセット オブジェクト カスタム フィールドを特定のアセットに設定できます。下の例では、次のように置き換えてください。
XXXXXをアセット オブジェクト カスタム フィールドの ID に置き換えます。[設定] ()、[課題]、[カスタム フィールド] でこのカスタム フィールドを設定する際に、URL で ID を取得できます。
ABC-123をアセット キーに置き換えます。
{
    "fields": {
        "customfield_XXXXX": [{"key" : "ABC-123"}]
    }
}