Jira Service Management の承認の設定

Jira Service Management allows you to add an approval step to a status in a workflow, which allows you to specify if an approval is needed for issue types (and their associated request types) that are mapped to the workflow. The option to add an approval step is only available if the workflow is associated with at least one Jira Service Management project. If you add an approval step to the workflow, and that workflow is also used by a non-Jira Service Management project, the issues in the non-Jira Service Management projects can still be worked on in the usual way, but the approval step will not be enforced for those issues.

ワークフローには複数の承認ステップを追加することが可能です。また、承認ステップで 1 人以上の承認が必要かどうかを指定できます。たとえば、まず管理者がリクエストを承認し、次に財務チームの 2 人のメンバーがリクエストの最終承認を行うようにできます。顧客に承認者を選択してもらうかどうか、または定義済みのリストから承認者を選択するかどうかも指定できます。

If you want to enforce an approval, so that an approver must make a decision before the request can be progressed, you should set the approval step on a status that only has two outgoing transitions, one to Decline and one to Approve. You can set the approval step on a status that has more than two outgoing transitions, but you can only enforce two of these, the additional transitions can be actioned by a Jira Service Management agent. For example, there may be exceptional circumstances where you can't wait for an approval, so you need a way to progress the request manually.

Having additional transitions on the status with the approval step allow your agents to progress the request. Transitions used by the approval step skip transition screens, so if your decline or approve transitions are going to a 'Done' status, add a post function that sets the resolution of the request so it's considered closed by Jira Service Management.

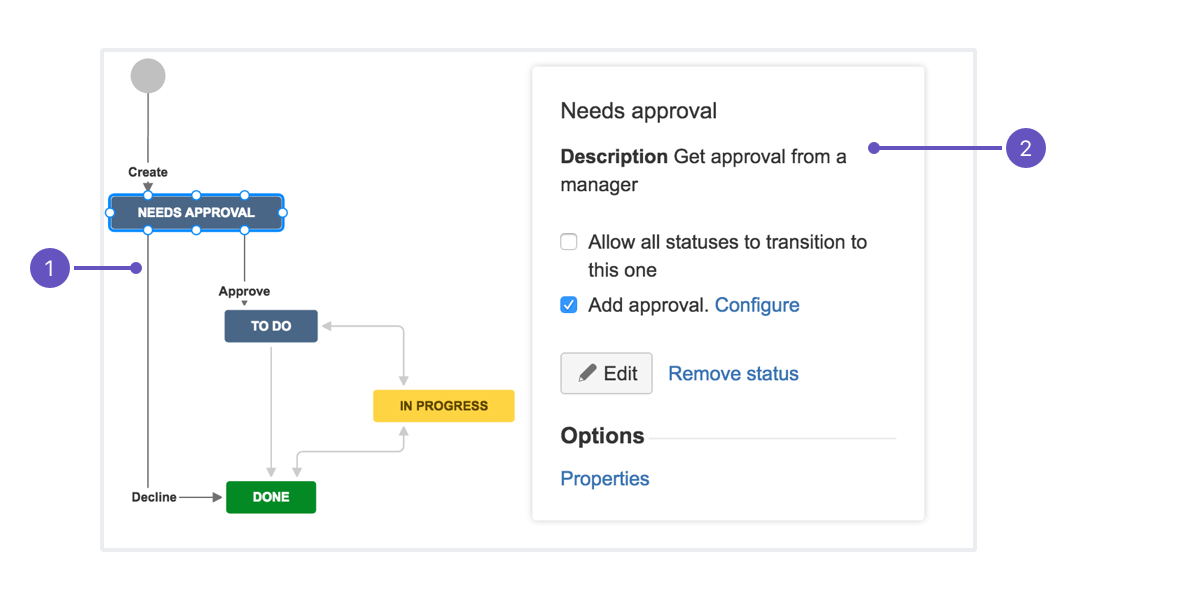
ワークフローで承認トランジションが必要です。画像の下に注釈の説明があります。

  1. 却下: このトランジションは「完了」ステータスへ移動します。解決策を設定してリクエストを終了する事後操作が必要です。
  2. 説明: ステータスの説明から生成されますが、カスタマー ポータルには表示されません。

動作の仕組み

承認ステップは、ワークフロー ステータスに設定できる追加の設定項目です。リクエストがこのステータスに遷移すると、指名された承認者は保留中の承認があることを知らせるメールを受け取ります。承認ステップが既存の 2 つの送信先トランジションのみを持つ場合、承認者がリクエストを承認または却下するまで、ほかのユーザーは操作することができません。エージェントは承認者を追加、編集、削除できますが、承認が完了するまではリクエストをトランジションできません。3 つ以上の既存のトランジションがある場合、エージェントは承認ステップで却下または承認に使用されないトランジションを経由して、課題を遷移させることができます。

JIRA インスタンスにユーザ ピッカー カスタム フィールドを追加し、ワークフローの承認ステップを設定するには、JIRA 管理者グローバル権限を持っている必要があります。リクエスト タイプにフィールドを追加するには、JIRA 管理者グローバル権限またはそのプロジェクトの管理者プロジェクト ロールを持っている必要があります。

1. インスタンスに定義済みのユーザ ピッカー カスタム フィールドがあることを確認します。

ユーザ ピッカー カスタム フィールド(マルチユーザ)はインスタンスに定義されている必要があり、承認ステップを追加するワークフローに関連付けられている作成および編集画面に追加される必要があります。2つ以上の承認ステップに同じフィールドを使用することができますが、同じワークフローに2つ以上の承認ステップが必要な場合には、混乱を避けるため、異なるユーザ ピッカー カスタム フィールドを各承認ステップに使用することをお勧めします。リクエスト タイプについて、カスタマー ポータルに追加できるように、ユーザ ピッカー カスタム フィールドの名前を覚えておいてください。

2. ワークフローに承認ステップを追加します。

Jira Service Management request types are mapped to JIRA issue types, and the issue types are in turn mapped to a workflow. When you add the approval step to a workflow, it will applied to all issue types mapped to that workflow, and hence all request types mapped to those issue types. It's important to make sure your approval step is valid for all issue types. If you want to add an approval step for one request type that's mapped to a workflow which is applied to multiple request types, you should create a separate workflow and issue type that you can map to the request type individually. For more information on how to do this, read up on creating issue types, associating issue types with projects, and working with workflows.

承認ステップを追加する前に、ステータスに少なくとも2つのアウト トランジションがあることを確認する必要があります。拒否または承認を使用するトランジションのいずれかを完了カテゴリにあるステータスにリードする場合、リクエストの解決状況を設定するトランジションの事後操作も設定する必要があります。

承認ステップを追加する方法:

  1. 画面右上で [管理] > [プロジェクト] の順に選択して、該当のプロジェクトを選択します。
  2. プロジェクト設定メニューでワークフローを選択します。プロジェクトに関連付けられているすべてのワークフローが表示されます。
  3. 編集するワークフローの [アクション] 列の [編集] を選択します。
  4. 承認ステップを追加したいステータスを選択します。ステータス ダイアログが表示されます。
  5. ステータス ダイアログの承認の追加チェックボックスをチェックします。承認の追加ダイアログが表示されます。
  6. ユーザ ピッカー カスタム フィールドで承認の追加ダイアログに、何人の承認者が必要か、どのトランジションを承認および拒否に使用するかを入力します。
  7. 作成をクリックして承認ステップを追加します。

公開をクリックして、ワークフローを利用可能にすることを忘れないで下さい。承認ステップを使用するトランジションが完了カテゴリのステータスにリードする場合、リクエストの解決状況がクローズとして表示されるように設定する事後操作があることも確認してください。

3. ユーザ ピッカー カスタム フィールドを設定します。

使用ケースに応じて、承認ステップで選択したユーザ ピッカー カスタム フィールドを構成する方法が3つあります。

  1. 顧客に承認者を選んでもらう場合 - これは自分が承認者が誰になるか知らない場合に有用ですが、顧客は例えばその上司を選択します。このシナリオでは、顧客がリクエストを作成した際に選択することができるように、ユーザ ピッカー カスタム フィールドはポータルで利用可能であることを確認する必要があります。
    リクエスト タイプにユーザ ピッカー カスタム フィールドを追加する方法:
    1. 画面右上で [管理] > [プロジェクト] の順に選択して、該当のプロジェクトを選択します。
    2. プロジェクト リストから必要なプロジェクトを選択します。
    3. プロジェクト設定メニューメニューで、リクエスト タイプを選択します。
    4. フィールドを追加するリクエスト タイプの操作列で、編集フィールドを選択します。
    5. + フィールドの追加をクリックし、追加するフィールドを選択して適用をクリックします。フィールドがリクエスト タイプに追加されます。
    6. 選択してテキストを入力することで、表示名(カスタマー ポータルで表示する名前)とフィールド ヘルプ(カスタマー ポータルでフィールドの隣に表示される情報)フィールドを編集します。この時点でフィールドを任意にするかどうかを決めることもできます。更新をクリックして、変更を保存します。
    7. このフィールドは表示として追加されます。ドラッグ アンド ドロップでフィールドの順番を変更することができます。
  1. You want to set a pre-defined list of approvers - This is useful if the customer doesn't know who the approver may be, or if you know that there is a set list of approvers for the request. The customer won't need to enter any approvers when they create the request, and when the request is transitioned to the status that has the approval step, the pre-defined set of approvers will be notified. In this scenario, you need to add the user picker custom field to your request type as described above, and then select the option to Hide it. At this point, Jira Service Management will ask you to populate a list of approvers. Save this, and your field is hidden and your list of approvers is set.
  2. エージェントが承認者を指定する場合 - これは顧客が承認者を知らず、承認者がリクエストの情報に依存する場合に有用です。この場合、エージェントはリクエストを確認し、手動で承認者を追加する必要があります。サービス プロジェクトのリクエストを表示すると、ユーザー ピッカー カスタム フィールドがリクエストのユーザー セクションに表示されます。必要な変更をインラインで行うことができます。すべての承認者を一覧表示する承認セクションもありますが、これは編集できないことに注意してください。フィールドが表示されない場合、Jira 管理者に、まだプロジェクト画面で利用可能なフィールドを確認してもらう必要があります。
最終更新日 2021 年 7 月 1 日

この内容はお役に立ちましたか?

はい
いいえ
この記事についてのフィードバックを送信する
Powered by Confluence and Scroll Viewport.