ブランチ
Bitbucket Data Center and Server makes it easy to use a branching workflow for your Git development process. This page describes how to use to use branches with Bitbucket.
On this page:
ブランチの作成
You can create a new branch from within JIRA Software or in Bitbucket. Bitbucket suggests the Branch type and Branch name based on where you are creating the branch from in the application. You can change these values depending on your branching model.
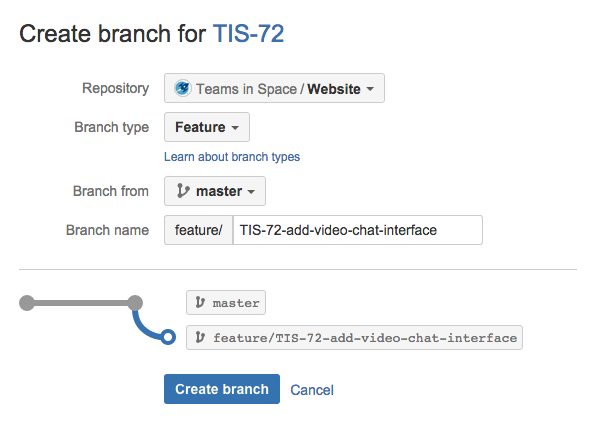
When creating a branch, you will provide this information for each branch:
- the Repository
- the Branch type, if a branching model has been previously configured – choose Custom if you need an ad hoc branch type
- the Branch from point – you can choose either a branch or a tag.
- the Branch name – the prefix is based on the branch type you selected, and as defined by the branching model.
Create a branch from JIRA Software
To create a branch when viewing an issue in JIRA Software:
Must have JIRA Software version 6.1 or above, and it must be connected with Bitbucket by an application link.
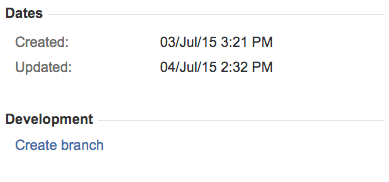
- In the Development pane, click Create Branch (requires the View Development Tools project permission).
- Choose the SCM, if more than one is available, where you want to create the branch.
Select the Branch type and Branch name, then click Create branch. Bitbucket suggests a Branch type based on the JIRA Software issue type, when a branching model is configured.
- Once the new branch is created, Bitbucket takes you to the file listing for that. You can now pull to your local repository and switch to the new branch.
Create a branch from Bitbucket
ブランチを作成するには:
- In Bitbucket, choose Create branch from the sidebar.
- Select the Branch type and Branch name.
- Click Create branch. Once the new branch is created, Bitbucket takes you to the file listing for that. You can now pull to your local repository and switch to the new branch.
Configure branching models
With Bitbucket you can use branching models to define a branch workflow for repositories. When you map your workflow to repository branches with a branching model, admins can guide developers to name branches consistently by configuring which branch types to make available. There are a number of branch types available, and several branch types have default branch naming prefixes (described below). You can also specify your own naming convention for each branch type. A consistent naming convention makes it easier to identify branches by type.
Branch types
Bitbucket comes with several types of branches that are frequently used in software development. This section explains what each branch type is for, and has the typical naming convention for the prefix for each branch type. The prefix can be changed for each branch type.
Development branch Usually the integration branch for feature work and is often the default branch or a named branch. For pull request workflows, the branch where new feature branches are targeted. | varies |
Production branch Used for deploying a release. Branches from, and merges back into, the development branch. In a Gitflow-based workflow it is used to prepare for a new production release. | varies |
Feature branch Used for specific feature work or improvements. Generally branch from, and merge back into, the development branch using pull requests. See Feature branch workflow. | feature/ |
Release branch Used for release task and long-term maintenance versions. They branch from, and merge back into, the development branch. Merging into an older release branch can be configured to automatically merge to newer release branches, as well as the development branch. | release/ |
Bugfix branch Typically used to fix Release branches. | bugfix/ |
Hotfix branch Used to quickly fix a Production branch without interrupting changes in the development branch. In a Gitflow-based workflow, changes are usually merged into the production and development branches. | hotfix/
|
By default, branch settings set at the project level are inherited by the repositories. Repository admins can either choose to inherit the project-level settings or override it by configuring custom settings at the repository level.
Later when you modify project settings, only settings in repositories that are set to inherit the project-level setting change to match the project branch settings.
Starting from Bitbucket 8.10, project admins can also restrict changes to repository-level settings. Note that when you restrict changes, any custom settings saved at the repository-level are deleted and the repositories inherit project settings.
Configure a project's branching model
New repositories will have the branching model enabled by default, and use the default branch prefixes.
- Enabled branch types can't have empty prefixes, have a 30 character limit, and can't overlap (for example PROD and PRODUCT would overlap).
To configure a branching model for a project (requires project admin permission):
- Go to Project settings > Branches.
- Choose the details of branching model for repositories that inherit the project settings, then select Save.
- Optional: To restrict repository-level changes, select Don't allow changes to branch settings from the Restrict changes to repository settings menu.
Configure a repository's branching model
リポジトリのブランチ モデルを設定する方法は、次のとおりです (リポジトリ管理者権限が必要)。
- Go to Repository settings > Branches.
- Under Project settings inheritance, select Use custom settings.
- Choose the details of your repository branching model, then select Save.
Automate the branch workflow
Bitbucket can automate some merges in the branch workflow, based on the branching model for the repository. Learn more about cascading merge
Find and manage branches
The branch listing page makes it easy to keep track of all the branches in your repository, to get there just select Branches from the side navigation bar.
The branch listing allows you to:
- See how many commits behind or ahead your branch is compared to a chosen 'base branch'.
- See the latest status for pull requests originating from branches.
- See the build status of branches at a glance.
- Track the review and merge work that still needs to be done and can help with branch cleanup.
- Identify work in progress as well as stale branches. It is calculated for each branch against the base branch.
| Behind/Ahead | Shows by how many commits a branch has diverged from the (default) 'base branch'. Use the branch selector to change the base branch. |
|---|---|
| プル リクエスト | Shows the relevant state of pull requests against each branch – click the status to see detailed pull request information.
|
* Builds | Shows the status of the latest build results published to Bitbucket. The overall status is 'passed' if all the different builds (for example, unit tests, functional tests, deploy to staging) succeeded and 'failed' if at least one run failed for any of those. Click an icon to see details of the builds. |
| アクション | Menu that includes tasks for working with branches. |
* Only if you have an integrated build server.
Search for branches
You can easily find branches by using the search at the top of the table on the Branches screen. If you're using a branching model, you can filter by branch type simply by searching for the prefix – for example, search for "feature/" to see all your feature branches.
You can find the feature and bugfix branches that haven't yet been merged into a particular release (for example, "release/2.10") by changing the 'base branch' – just use the branch selector to change the base branch, and refer to the Behind/Ahead and Pull requests columns.
Branch deletion when merging a pull request
When you merge a pull request, you can choose to delete the source branch after merging is complete. Project and repository admins can set the default behavior to either On (the branch will be deleted after merge) or Off (the branch will not be deleted after merge). Users can override this setting when they merge a pull request.
Set the default for branch deletion on merge
Branch deletion on merge is set to Off by default, therefore the option to delete the branch in the Merge pull request dialog will not be selected.
To change the default status of deleting a source branch on merge for a project (requires project admin permission):
- Go to Project settings > Branches.
- Under Branch deletion on merge, select one of the following options:
- Off - When merging a pull request, the option to delete a source branch will not be selected.
- On - When merging a pull request, the option to delete a source branch will be selected.
To change the default status of deleting a source branch on merge for a repository (requires repository admin permission):
- Go to Repository settings > Branches.
- Under Project settings inheritance, select Custom settings.
- Under Branch deletion on merge, select one of the following options:
- Off - When merging a pull request, the option to delete a source branch will not be selected.
- On - When merging a pull request, the option to delete a source branch will be selected.


