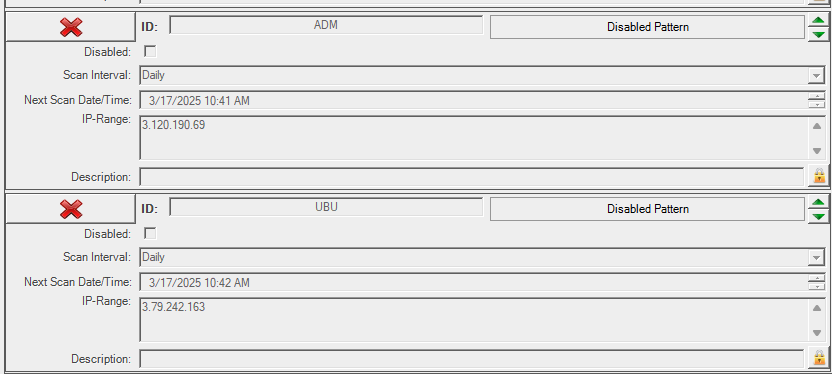
スキャン設定を構成する
| 設定 | 説明 |
|---|---|
無効 | If you select this option, Discovery will ignore the scan settings when it is running. |
スキャンの間隔 | 構成した設定を実行する間隔の種類 (毎日または毎週) を選択します。 |
Next Scan Time/Date (次のスキャン日時) | Depending on the interval, you can set the next time or date when the scan should run. The setting value is saved in the Discovery.cfg file in the local date time format for the machine where Discovery is installed. 例: |
無効なパターン ファイル | Select one or more patterns that will be disabled when Assets Discovery is executing this scan. If you are scanning different areas of your network separately, you can disable unused patterns to save time. |
説明 | A description of the scan setting. |
鍵 | Select the lock icon at the lower-right corner of the Scan Settings to lock or unlock changes to these settings. |
IP-Range | Enter the IP address(es) to scan when Assets Discovery executes. Special modifiers are available for IP's. You can combine them using the semicolon separator. |
IP variations, modifiers, and examples
次のバリエーションを使用できます。
バリアント | 説明 |
|---|---|
| 192.168.178.10 | A single IP of a host system. |
| 192.168.178.10;192.168.178.22 | Two IPs separated by a semicolon. |
| myserver.company.org | DNS Name of a host. |
| 192.168.178.10~20 | A given range of IPs from a subnet. |
| 192.168.178.0/24 | All 254 IPs of a subnet, specified using the CIDR notation. |
| [2001:0db8:85a3:08d3:1319:8a2e:0370:7344] | A single IPV6 address. |
iprange.txt rangqsfolder/subrange2.txt | A text file specifying the location of the address information, which can contain the previous described range types. The text file is read with every execution of Assets Discovery. |
You can also use a number of modifiers to specify which hosts and ports to include when Assets Discovery scans your system.
修飾子 | 説明 | 例 |
|---|---|---|
~ | Use the tilde modifier to force a scan if the ICMP echo on a host system is disabled. | 192.168.178.10~ |
| :<Port> | Use the colon modifier to change the default SSH or SNMP Port if it is changed on a Host system. | 192.168.178.10:1387 |
| ! | Use the exclamation mark modifier to set IPs that should be ignored. | 192.168.178.150-170! |
組み合わせ例:
IP 範囲の例 |
|---|
| 172.70.10.18:2256;172.80.10.90-200;192.168.70.99~ |
| 177.20.80.2-100;177.20.80.50-90! |
| 177.20.80.2-100;177.20.80.50-90!;rangefoled\iprange1.txt;rangefolder\iprange2.txt |
| 192.168.178.10-50;172.213.13.100/27;172.20.222.200/29 |
| 192.168.178.10~;172.213.13.0/24 |
| [2001:0db8:85a3:08d3:1319:8a2e:0370:7344]:55221 |
For IPV6 addresses, it is actually only possible to use single addresses, not ranges. Remember to use braces, around the address.
Adding a scan setting
You can add multiple scan settings for Assets Discovery to execute. This could be useful if you wanted to run scans or different parts of your system at different intervals.
To add a scan setting, select the '+' button at top.
Deleting a scan setting
- To delete a scan setting, select the 'x' button at top.
- In the Delete Entry screen, select Yes.
Testing a scan setting
Once you have configured a scan setting, you can test the scan without running a full execution of Assets Discovery. The results are displayed immediately, and a more detailed Evaluation Report is saved to your \logs\ directory.
- Select Start Evaluation-Report.
- Enable or disable the fast checkbox:
- If enabled, Assets Discovery tests your scan settings using ICMP pings only.
- If disabled, Assets Discovery tests your scan settings by trying each individual connection.
- Select Start to begin the test scan. When the scan is complete a success message will be displayed that includes the location of the saved Evaluation Report.

