Jira Cloud と GitHub の接続
When your GitHub or GitHub Enterprise account is linked to Jira Software, your team gets to see their branches, commit messages, pull requests, builds and deployments right in the context of the Jira Software issues they're working on. Read more in Integrating with development tools.
Connect a GitHub account to Jira Software
Marketplace アプリを使用して、Jira Cloud と GitHub を連携できます。Jira の使用経験が長いユーザーの場合、これがこれまでの方法と大きく異なることにお気づきかもしれません。
You can learn more about the integration and raises issues from GitHub's open source repository, or contact the Atlassian team for help.
Jira Software and GitHub have created free apps in their marketplaces that allow you to view activity in your source code repository inside of your Jira tickets. Linking between these accounts gives you quick, direct access to branches, commits, pull requests, builds and deployments while viewing Jira Software tickets in planning and during standups.
To connect a GitHub account with Jira Software:
Atlassian Marketplace から Jira 向け GitHub アプリ (無料) をインストールして、指示に従ってインストールを完了します。
[始める] を選択します。
[組織を追加] を選択します。
統合する GitHub アカウントを見つけて [インストール] を選択します。
GitHub の設定ページが Jira に表示されます。
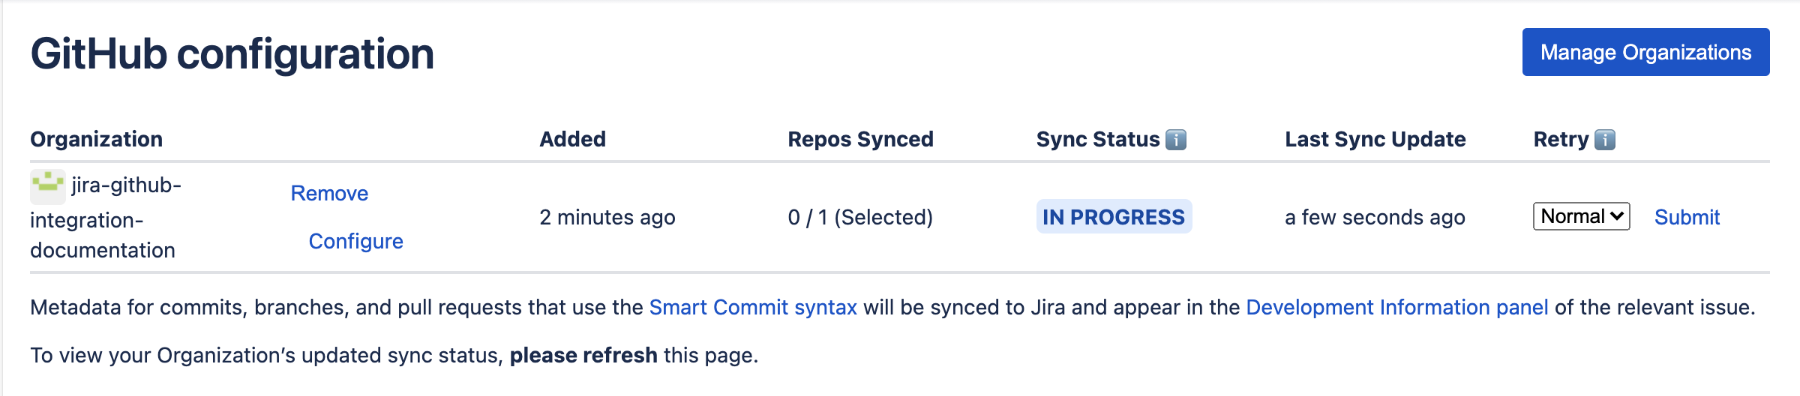
これで、サイトにある Jira 課題を参照するブランチ、コミット、プル リクエスト、ビルド、デプロイに関する開発情報が表示されるようになりました。開発作業から課題を参照する方法をご確認ください。
Connect a GitHub Enterprise account to Jira Software
To connect your GitHub Enterprise account to Jira Software, you use the DVCS Connector provided in Jira.
By the way, you'll need to have admin permissions on both Jira Software and on the GitHub Enterprise account you want to link.
次の手順を実行します。
ステップ 1. GitHub Enterprise アカウント用に OAuth アクセス トークンを作成
DVCS コネクタには OAuth アクセス トークンが必要です。アクセス トークンはGitHub Enterprise アカウントで作成します。アクセス トークンは、リンクするリポジトリを所有している GitHub Enterprise アカウントで作成する必要があります。チームのリポジトリをリンクする場合、チーム アカウントを使用してこのトークンを作成する必要があります。
次のように OAuth トークンを作成します。
- GitHub Enterprise に、アカウントの管理者権限を持つユーザーとしてログインします。
- プロファイルの編集を選択します。
- OAuth アプリケーションを選択します。
- 開発者アプリケーション タブを選択します。
- 新しい OAuth アプリケーションの登録を選択します。
- アプリケーション名に名前を入力します。
Enter the Jira Software URL for both the URL and Callback URL fields. Use lower case. Press Register Application.
Make sure you enter the Jira Software Base URL (for example,
https://myjiracloud.atlassian.net/) for both the Homepage URL and Authorization callback URL fields. Don't use the dashboard URL, such ashttps://myjiracloud.atlassian.net/secure/Dashboard.jspa.- ステップ 2 の実行中は、GitHub Enterprise アカウントでブラウザを開いたままにしてください。
Step 2. Add the OAuth token in Jira Software
After you create a key and secret in GitHub Enterprise, you go back to Jira Software and enter the account, the OAuth key, and secret as follows:
- Log in to Jira Software as a user with admin permissions.
 > [製品] を選択します。
- 左側の統合セクションで、DVCS アカウントを選択します。
- [GitHub Enterprise アカウントをリンク] をクリックします。
GitHub ユーザー アカウント名を入力します。
- [Host URL] として GitHub Enterprise サイトの URL を入力します。
[クライアント ID] と [クライアント シークレット] 値を GitHub Enterprise サイトからダイアログにコピーします。
- 既定の自動リンクとスマートコミットをそのままにする (推奨) か、変更します。
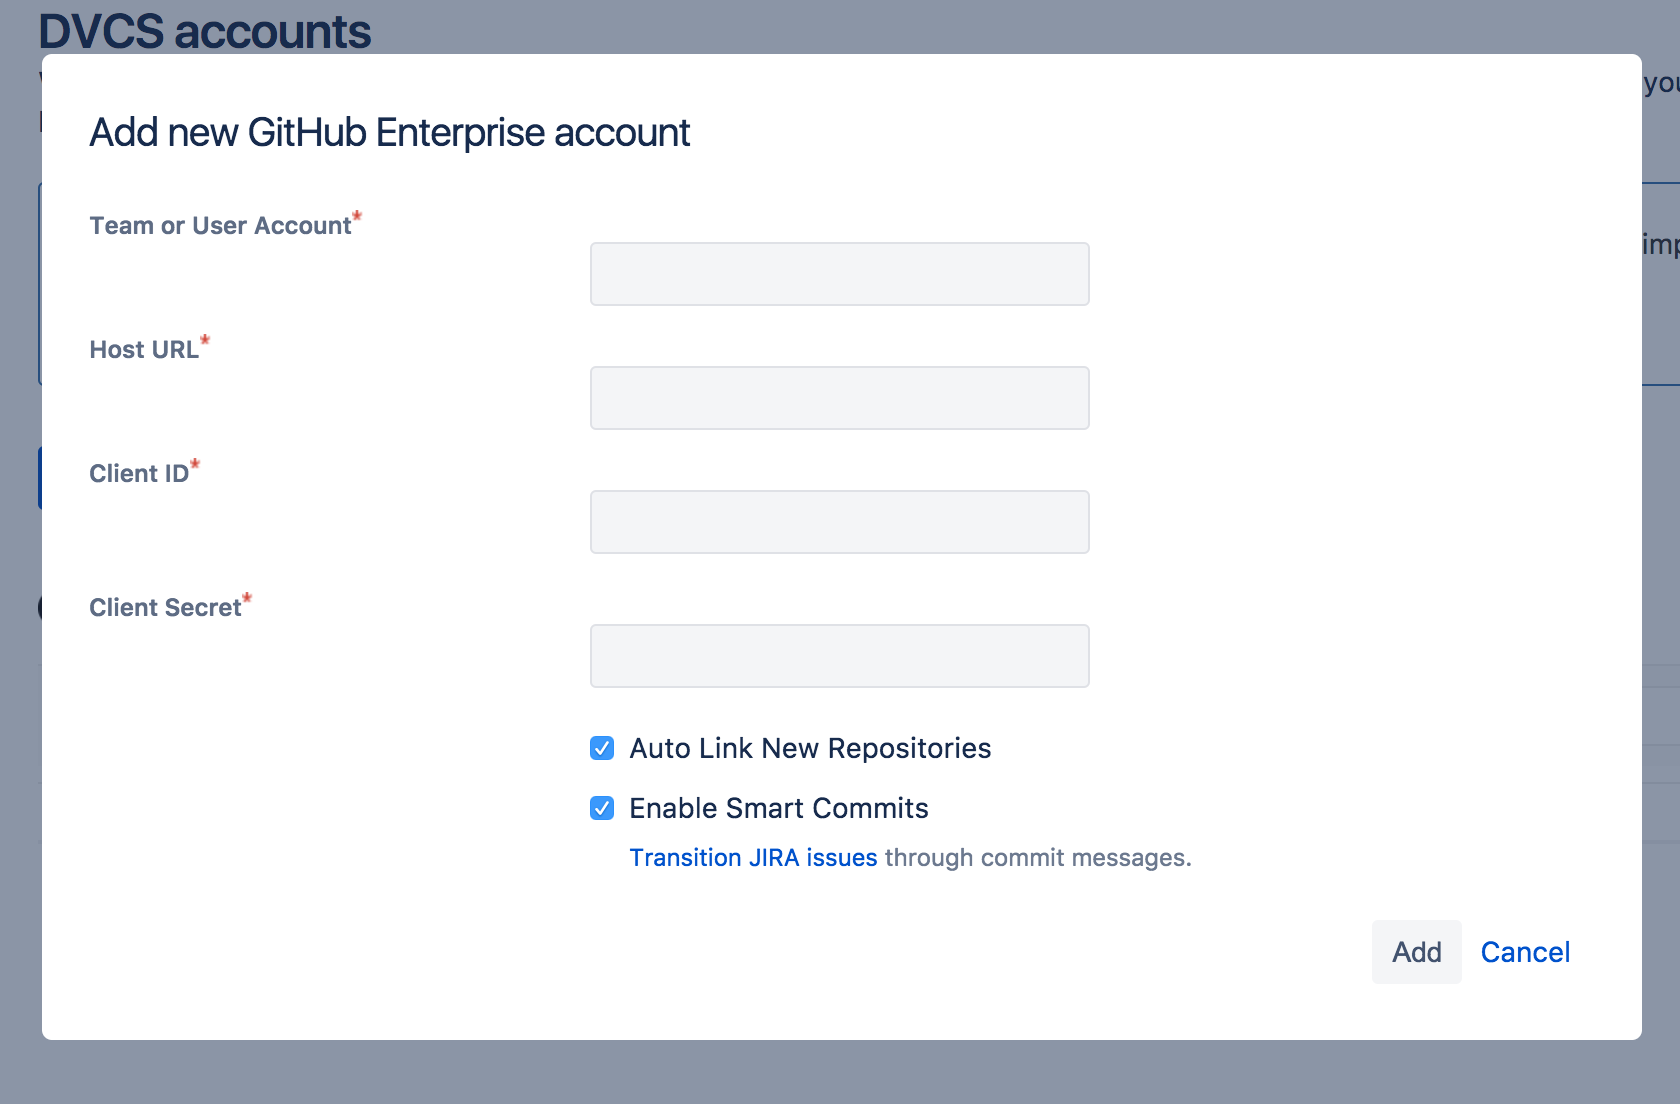
追加をクリックします。この時点でブランクページにリダイレクトされた場合、「GitHub への DVCS 接続でブランクページが生成される」を参照してください。
- プロンプトが出たらアクセスを許可します。
- Jira が正常に接続されると、「DVCS アカウント」ページにご使用のアカウントが表示されます。
接続したアカウントとそのすべてのリポジトリが、「管理対象 DVCS アカウント」ページに表示されます。最初の同期が自動で開始します。それ以降、システムは定期的にリポジトリの同期を継続して行います。
GitHub Enterprise アカウント用の OAuth アクセス トークンをリセットする
OAuth トークンを再生成するには、次の手順に従います。
- GitHub Enterprise に、アカウントの管理者権限を持つユーザーとしてログインします。
- [設定] > [開発者設定] > [OAuth アプリ] の順に移動します。
- OAuth アプリを選択します。
- アプリのページで [Revoke all user tokens (すべてのユーザー トークンを取り消す)] をクリックして、このアプリケーションのすべての古いユーザー トークンを削除します。
- [Generate a new client secret (新しいクライアント シークレットの生成)] をクリックします。
- 新しいクライアント シークレットをコピーして、古いクライアント シークレットを削除します。
- Jira の DVCS アカウント ページに移動します。
- 既存の GitHub Enterprise アカウントまたはワークスペースの横にある [その他のオプション] (•••) メニューをクリックします。
- [OAuth 設定をリセット] を選択します。
- 既存のクライアント ID をキーとして、新しいクライアント シークレットをシークレットとして貼り付けて、アクセス トークンを再生成します。
接続に関する注意事項
コネクターは、キーとシークレットを自動的には信頼しません。アカウントとパスワードの組み合わせを使用して DVCS への接続を認証することを求められます。認証するアカウントは、キーとシークレットの作成に使用したアカウントではなくてもかまいませんが、リンクするすべてのリポジトリに対して管理アクセス権限を持つアカウントである必要があります。
Jira DVCS コネクタを使用してアカウントをリンクすると、コネクタは GitHub Enterprise のアカウントで所有しているすべてのリポジトリにコミット後の webhook を追加します。コミットが発生すると、DVCS コネクタはコミット メッセージを収集して処理します。
On the Jira Software side, the repositories owned by your GitHub Enterprise account appear on the 'DVCS accounts' page. A team member may create repositories under their individual GitHub Enterprise account, but assign the team as the owner. These repositories also appear in the list.
自動同期と、リンクの一時的な無効化
After you link an account, Jira Software automatically starts looking for commits that reference issue keys. The summary shows the synchronization results and errors if any. A synchronization of commit data from the GitHub Enterprise repository to Jira Software can take some time. As the synchronization progresses, the commits appear in related issues. You can always enable and disable the linking of repositories with Jira Software as needed.
Example of how commit information appears in a Jira Software project
When a developer makes a commit, they should add a Jira Software issue key to the commit message, like this:
git commit -m "PROJ-123 add a README file to the project."
git push origin <branchname>
Jira Software uses the issue key to associate the commit with an issue, so the commit can be summarized in the Development panel of the Jira Software issue.
詳細は、開発ツールとの連携 を参照してください。
Project users must have the 'View Development Tools' permission to see commit information in the Development panel in a Jira Software issue. A Jira Software admin can edit a project's permission schema to grant this permission. See Managing Project Permissions.
リポジトリ アクティビティを使用して、企業管理対象プロジェクトの課題を自動でアップデートする
企業管理対象のソフトウェア プロジェクトでは、GitHub リポジトリでアクティビティが発生したときに、課題のワークフローを自動化して課題をトランジションできます。
これを行う際は Automation for Jira のご利用をお勧めします。ワークフローを自動化するには、次の手順に従います。
企業管理対象プロジェクトに移動します。
[プロジェクト設定] > [Automation] の順に選択します。
[ライブラリ] タブを選択します。
[DevOps] で、事前設定されたルールのいずれかを選択します。
ルールの設定をプレビューするときに、[オンにする] を選択して有効にします。
プロジェクトの Automation ライブラリには、接続されたソース コード ツールで開発が行われたときに、ワークフローに沿って課題をトランジションする 3 つの事前設定ルールが用意されています。
ブランチが作成されたら → 課題を「進行中」に移動
コミットしたら → 課題を「進行中」に移動
プル リクエストがマージされたら → 課題を「完了」に移動
ソース コード トリガーを使用して、Jira プロジェクトの他の部分を自動化できます。Automation for Jira の詳細をご確認ください。