How to copy configuration files between Discovery Tool and Discovery Agents
プラットフォームについて: Cloud および Data Center - この記事はクラウドと Data Center 両方のプラットフォームに等しく適用されます。
Support for Server* products ended on February 15th 2024. If you are running a Server product, you can visit the Atlassian Server end of support announcement to review your migration options.
*Fisheye および Crucible は除く
Some organizations need to deploy Discovery Agents on multiple hosts, such as laptops, and distribute Agent configuration files over the network. This task can be time-consuming if you manually copy each file to every Agent host. To make this process faster, you can copy configuration files between Discovery Agent hosts using the Asset Discovery tool.
このページの内容
はじめる前に
Before you start transferring files using the Asset Discovery tool, consider the following prerequisites and configurations needed to ensure a smooth and efficient process:
Patterns transfer only works on a relative path:
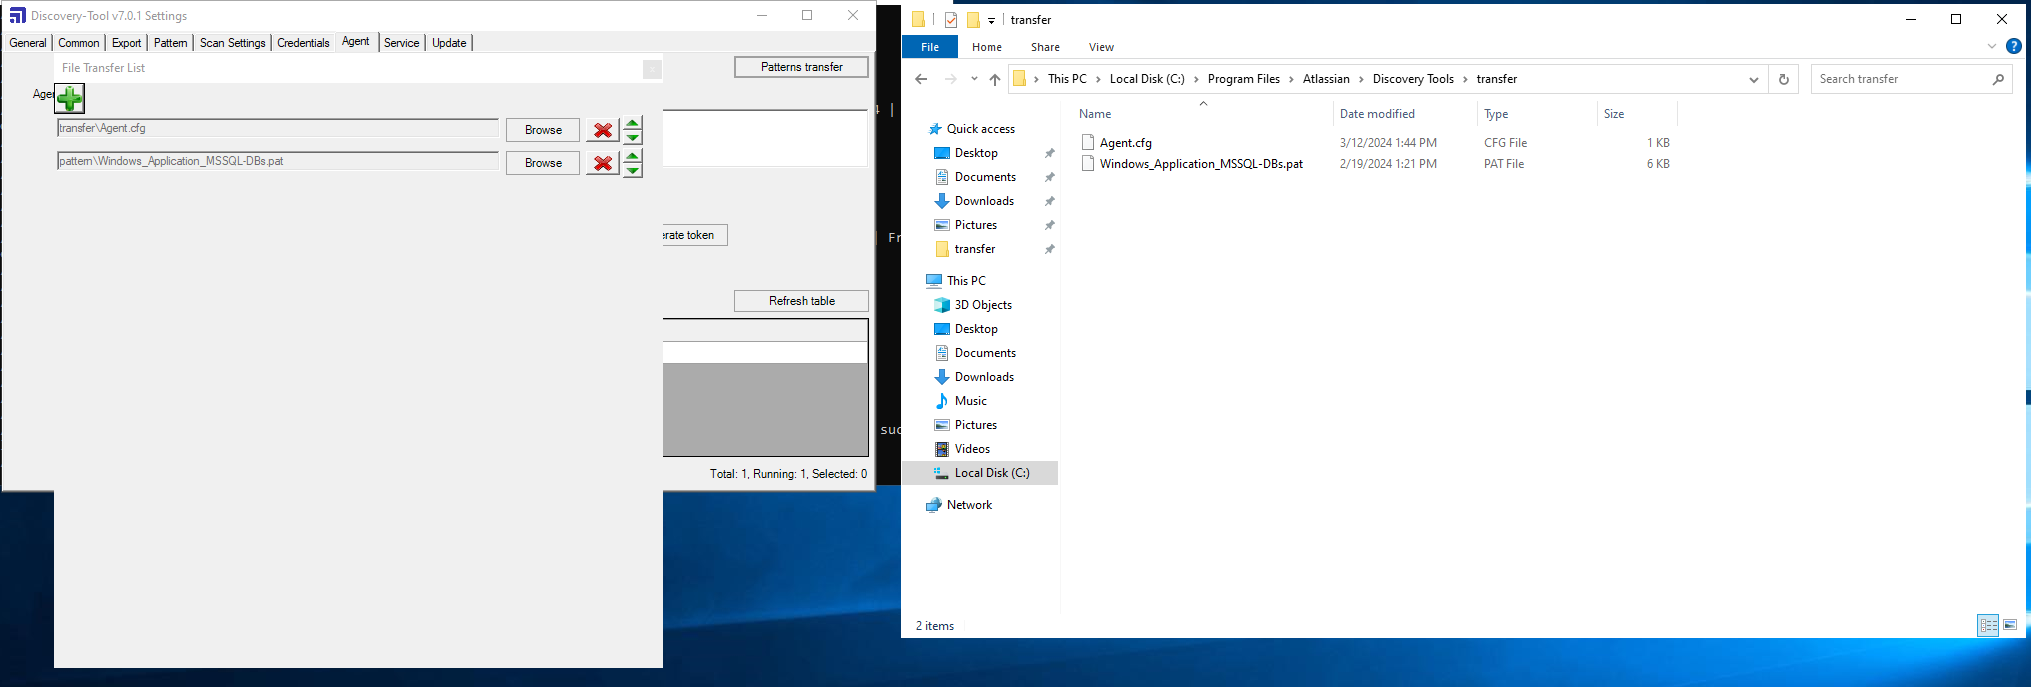
Source files must be within the Discovery tool installation directory. Files will then be copied to the Discovery Agents directory. For example, the
C:\Program Files\Atlassian\Discovery Agent Installerdirectory.If the source files are stored outside of the Discovery tool directory, they'll be copied to the Discovery Installation directory on the Agent host if it exist.
If modifications are made to the current files selected in Patterns transfer, the updated file will sync to all your Agents.
If the Discovery tool service is restarted, sync will be triggered automatically.
If the Agents are included in any of the Scan Settings IP Ranges, exclude them from the range by indicating the Agents' IPs with the modifier
!.
概要
Configuring and synchronizing files across all available Agents can be helpful in efficiently sharing updated files or configurations with multiple Agents. Transferring files can help speed up this process.
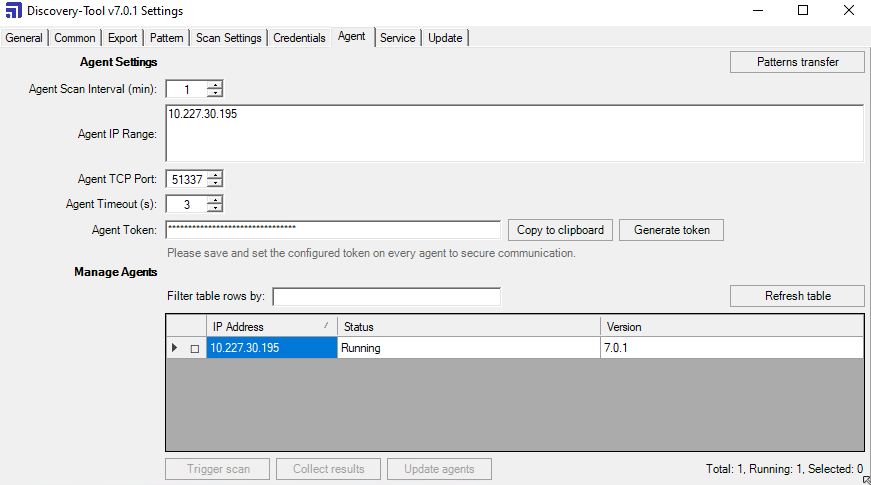
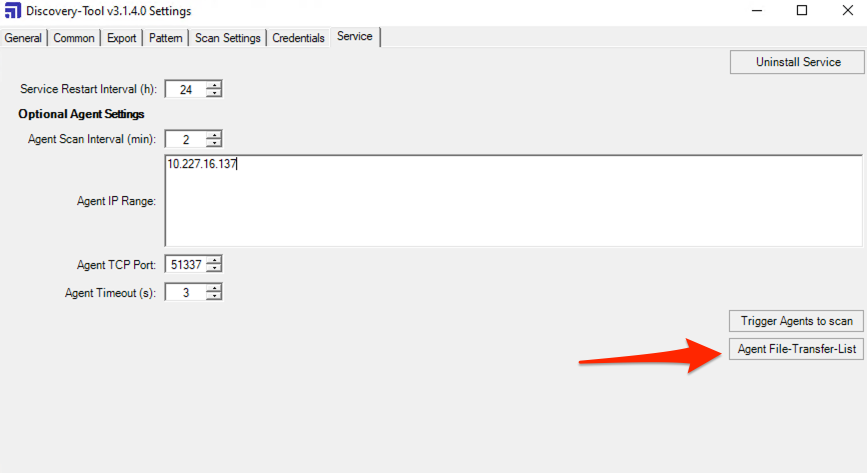
To transfer a file, open the Agent tab and select Patterns transfer. For Assets Discovery earlier than 7.x, go to Scan Settings and select Agent File-Transfer List.
Agent settings in Discovery Tool v7.x | Agent settings in Discovery Tool versions below 7.x |
|---|
Here, you can configure files synchronized with all available Agents at the configured range. Let's consider an example where you need to transfer a pattern file:
from a source file:
discovery_host/pattern/myCustomPattern.patto a destination file:
agent_host/pattern/myCustomPattern.pat
In addition to pattern files, you can sync other important files, such as Agent configuration files (Agents.cfg) or hash settings (ObjectHashSettings.xml). To sync these files, copy them to your main Discovery folder and select them for sync. This process applies if you've changed your source files and wish to distribute these updates to other Agents.
Synchronizing files
To sync the transferred files:
- In terminal, go to your Assets Discovery directory and type
discovery.exe -s. - Enter your password. If this is your first time using Asset Discovery, you'll be asked to enter and confirm a new password. This password must contain at least eight characters, including at least one uppercase, one lowercase, one numeric, and one non-alphanumeric (symbol) character.
- Open the Agent tab. Here, you can configure the following fields:
Agent Scan Interval - The interval, in minutes, is when the Discovery service checks with the Discovery Agents for new data available.
Agent IP Range - Define the Agents IP ranges that will be checked. You can define multiple ranges. When you define an Agent IP range, Discovery goes through it as per the time set up in the Agent Scan Interval field and tries to get data from the Agents. If an Agent has new data, it will perform an SSL handshake to encrypt data for this communication.
Agent TCP Port - The TCP Port of the available Agents in the configured IP Range.
Discovery tool uses the outgoing TCP port 51337.
Discovery-Agent TCP uses port 51337 as inbound.
Agent Timeout(s) - The default timeout for each connection to a remote agent. The default period is 3 seconds.
Agent Token - Add a secure token in this field or generate a token for all Agents and save it.
- Select Patterns transfer to configure files synchronized with all available agents at the configured range.
The files you want to transfer must be stored in the Discovery tool directory. Below are the screenshots from Discovery Tool v7.0.1 and 3.1.4. In this example, the Windows_custom.pat file will be copied to \Discovery Agent Installer\pattern Agent directory (with the IP address 10.227.16.137) based on the value set in the Agent Scan Interval field. In this case, after two minutes, as long as the Discovery tool is installed as a Service.
Enabling Discovery as a service
If Discovery isn't enabled as a service, you can manually trigger the transfer by following the steps below. Installing Discovery as a service is available under the Service tab.
As an administrator on your Windows or Linux system, open a command-line interpreter window.
Navigate to your Asset Discovery directory and type
discovery -stadin your terminal or command-line interpreter.You can display all the available commands with
Discovery -?. Explore Assets Discovery commands
Syncing Agent configuration files
To synchronize the Agent configuration file (Agents.cfg) across all the Agent hosts in Discovery 7.x and later:
- Set the agent token.
- Within the
Agent.cfgfile intended for duplication, the <SaveTimeStamp> value must be modified by adding a future date, for example, advancing it by one day. Failure to do so will result in the copiedAgent.cfgfile being overwritten with the previous version shortly after.


