Managing permissions
- インスタンスの設定
- プロジェクトを作成する
- 新規ユーザーの追加
- Managing permissions
Jira Core でチーム内のユーザー全員が同レベルのアクセス権を持つ事は望ましくありません。たとえば、Jira Core の管理者権限を持つユーザーを制限したり、ほかのユーザーがプロジェクトを表示できないようにしたりすることができます。このステップでは、Jira Core のさまざまな権限について学び、新しいプロジェクトに権限を設定します。
ロール、グループ、ユーザーの概要
ロールとは、プロジェクト固有のグループや個別のユーザーの集合を表します。T シャツ ビジネスのデザイン プロジェクトの例では、すべての製品マネージャーがすべてのプロジェクトで作業 (課題) を割り当てる権限を持ち、シニア デザイナーは特定のデザイン プロジェクトで作業を割り当てる権限を持っている必要があります。Jira Core では、製品マネージャー ロールを定義して、すべての製品マネージャーにこのロールを設定できます。その後、このロールに対して「課題の割り当て」を可能にする権限セットを定義し、この権限セットをすべてのプロジェクトに適用できます。必要に応じて、各プロジェクトの「製品マネージャー」ロールにシニア デザイナーを個別に追加することができます。
グローバル権限とプロジェクト権限の概要
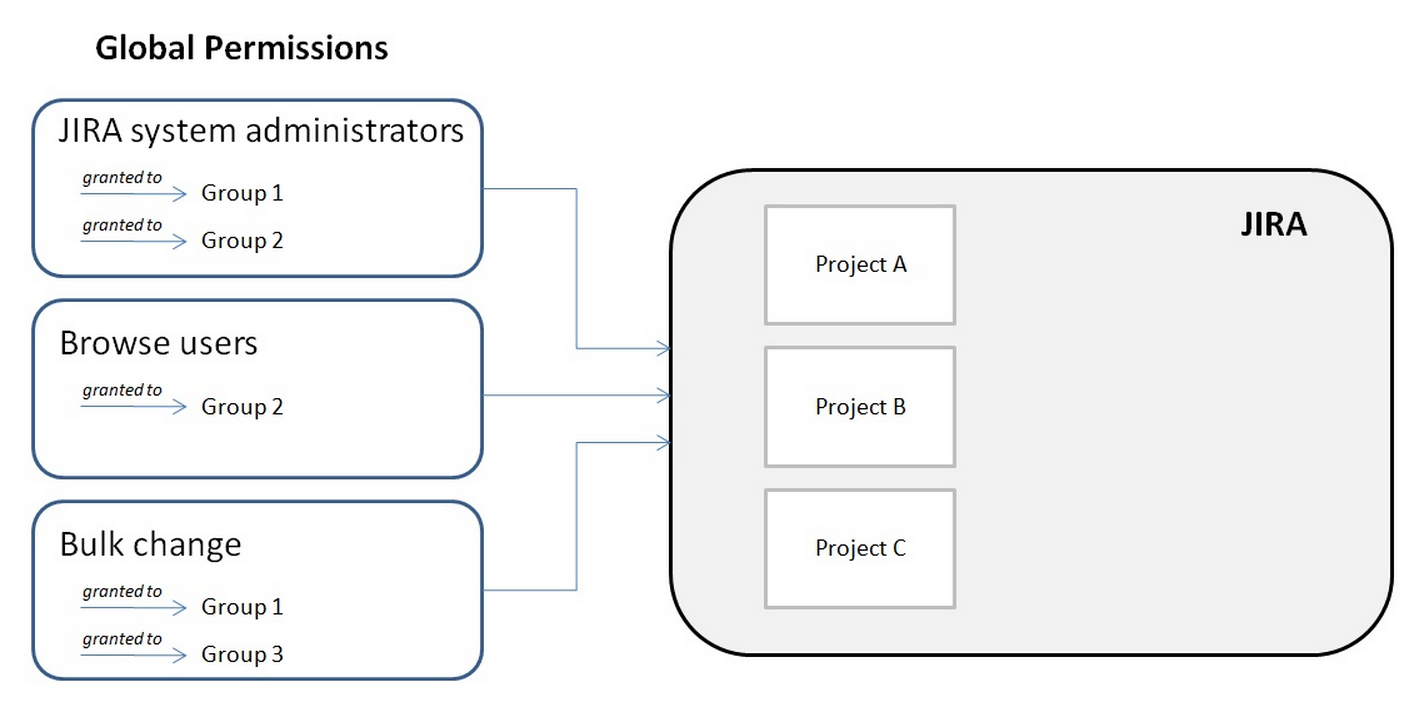
グローバル権限は、Jira Core のすべてのプロジェクトに影響する小規模な機能セット (Jira Core の管理権限など) を網羅します。グローバル権限は、グループにのみ割り当てることができます。
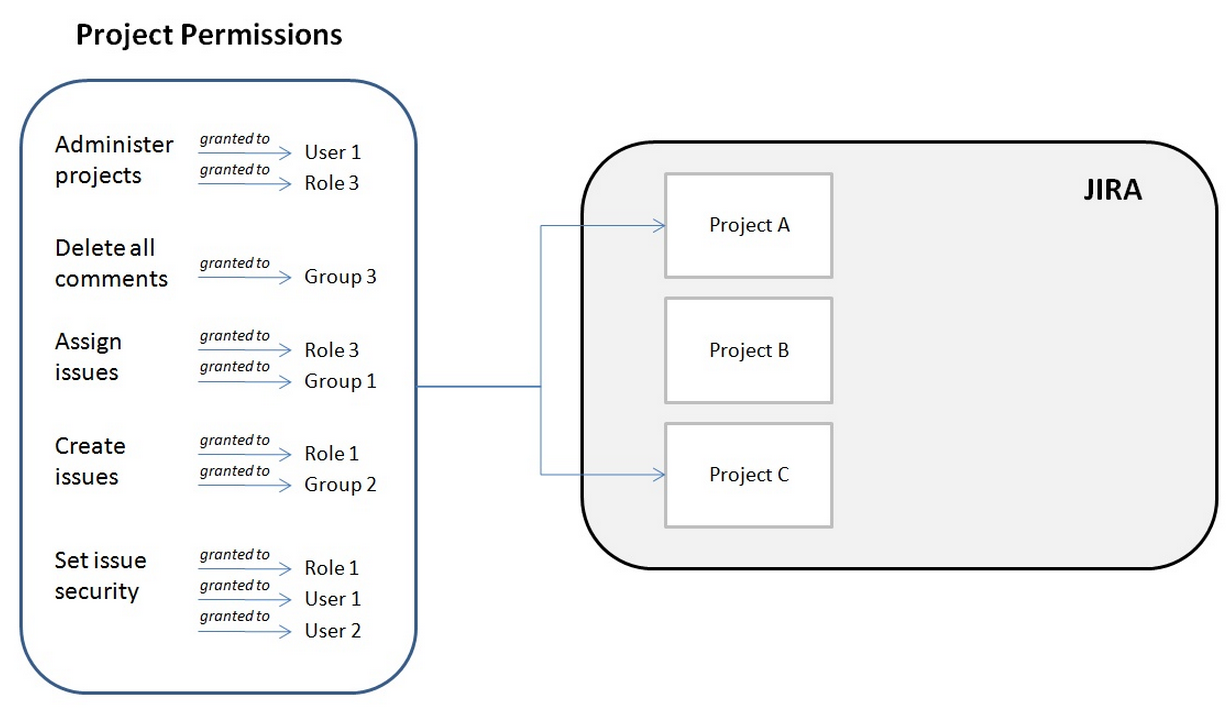
プロジェクト権限は、Jira Core の個々のプロジェクトに影響するさらに細かい機能セットに対応します。たとえば、特定のプロジェクトで課題を作成する権限などです。プロジェクト権限は、グループ、ユーザー、プロジェクト固有のロールに割り当てることができます。
それでは実際にやってみましょう。新しい、秘密のTシャツ デザイン プロジェクトをユーザーから非表示にするために、プロジェクト権限を使用するタスクを実行します。
新しいプロジェクト ロールの作成
このプロジェクト ロールには、特定のプロジェクトを参照させるようにしたいユーザーのみを含めるようにします。次のステップで、このロールに権限を適用します。
- [管理] () > [システム] を選択します。
- セキュリティセクションで、プロジェクトロールを選択します。
- 既存のプロジェクトロールの下に、「レビュー」と名付けたプロジェクトロール名を追加します。今は説明フィールドを空白のままにし、プロジェクトロールを追加するを選択します。
- 既定のメンバーを管理するを選択し、次に既定のユーザーの下から編集するを選択して、自分とJasonをレビューロールに追加します。Kate や Emma は追加しません。
新しい権限スキームの構成
「プロジェクトの閲覧」権限は、ユーザーがそのプロジェクトを閲覧できるかどうか、つまり見ることができるかを制御します。この権限を新しいロールに割り当ててみましょう。
- [管理] () > [課題] > [権限スキーム] を選択します。
- 既定の権限スキームをコピーします。
- コピーした権限スキームを編集して、名前を機密権限スキームに変更します。更新を選択します。
- 機密権限スキームに対して権限を選択します。プロジェクトを閲覧する権限に対して、
- 「アプリケーションロール (ログイン済みのユーザー全員)」で削除を選択します。
- 編集をクリックし、プロジェクト ロールを選択してから、ドロップダウンで レビュー を選択します。供与 をクリックします。
スキームをプロジェクトに関連付ける
最後に、権限スキームを新しいプロジェクトに紐づけましょう。
- プロジェクト > プロジェクトの作成 を選択し、タスク管理を選択します。
- プロジェクトにTop Secret Teeと名前をつけます。送信をクリックします。
- 左下隅で、プロジェクト設定 > 権限を選択します。
- 既定の権限スキーム画面で、アクション > 別のスキームを使用 を選択します。
- スキームで 機密権限スキームを選択し、関連付け をクリックします。
新しいプロジェクトを閲覧することができる、唯一のユーザーは、ジェイソンとあなたです。注 :デフォルトのメンバーは新しいプロジェクトのロールに追加されるだけです。この方法は、プロジェクトにおける課題の 作成や、コメントの追加、課題のクローズなどの権限の制限にも応用することができます。
よく出来ました! プロジェクトの権限スキームを作成し、プロジェクトに適用しました。
管理者入門編のチュートリアルはこれで終了です。引き続き、プロジェクト管理者チュートリアルを受講することをおすすめします。チームがどのように Jira Core を利用できるかについて、理解を深めることができます。プロジェクト管理者向けのチュートリアルを開始しましょう。


