洞察力に富んだ顧客インタビュー ページの作成
この記事について
By Jamey Austin, published August 31st, 2015.
How to standardize your customer interviews by creating a page template
We have loads (technical term) of customer interviews documented on our internal Confluence instance, so we thought we'd share our best practices for creating an interview page template. Feel free to make modifications to better suit your process. Remember, Confluence is a canvas to design as you like.
Create your first customer interview page
Start off with the essentials. Design your page so you can add company and background information where it's easily accessible. You're providing context for your team, so include details about your relationship with the interviewee, the role of that person, and how the interview came to be. Also, make sure to add what product(s) they use.
The goal is to capture the critical details at the top of your page so anyone can quickly grasp who you interviewed, why, and what you talked about.
A design for your page might look something like this:
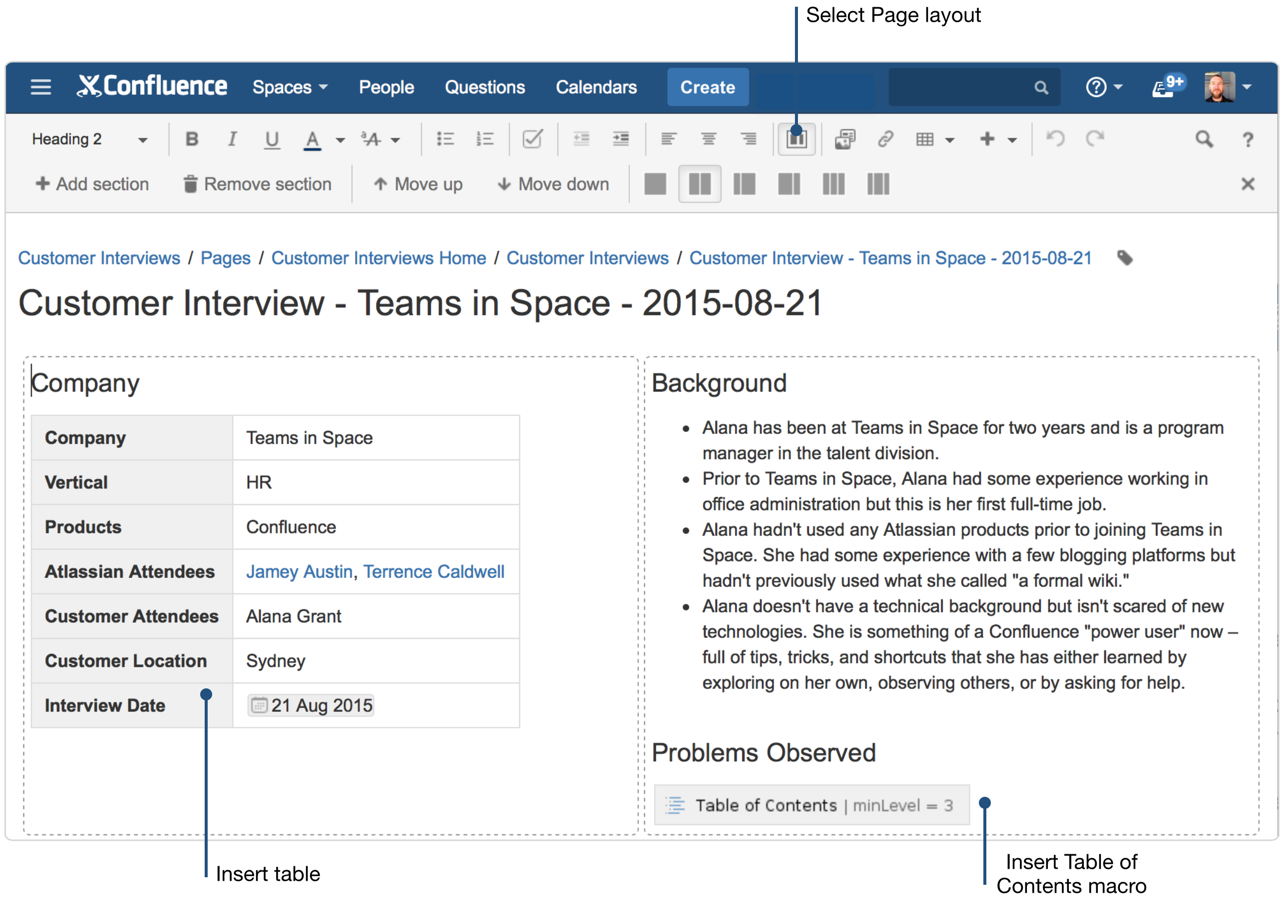
The top section of this page is set up to capture the essential interview details we've talked about. It features a detailed title, and company and background sections.
To create a page with a similar design, try this:
- Use the Page layout button from the editor toolbar (see screenshot) to decide how you'd like your information displayed. Here a Two column section is selected which splits the page into two equal sections.
- Add page elements. Select Insert table from the toolbar to add a table like in the above company section and add as many columns and rows as you need.
- We've inserted a Table of Contents macro (select + button in toolbar > Other macros > Table of Contents macro). This macro creates a list of heading links for quick access to more detailed information. In this example, a list of headings for each problem observed.
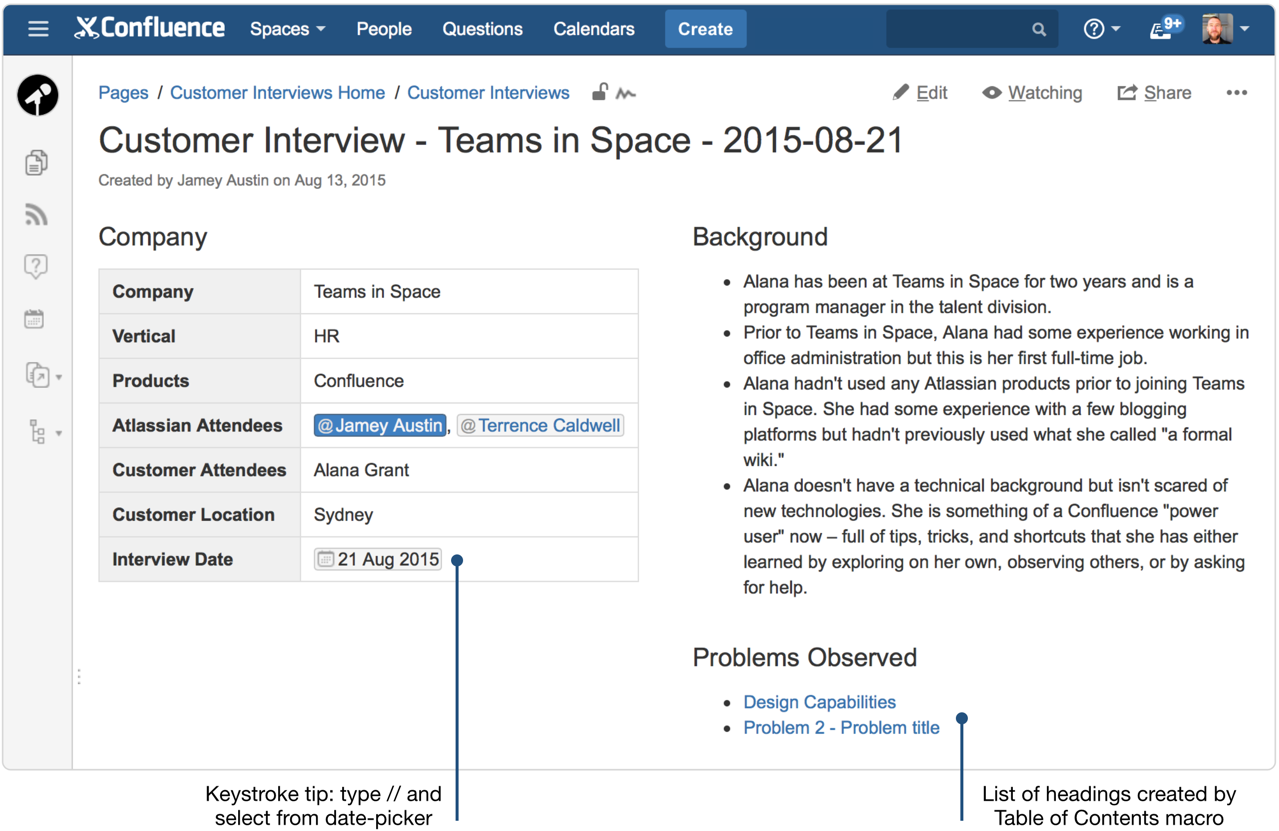
This is what it looks like after you save the page:
Note the list of headings created by the macro. The information these heading links are pointing to is described in the next section.
プロのヒント
The Table of Contents macro creates a list of headings (in this case, each problem title) that link to a specified section where the full details live. In this example, the headings appear where we inserted the macro in the top "Problems Observed" section and link to the detailed information about each problem in the next section. You can configure your Table of Contents macro to grab headings and create similar lists by selecting edit in the macro and completing the necessary fields. Learn more about the Table of Contents macro.
Note the Table of Contents macro used in the first section grabbed the headings "Design Capabilities" and "Problem 2 - Problem title," which link users here where the full details of each problem are found.
ページの次のセクションを上記のようにデザインするには、次の手順に従います。
- Create a new section (select + Add section from toolbar, then choose Single column section). Our example starts of with use cases.
- Below that, in the same section, is "Problems observed." To organize this information, we've inserted a Panel macro. (Select + from the toolbar > Other macros > Panel macro.)
プロのヒント
For each problem, try this method:
- Write a one-line problem statement. Be concise and articulate the user's intention but not their feature request.
- Note all observations that led you to confirm the problem. Be sure to include screenshots, recordings, or practical examples to provide additional context for your team.
- Add opportunities you have to solve the problem. Link to related epics, tasks, or feature requests in JIRA (or whatever you use to manage your team's backlog).
Quick tip
顧客インタビュー ページに画像を追加します。会社の写真や製品のスクリーンショットによって、顧客インタビュー ページがわかりやすくなります。Confluence にはドラッグ & ドロップで簡単に画像を追加できます (または、ツールバーの [ファイルと画像を挿入] を選択します。この方法も簡単です!)。
Create a customer interview page template
Once you've created a customer interview page you like, Confluence lets you "templatize" that page so you can use it again and again. Learn more about creating a template.
ページ テンプレートによって顧客インタビューを標準化することで、顧客インタビューを実施するすべてのユーザーで一貫性が守られます。次のステップとして、顧客インタビュー情報の整理、一元化、共有があります。
How to organize your customer interviews
Add labels to your customer interview page template
ラベルによって、顧客インタビューの検索が簡単になります。タイトルが終わるページ上部にあるラベル アイコンを選択します。「顧客インタビュー」などのラベルを追加します、これだけです。
Add additional labels
「顧客インタビュー」のラベルをページに追加すると、その他のトピック ラベル (製品、ユース ケース、用語) をいつでも追加できます。よってマクロを介してインデックス ページの要約リストに取り込めるため、ラベルは Confluence で重要です。ラベルを使用してインタビュー ページにタグを付ける習慣を身につけることをお勧めします。これによって、すべての顧客インタビューのリストや人気のあるトピックのリストなど、複数の方法でインデックス ページを表示できるようになります。
How to centralize your customer interviews
Another great aspect of Confluence is not only keeping your information organized, but also centralized. Here are some suggested steps for centralizing your customer interviews in Confluence.
Create a customer interviews index page
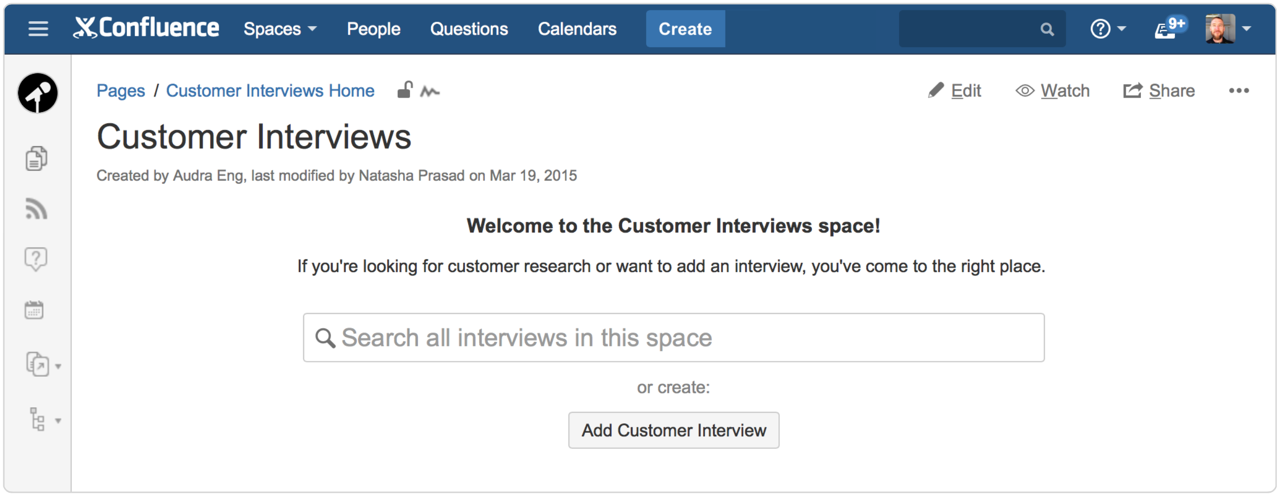
It's a good idea to create a customer interviews space and make the home page a customer interviews index page. An index page is great for keeping all your customer interview information in one place.
If your team is small, you may not need a dedicated space for customer interviews. But if you have multiple teams, it makes sense to create a customer interviews space and make the home page your customer interviews index page. Either way, an index page is great for keeping all your customer interview information in one place.
Tips for creating a space and an index page
Create your customer interview space
Select Spaces from the header > Create space > Blank space
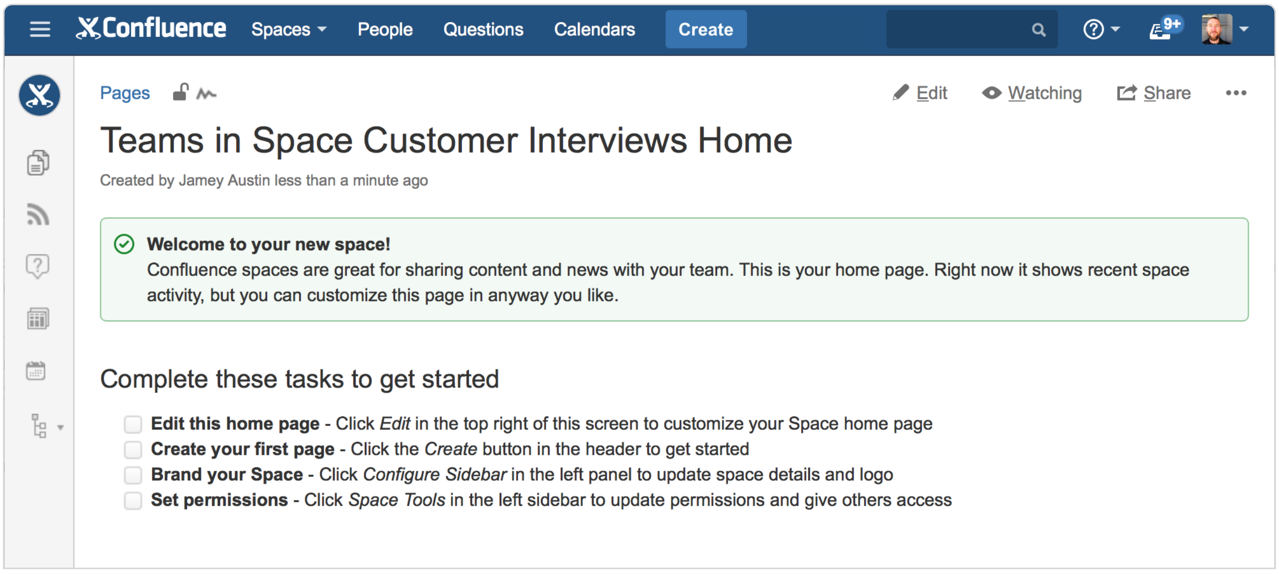
- Add Space name. Add a Space key, or Confluence will create one for you. After you select Create, your space home page looks like this:
Important note: this is the home page. Complete the first task by creating an index page (details below), and the index page becomes the home page.
Create your customer interview index page
- Select Edit from your customer interviews space home page (or from any page if not using a dedicated space)
- Start creating your customer interviews index page!
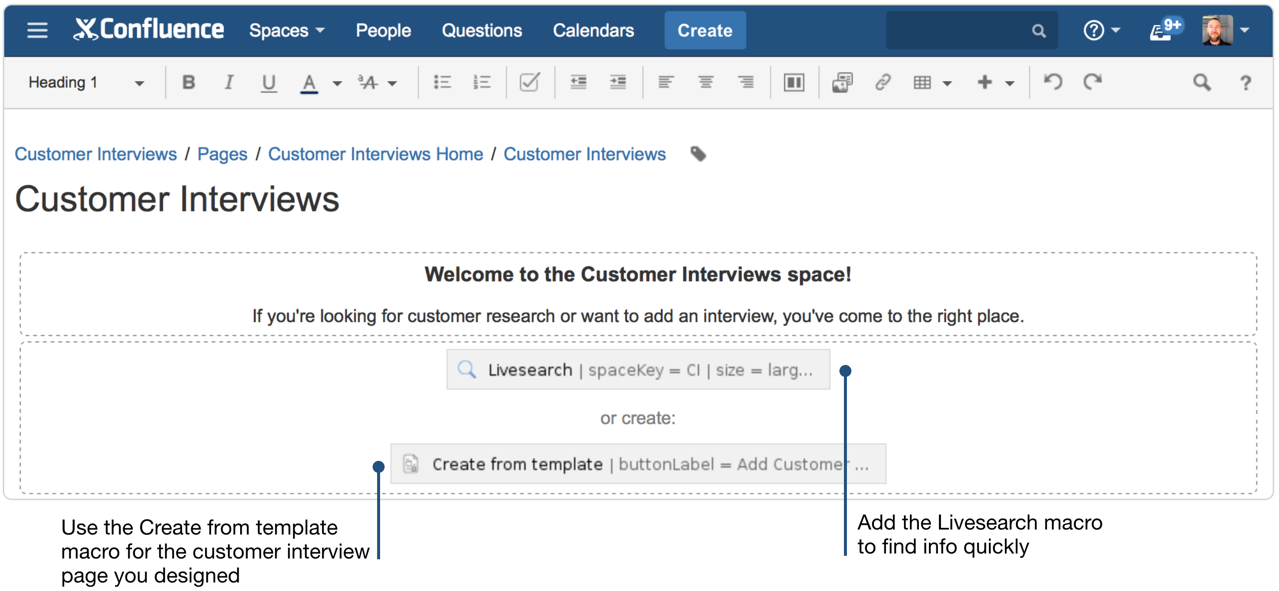
Check out this example from our own Atlassian customer interviews index page, in edit mode:
プロのヒント
Two macros are doing the heavy lifting in this example. Let's take a quick look at each:
- Livesearch macro - lets you add a search box, which can be configured to best suit your needs for your index page. Find out more about the Livesearch macro.
- Create from Template macro - add a button on your index page that opens a page template (like your newly created customer interview page template) when clicked. Check out more about the Create from Template macro.
How to share your customer interviews
The final step of your customer interview process is sharing the information. You can do this in two simple ways:
- Use the share button and send a customer interview to anyone on your team or in your organization
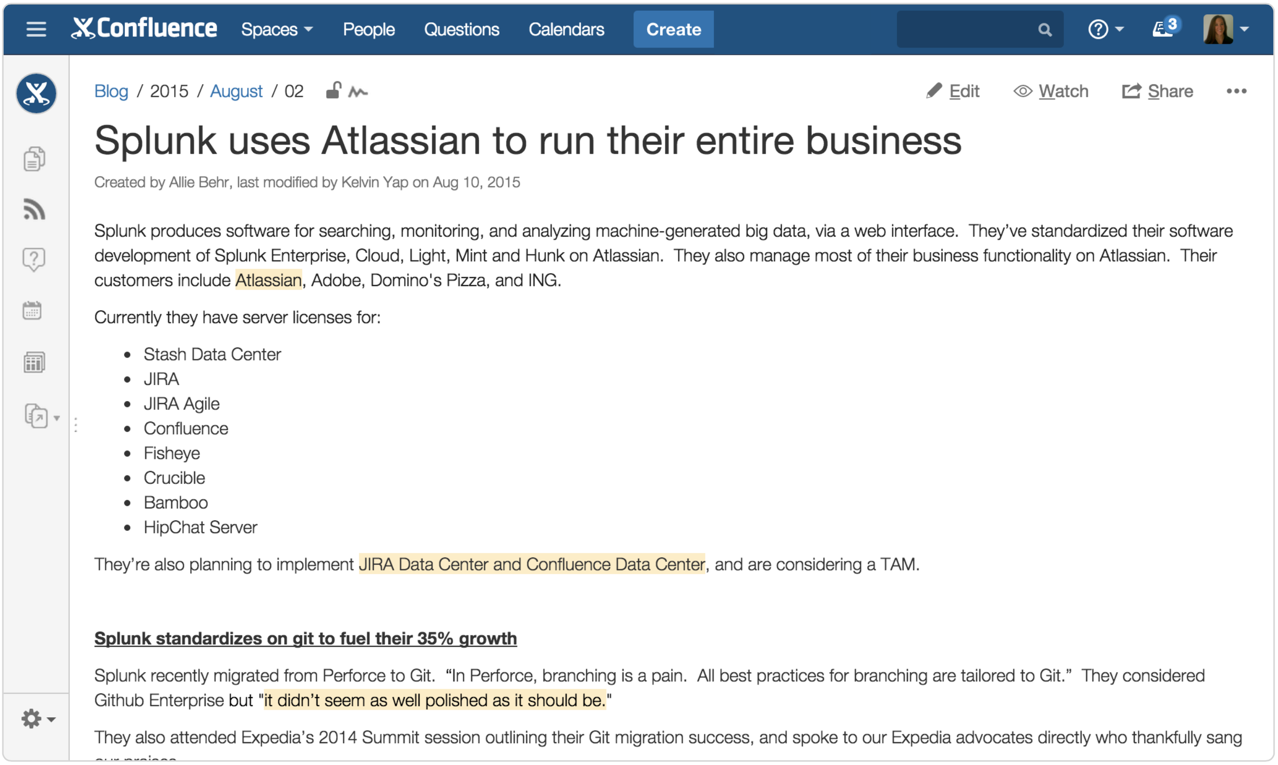
- Blog your product's successes and "room for improvement"s with your organization
- Example shared blog post: "Splunk uses Atlassian to run their entire business"
At a glance: what did you just learn?
Creating a customer interview page—and an index page to organize and centralize all your customer interviews—will help you to both communicate customer feedback to your team and organization and turn interview information into insights about your products. Remember to experiment with you pages to make them work best for your process.
Here's a list of what we covered:
- Page layouts: organize your page with different column layouts
- Table of Contents macro: create a list of heading links for quick navigation.
- Panel macro: helps organize information by creating a container.
- Creating a template: pages used again and again can be turned into templates.
- Adding labels: labeling pages does two things: organize information and help macros do their magic.
- スペースの作成: 顧客インタビューの専用スペースを作ることは、どのチームにとっても名案です。
- インデックス ページの作成: スペースのホーム ページを、すばやく参照できるインデックス ページにします。
- Livesearch macro: add search to help quickly locate customer interviews.
- Create from Template macro: add a button to open a new page with the template you created from your page.
- ラベル リスト マクロ: ページに添付するラベルから、クイック リファレンス リストを作成します。
- Content by Label macro: use this to create a list of all customer interviews.
This post is part of our latest collection, A Software Team’s Guide to Confluence. Click the lovely green button below to see more.
Hungry for more?
Download the Software Team’s Guide to Confluence ebook to see all our tips in one place, then watch the blogs in this space to get notified when new tips articles like this are posted. And if that's not enough, sign up for Confluence Insiders – our monthly newsletter covering all things Confluence.
Loved this page? Share it on Twitter!
