Data Center ノードを追加・削除する
You can rapidly scale the capacity of Bitbucket Data Center, with no downtime, by provisioning extra cluster nodes. This page describes how to add another cluster node to an existing instance of Bitbucket Data Center.
If you are moving to Bitbucket Data Center from a single instance of Bitbucket Server, go straight to Installing Bitbucket Data Center, instead.
If you are new to Bitbucket Data Center, we suggest you take a look at Clustering with Bitbucket.
If you’re looking to improve Git performance and availability of repositories, we suggest you take a look at Bitbucket Mesh and Smart Mirroring.
Things to consider before provisioning a cluster node
We highly recommend provisioning cluster nodes using an automated configuration management tool such as Chef, Puppet, or Vagrant, or by spinning up identical virtual machine snapshots.
Minimum requirements for cluster nodes
Each Bitbucket cluster node runs the Bitbucket Data Center web application, and each should meet these minimum requirements:
- Each Bitbucket cluster node must be a dedicated machine, although machines may be physical or virtual.
- Cluster nodes must be connected in a high speed LAN (that is, they must be physically in the same data center).
- Bitbucket Server supported platforms requirements, including those for Java and Git, apply to each cluster node.
- For consistent performance, each cluster node should be nearly identical, or as similar as possible.
- All cluster nodes must run the same version of Bitbucket Data Center.
- All cluster nodes must have synchronized clocks (for example, using NTP) and be configured with the identical timezone.
ノードを追加する
1. Mount the shared home directory on the node
Bitbucket Data Center makes use of a shared file system that lives on a dedicated machine and is accessible using NFS. See Installing Bitbucket Data Center for more information.
Mount the shared home directory as ${BITBUCKET_HOME}/shared. For example, suppose your Bitbucket home directory is /var/atlassian/application-data/bitbucket, and your shared home directory is available as an NFS export called bitbucket-san:/bitbucket-shared. Add the following line to /etc/fstab on the cluster node:
bitbucket-san:/bitbucket-shared /var/atlassian/application-data/bitbucket/shared nfs nfsvers=3,lookupcache=pos,noatime,intr,rsize=32768,wsize=32768 0 0Then mount it:
mkdir -p /var/atlassian/application-data/bitbucket/shared
sudo mount -a
2. Install Bitbucket Data Center on the node
Download the latest Bitbucket Data Center distribution from https://www.atlassian.com/software/bitbucket/download, and install Bitbucket Server on the cluster node by either using the installer or by installing the application manually from an archive file.
3. Add the node to the cluster
Start Bitbucket Server on the new node. See Start and stop Bitbucket. You can optionally give the node a persistent, human readable name by setting a node.name
system property under JVM_SUPPORT_RECOMMENDED_ARGS in _start-webapp.sh For example:
-Dcluster.node.name=bitbucket-1Once Bitbucket Server starts, go to http://<load-balancer>/admin/clustering. You should see the new node listed, which would look similar to this:

Verify that the new node you have started up has successfully joined the cluster. If it does not, check your network configuration and the ${BITBUCKET_HOME}/log/atlassian-bitbucket.log files on all nodes. If you are unable to find a reason for the node failing to join successfully, contact Atlassian Support .
4. Connect the node to the load balancer
Bitbucket Data Center makes use of a load balancer to distribute requests from your users to the cluster nodes. If a cluster node goes down, the load balancer immediately detects the failure and automatically directs requests to the other nodes within seconds. See Installing Bitbucket Data Center for more information.
If you are using a hardware or software load balancer other than HAProxy, consult your vendor's documentation on how to add the new Bitbucket cluster node to the load balancer.
If you are using HAProxy, simply add the following lines to your haproxy.cfg file:
# In the backend bitbucket_http_backend section, add:
server bitbucket<xx> 192.168.0.<x>:7990 check inter 10000 rise 2 fall 5
# In the backend bitbucket_ssh_backend section, add:
server bitbucket<xx> 192.168.0.<x>:7999 check port 7999
where the values for <x> and <xx> don't conflict with an existing node.
Now restart HAProxy :
sudo service haproxy restartVerify that the new node is in the cluster and receiving requests by checking the logs on each node to ensure that all are receiving traffic. Also check that updates done on one node are visible on the other nodes.
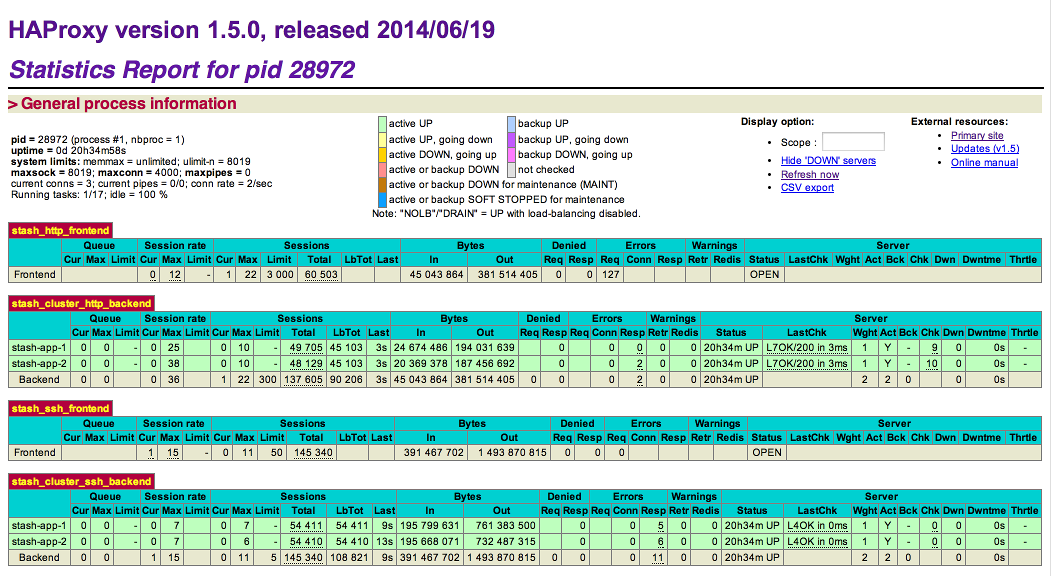
You can monitor the health of your cluster by navigating to HAProxy's statistics page at http://<load-balancer>:8090/. You should see a page similar to this:
ノードを削除する。
To remove a node, stop Bitbucket on that node. You can then remove the installation and local home directory as required.
To see the number of nodes remaining, go to Administration > Clustering.
AWS および Azure でのスケーリング (拡張および縮小)
If you deployed Bitbucket Data Center on AWS or Azure, your Bitbucket nodes will be in scaling groups. You will add and remove nodes either by changing the minimum and maximum size of each group or using a scaling plan. See the following resources for more info:
Moving to a non-clustered Data Center
If you no longer need clustering, but still want access to Data Center features, you can go back to a non-clustered (single node) Data Center installation. In these instructions we'll assume that you'll use one of your existing cluster nodes as your new, standalone installation. You'll also need to make some infrastructure changes as part of the switch.
機能への影響について
After moving to a single node Data Center, you will lose capabilities that are based on clustering, such as instant scalability or performance and scale. For the complete list of features, see Server and Data Center feature comparison.
はじめる前に
このプロセスをステージング環境で完了し、一連の機能テスト、連携テスト、およびパフォーマンス テストを実行してから、本番環境に変更を加えることをおすすめします。
1. Shut down Bitbucket
続行する前にすべてのクラスタ ノードを停止します。
2. ロード バランサの構成
Configure your load balancer to redirect traffic away from all Bitbucket nodes, except the node you plan to use for your standalone installation.
ロード バランサが不要になった場合はこの手順で削除できます。
3. ホームで共有されているクラスタのの項目をローカルのホームに戻す
Unmount the
<shared home>directory and copy its contents to the<local home>/shareddirectory.
Make sure that the path to the shared subdirectory remains the same, as Git repositories are using absolute paths to other repositories and will break if the path changes.
4. Start Bitbucket
Restart Bitbucket.
To confirm you're now running a standalone installation, go to Administration > Clustering, which will show you the number of nodes in your cluster.