Bitbucket OAuth 2.0 provider API
Bitbucket (Data Center and Server) provides APIs to allow external services to access resources on a user’s behalf with the OAuth 2.0 protocol.
If you already have an integration that you’d like to add to Bitbucket, see Configure an incoming link for detailed steps. If not, this page will help you understand the details of our OAuth 2.0 implementation so you can create such an integration.
サポート対象の OAuth 2.0 フロー
次の OAuth 2.0 フローがサポート対象です。
Proof Key for Code Exchange (PKCE) を含む認可コード
認可コード
Implicit Grant と Resource Owner Password Credentials のフローは、次の OAuth 仕様バージョンで非推奨になるためサポート対象外です。
これらのフローの仕組みに関する詳細は、OAuth RFC をご確認ください。フローを理解して、自分に適したフローを選択するのに役立ちます。
セキュリティに関する推奨事項
ここでは、セキュリティ向上の方法に関する推奨事項をいくつか説明します。
CSRF 攻撃を防止する
To protect redirect-based flows, the OAuth specification recommends the use of “One-time use CSRF tokens carried in the state parameter, which are securely bound to the user agent” using the state query parameter, with each request to the /rest/oauth2/latest/authorize endpoint. This can prevent CSRF attacks.
本番環境で HTTPS を使用する
本番環境には、redirect uri に HTTPS を使用します。OAuth 2.0 のセキュリティがトランスポート層に基づいているため、これは重要になります。詳細については「OAuth 2.0 RFC」と「OAuth 2.0 脅威モデル RFC」をご確認ください。
同じ理由で、本番環境のベース URL にも HTTPS を義務付けています。関連するシステム プロパティを有効にすることで、ステージングまたは開発の各環境に安全ではない URI とベース URL を使用できます。
Proof Key for Code Exchange (PKCE) を含む認可コード
このフローによって、公開クライアント上でアクセス トークンに対するクライアント認証情報の OAuth 交換を安全に実行できます。次のステップとパラメーターでは、このフローの実装について説明しています。
パラメーター
このフローで使用するパラメーターは次のとおりです。
| パラメーター | 説明 | 必須 |
|---|---|---|
| redirect_uri | リクエストの承認後にユーザーがリダイレクトされる URL。 | はい |
| client_id | アプリケーションの登録後に Jira から受け取ったクライアント ID。 | はい |
| response_time | 認可コード。 | はい |
| scope | ユーザー アカウントに対してアプリケーションの権限を定義するスコープ。詳細については「スコープ」をご確認ください。 | はい |
| code_challenge |
| はい |
| code_challenge_method | code_challenge が生成された方法に応じて、plain または sha256 になります。 | はい |
| code_verifier | 予約されていない文字を用いるハイエントロピー暗号ランダム文字列: [A-Z] / [a-z] / [0-9] / "-" / "." / "_" / "~"。43 ~ 127 文字にする必要があります。詳細については RFC をご確認ください。 | はい |
| state | 予測できない値。リクエストとコールバックの間のステータスを維持するために、クライアントによって使用されます。CSRF トークンとしても使用する必要があります。code_verifier と同様の方法で生成できます。 | いいえ |
はじめる前に
Register your application in Bitbucket by creating an incoming link in application links. During registration, you can enable proper scopes to limit the range of resources which the application can access. After creating the link, you should receive the OAuth credentials: Client ID and Client secret - keep them secure. For more info, see Configure an incoming link.
- フローを開始する前に、
state(オプション)、code_verifier、code_challenge、code_challenge_methodを生成します。
手順
1. 次のクエリ パラメーターによって、/rest/oauth2/latest/authorize ページにユーザーをリダイレクトすることで認可コードをリクエストします。
curl https://atlassian.example.com/rest/oauth2/latest/authorize?client_id=CLIENT_ID&redirect_uri=REDIRECT_URI&response_type=code&state=STATE&scope=SCOPE&code_challenge=CODE_CHALLENGE&code_challenge_method=S256これは、scope で指定されたスコープでアカウントにアクセスするアプリケーションのリクエストの承認をユーザーに求める同意画面です。ユーザーは、redirect_uri で指定された URL にリダイレクトされます。リダイレクトには、次の例で示すような認可コードが含まれます。
https://atlassian.example.com/plugins/servlet/oauth2/consent?client_id=CLIENT_ID&redirect_uri=REDIRECT_URI&response_type=code&scope=SCOPE&state=STATE&code_challenge_method=CODE_CHALLENGE_METHOD&code_challenge=CODE_CHALLENGE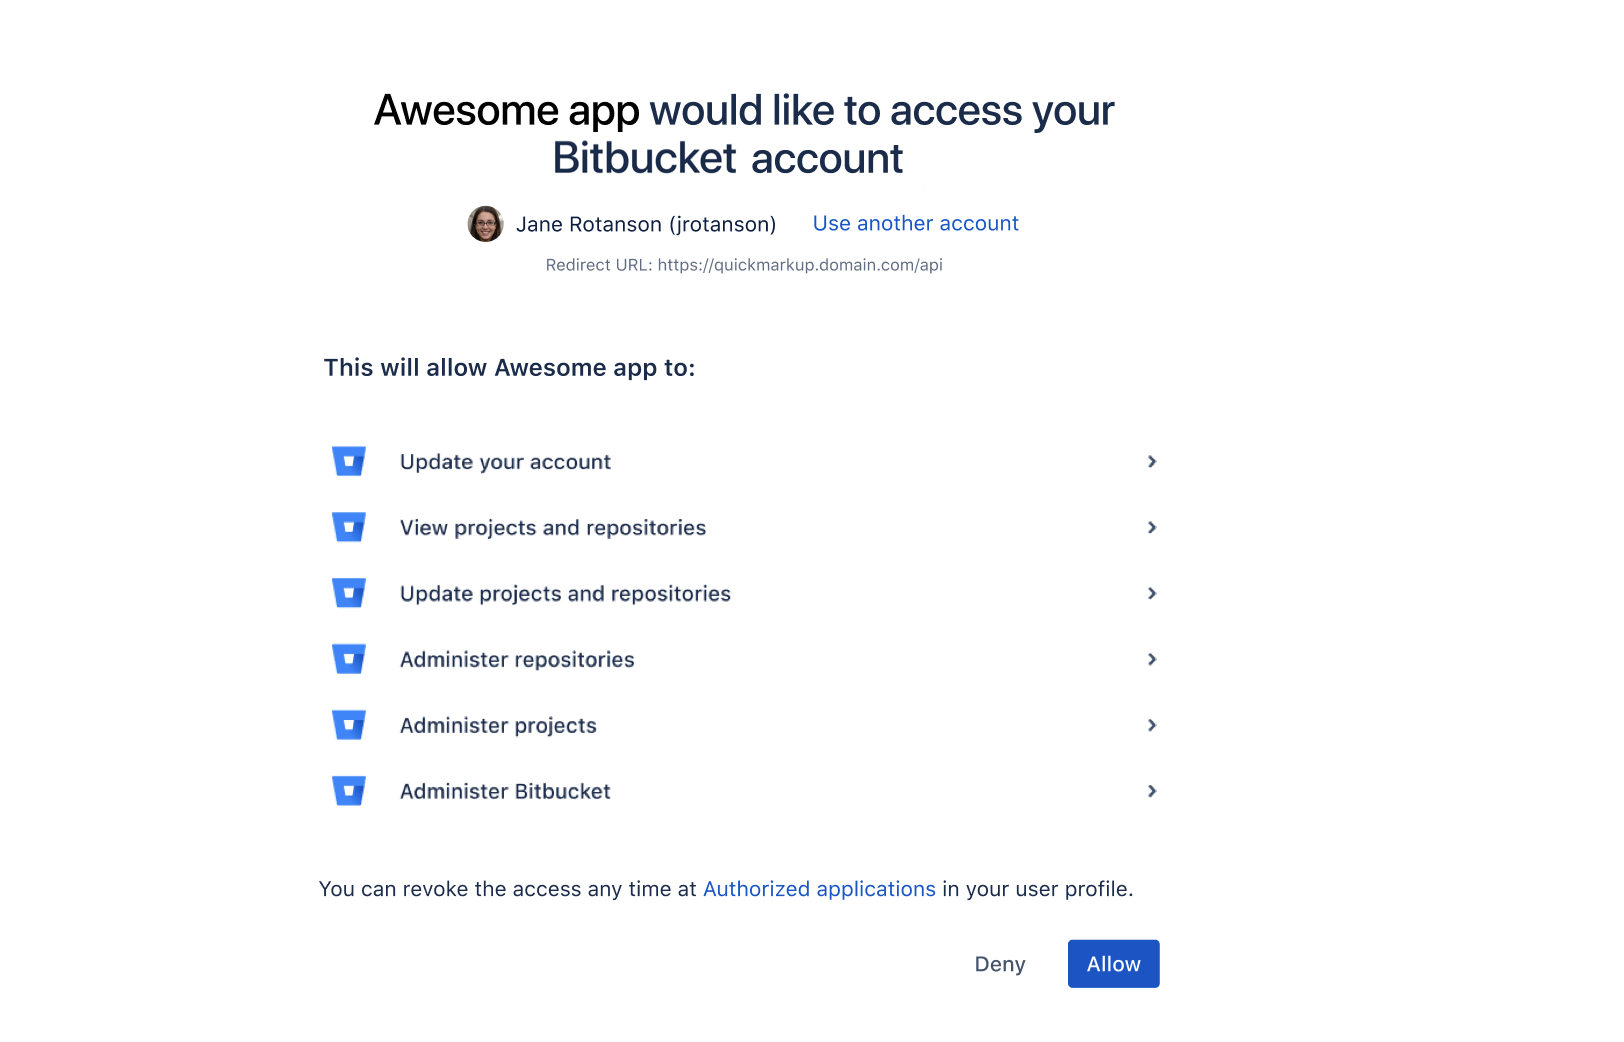
2. 前のリクエストから返された認可 code によって、任意の HTTP クライアントで access_token をリクエストできます。次の例では curl を使用します。
curl -X POST https://atlassian.example.com/rest/oauth2/latest/token?client_id=CLIENT_ID&client_secret=CLIENT_SECRET&code=CODE&grant_type=authorization_code&redirect_uri=REDIRECT_URI&code_verifier=CODE_VERIFIERレスポンスの例
{
 "access_token": "eyJhbGciOiJIUzI1NiJ9.eyJpZCI6IjNmMTQ3NTUzYjg3OTQ2Y2FhMWJhYWJkZWQ0MzgwYTM4In0.EDnpBl0hd1BQzIRP--xEvyW1F6gDuiFranQCvi98b2c",
 "token_type": "bearer",
 "expires_in": 7200,
 "refresh_token": "eyJhbGciOiJIUzI1NiJ9.eyJpZCI6ImMwZTMxYmZjYTI2NWI0YTkwMzBiOGM2OTJjNWIyMTYwIn0.grHOsso3B3kaSxNd0QJfj1H3ayjRUuA75SiEt0usmiM",
 "created_at": 1607635748
}
3. 新しい access_token を取得するには、refresh_token パラメーターを使用します。リフレッシュ トークンは、access_token そのものの有効期限が切れた後でも使用できます。次のリクエストは次のとおりです。
既存の
access_tokenとrefresh_tokenを無効にします。レスポンスで新しいトークンを送信します。
curl -X POST https://atlassian.example.com/rest/oauth2/latest/token?client_id=CLIENT_ID&client_secret=CLIENT_SECRET&refresh_token=REFRESH_TOKEN&grant_type=refresh_token&redirect_uri=REDIRECT_URIレスポンスの例
{
  "access_token": "eyJhbGciOiJIUzI1NiJ9.eyJpZCI6ImJmZjg4MzU5YTVkNGUyZmQ3ZmYwOTEwOGIxNjg4MDA0In0.BocpI91mpUzWskyjxHp57hnyl8ZcHehGJwmaBsGJEMg",
  "token_type": "bearer",
  "expires_in": 7200,
  "refresh_token": "eyJhbGciOiJIUzI1NiJ9.eyJpZCI6Ijg1NjQ1YjA1NGJiYmZkNjVmMDNkMzliYzM0YzQ4MzZjIn0.4MSMIG46zjB9QCV-qCCglgojM5dL7_E2kcqmiV46YQ4",
  "created_at": 1628711391
}
You can now make requests to the API with the access token. For more info, see Access Bitbucket API with access token below.
認可コード
このフローによって、公開クライアント上でアクセス トークンに対するクライアント認証情報の OAuth 交換を安全に実行できます。
パラメーター
このフローで使用するパラメーターは次のとおりです。
| パラメーター | 説明 | 必須 |
|---|---|---|
redirect_uri | リクエストの承認後にユーザーがリダイレクトされる URL。 | はい |
client_id | アプリケーションの登録後に Jira から受け取ったクライアント ID。 | はい |
response_type | 認可コード。 | はい |
scope | ユーザー アカウントに対してアプリケーションの権限を定義するスコープ。詳細については「スコープ」をご確認ください。 | はい |
state | 予測できない値。リクエストとコールバックの間のステータスを維持するために、クライアントによって使用されます。CSRF トークンとしても使用する必要があります。 | いいえ |
はじめる前に
Register your application in Bitbucket by creating an incoming link in application links. During registration, you can enable proper scopes to limit the range of resources which the application can access. After creating the link, you should receive the OAuth credentials: Client ID and Client secret - keep them secure. For more info, see Configure an incoming link.
オプションの
stateパラメーターを使用する場合は、フローを開始する前に生成します。
手順
1. 次のクエリ パラメーターによって /oauth/authorize ページにユーザーをリダイレクトすることで、認可コードをリクエストします。
curl https://atlassian.example.com/rest/oauth2/latest/authorize?client_id=CLIENT_ID&redirect_uri=REDIRECT_URI&response_type=code&state=STATE&scope=SCOPEこれは、scope で指定されたスコープでアカウントにアクセスするアプリケーションのリクエストの承認をユーザーに求める同意画面です。ユーザーは、redirect_uri で指定された URL にリダイレクトされます。リダイレクトには、次の例で示すような認可コードが含まれます。
https://atlassian.example.com/plugins/servlet/oauth2/consent?client_id=CLIENT_ID&redirect_uri=REDIRECT_URI&response_type=code&scope=SCOPE&state=STATE
2. 前のリクエストから返された認可コード (response_type) によって、任意の HTTP クライアントで access_token をリクエストできます。次の例では Ruby の rest-client を使用します。
curl -X POST https://atlassian.example.com/rest/oauth2/latest/token?client_id=CLIENT_ID&client_secret=CLIENT_SECRET&code=CODE&grant_type=authorization_code&redirect_uri=REDIRECT_URIレスポンスの例
{
 "access_token": "eyJhbGciOiJIUzI1NiJ9.eyJpZCI6IjNmMTQ3NTUzYjg3OTQ2Y2FhMWJhYWJkZWQ0MzgwYTM4In0.EDnpBl0hd1BQzIRP--xEvyW1F6gDuiFranQCvi98b2c",
 "token_type": "bearer",
 "expires_in": 7200,
 "refresh_token": "eyJhbGciOiJIUzI1NiJ9.eyJpZCI6ImMwZTMxYmZjYTI2NWI0YTkwMzBiOGM2OTJjNWIyMTYwIn0.grHOsso3B3kaSxNd0QJfj1H3ayjRUuA75SiEt0usmiM",
 "created_at": 1607635748
}
3. 新しい access_token を取得するには、refresh_token パラメーターを使用します。リフレッシュ トークンは、access_token そのものの有効期限が切れた後でも使用できます。このリクエストは次のとおりです。
既存の
access_tokenとrefresh_tokenを無効にします。レスポンスで新しいトークンを送信します。
curl -X POST https://atlassian.example.com/rest/oauth2/latest/token?client_id=CLIENT_ID&client_secret=CLIENT_SECRET&refresh_token=REFRESH_TOKEN&grant_type=refresh_token&redirect_uri=REDIRECT_URIレスポンスの例
{
  "access_token": "eyJhbGciOiJIUzI1NiJ9.eyJpZCI6ImJmZjg4MzU5YTVkNGUyZmQ3ZmYwOTEwOGIxNjg4MDA0In0.BocpI91mpUzWskyjxHp57hnyl8ZcHehGJwmaBsGJEMg",
  "token_type": "bearer",
  "expires_in": 7200,
  "refresh_token": "eyJhbGciOiJIUzI1NiJ9.eyJpZCI6Ijg1NjQ1YjA1NGJiYmZkNjVmMDNkMzliYzM0YzQ4MzZjIn0.4MSMIG46zjB9QCV-qCCglgojM5dL7_E2kcqmiV46YQ4",
  "created_at": 1628711391
}
You can now make requests to the API with the access token returned. For more info, see Access Bitbucket API with access token below.
Access Bitbucket API with access token
アクセス トークンによって、ユーザーに代わって API にリクエストできます。認証ヘッダーにトークンを次のように入れられます。
curl --header "Authorization: Bearer OAUTH2-TOKEN" "https://atlassian.example.com/rest/api/latest/issue/JRA-9"スコープ
The scope parameter is required in both flows. It allows you to specify the permission scopes your application can request from the authorizing user. Note that regardless of which scopes you choose, the actual permissions will always be capped at what the user can actually do.
Here you can find the scope keys you can use in your requests, as values of the scope parameter:
| スコープ キー | 説明 |
|---|---|
No scope / PUBLIC_REPOS | View public projects and repositories View projects and repositories that are publicly accessible, including pulling code and cloning repositories. |
ACCOUNT_WRITE | Update user account Update the user account settings. |
REPO_READ | View projects and repositories View projects and repositories the user account can view, including pulling code, cloning, and forking repositories. Create and comment on pull requests. |
REPO_WRITE | Update projects and repositories Update projects and repositories the user account can change, including pushing code and merging pull requests. |
REPO_ADMIN | Administer repositories Perform administrative functions on repositories and pull requests the user account can change, including deleting pull requests and updating repository settings and permissions. |
PROJECT_ADMIN | プロジェクトの管理 Perform administrative functions on projects, repositories, and pull requests the user account can change, including creating new repositories and updating project settings and permissions. |
ADMIN_WRITE | Administer Bitbucket Perform most administrative functions on the entire Bitbucket instance, excluding functions such as backups, imports, and infrastructure settings which are limited to system administrators. |
SYSTEM_ADMIN | Administer Bitbucket system Perform all administrative functions on the entire Bitbucket instance, including functions such as backups, imports, and infrastructure settings. |