コミット前のレビューに対しパッチファイルを作成する
This page describes how to create patch files from your local repository, how to attach them to a Crucible review and how to use Crucible's Patch Anchoring to retrieve more context from the original file.
A patch file is a portion of a source code file that contains the code changes that you have made – it's a diff that shows the differences between your working copy and the base revision.
A pre-commit review in Crucible allows a developer's code changes, in the form of a patch file, to be reviewed before those changes are committed to the SCM. A typical scenario is where the developer does not have write access to the repository.The developer creates the patch file and adds it to a Crucible review. Once reviewed, the patch is either committed to the repository or is sent back to the author.
You can create the patch file from your local repository:
- using tools in your IDE – described below
- using repository command-line tools
- using the Crucible Review CLI tool – see Creating reviews from the command line
As an enhancement, Crucible's patch anchoring adds context:
- By default, patch files will only show a few lines of code surrounding each change, rather than the entire file and its changes. Patch anchoring overcomes this limitation.
On this page:
Creating a patch file from IntelliJ IDEA 7.0
- Select a parent folder, sub-folder or file that you have altered, in the Project tool window.
- Select Version Control > Create Patch:
- Click Create Patch, choose a location to save the patch file to, and click OK.
If you do not have the Create Patch command available in IDEA
If you have not configured version control in IDEA, you may not have the Create Patch option available. If so, use the following steps to create a patch file in IDEA:
1. Select a parent folder, sub-folder or file that you have altered in the Project tool window, right-click it and choose Local History > Show History.
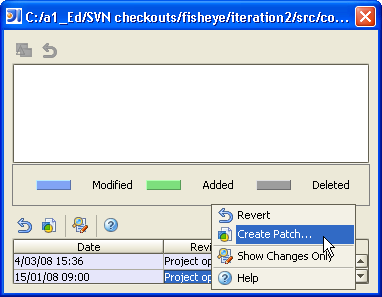
2. In the Local History view, right-click the revision number, and choose Create Patch.

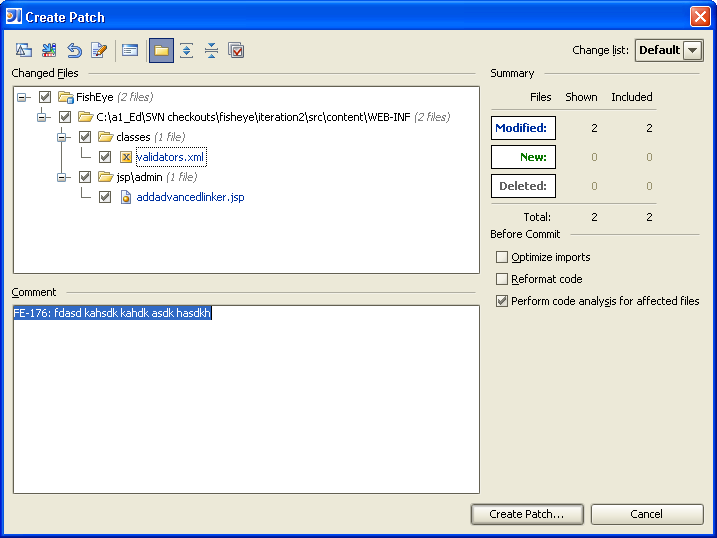
3. In the Create Patch dialog, choose a location for the patch file and a file name, then click OK.
Creating a patch file in Eclipse 3.3.1.1
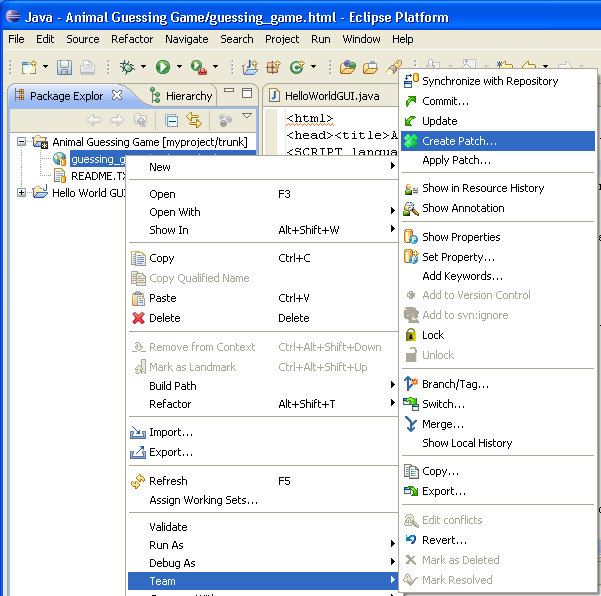
- Find the parent folder, sub-folder or file that you have altered, right-click it and choose Team > Create Patch.
- In the Create Patch window, choose a location on your computer and type an appropriate file name (the file format is plain text):

Creating a patch file from the command line
Create patches yourself, directly from the SCM, using the following commands, where patch.txt represents your name for the new patch file.
Then you can use the dedicated Crucible Review CLI tool to create reviews for your patches and commits, directly from your terminal. See Creating reviews from the command line.
| SCM | コマンド | 注意 |
|---|---|---|
| CVS | cvs diff -Nu > patch.txt | Creates a patch file with around three lines of code, before and after each change. Revision information is included by default, so if you have Fisheye, you may be able to anchor the patch to get full context. |
cvs diff -N -U 10000 > patch.txt | Creates a patch file that shows all code in the file.
| |
| SVN | svn diff > patch.txt | Creates a patch file with around three lines of code, before and after each change. Revision information is included by default, so if you have Fisheye, you may be able to anchor the patch to get full context.
|
svn diff --diff-cmd diff -x "-U 10000" > patch.txt | Creates a patch file that shows all code in the file.
| |
| perforce | Crucible 3.3.1 or earlier: Crucible 3.3.2 or later: | Creates a patch file with around three lines of code, before and after each change. Revision information is included by default, so if you have Fisheye, you may be able to anchor the patch to get full context. The |
| Example of using GNU Since Perforce diffs do not include added and deleted files, you should use Replace | |
| Mercurial | hg diff > patch.txt | Creates a patch file with around three lines of code, before and after each change. Revision information is included by default, so if you have Fisheye, you may be able to anchor the patch to get full context. If you use Git-style diffs (--git), the revision information will not be provided. This means that Crucible won't be able to directly find a revision to anchor to and will try to anchor to the newest revision on the main branch instead. |
| Git | git diff > patch.txt | Creates a patch file with around three lines of code, before and after each change. Revision information is included by default, so if you have Fisheye, you may be able to anchor the patch to get full context. |
Using Crucible patch anchoring to automatically add full context
Crucible's Patch Anchoring feature allows you to add a regular patch (showing only a few lines of context) to a review. Then, Crucible will automatically search for the relevant file content in the connected repositories. When it finds the files, it will seamlessly add in more context from the files so that you can view all of the lines of code (greatly enhancing the review process).
To use patch anchoring:
- Click Create review in the Crucible header.
- Click Pre-commit. In the dialog that appears, click Choose File to locate your file, then Upload. Crucible will now search for matches in the files in its database. Crucible will analyze all the paths in the patch, find the branches containing all those paths, then anchor the patch to the trunk or the branch with the most recent commit activity.
Crucible makes a 'best guess' in its processing – you should check that it has anchored the patch to the correct location in your repository.
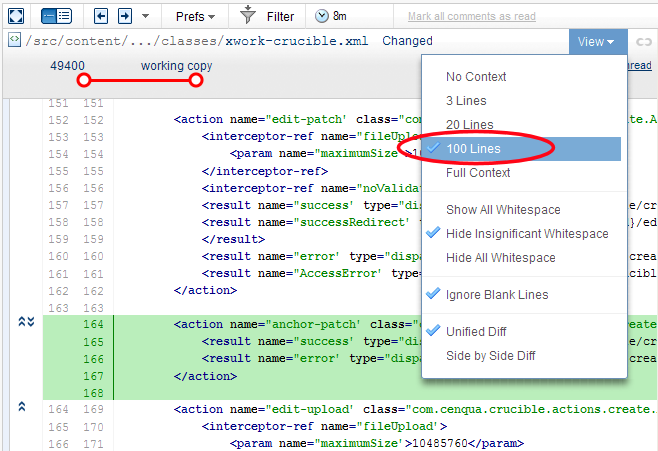
When you start the review, and view a diff, you will be able to choose more than three lines of context from the View menu.
Screenshot: Viewing more than three lines with Patch Anchoring