Crowd Data Center のインストール
Beta versions of Crowd Data Center are not intended to be deployed in production environments. Those versions are not feature complete and may contain bugs. Atlassian does not take responsibility for potential data loss or malfunctions caused by Crowd Data Center.
Problems?
If you encounter any problems while installing Crowd Data Center, create an issue, and we'll get this sorted out for you.
始める前に
Before you install Crowd Data Center, review this prerequisite information:
- Prepare a Crowd Data Center license. As a participant in the private beta, you should have already received a license key from Atlassian in a separate email. If you need a new license or want to get involved, sign up for Beta.
Understand the node requirements.
Install and configure a load balancer of your choice.
To guarantee high availability, you should also cluster the load balancer and database.
Crowd Data Center のインストール
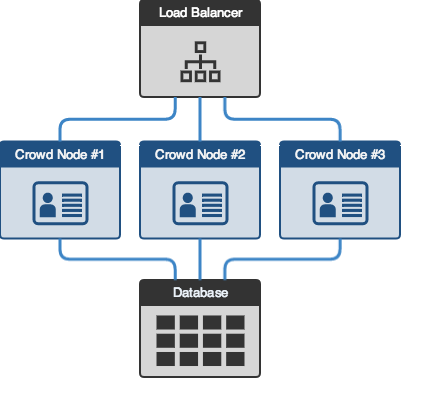
This illustration shows the general method of installing a Crowd clustered instance:

This install guide assumes that you already have a Crowd instance, a load balancer, and a database service.
Before upgrading from an earlier version of Crowd, back up your data.
1. Create the shared directory
This step is required only for Crowd Data Center 3.0.0-m02 and onward.
- Create a directory and name it
shared. All nodes in your Data Center must be able to access it. When installing Crowd, you'll create a home directory. Mount
sharedas a subdirectory of it.
2. Upgrade or install Crowd 3.0 or later
See Installation and Upgrade Guide. If you upgraded your license in an existing instance of Crowd, restart it before proceeding.
You can verify that Crowd is running in Data Center mode by checking that the node id is displayed in the footer
3. Add the first Crowd node to your load balancer
Crowd Data Center relies on a load balancer to balance traffic between the nodes. Many larger installations of Crowd already have a reverse proxy configured, and many reverse proxies have the ability to perform load balancing as well. We've provided a sample Apache httpd configuration to serve as an example, but check with your proxy vendor for specific information.
After adding Crowd to the load balancer, ensure that basic functionality is working after restarting the Crowd instance by navigating to the instance, logging in, and noting any broken links or malfunctioning Crowd functionality.
You can also use the REST endpoint ( http://<your instance>/crowd/rest/admin/1.0/cluster) to verify that the first node is correctly listed, and that you're running in the clustered mode. Be sure to check that the base server URL is configured properly (to the load balancer public URL).
4. Configure the first Crowd node
Make sure that the Base URL configured in Crowd's General settings points to the load balancer URL.
5. Add a new node to the cluster
- Copy your existing Crowd installation directory to the new node. You can install a new Crowd instance, but we recommend copying the existing one to keep the configuration (installation paths, users, permissions, etc.) on both nodes the same, which makes the deployment easier.
- Create a home directory for Crowd on the new node, and mount shared as a subdirectory of it.
- Start Crowd on the new node. The node should automatically join the cluster.
- Ensure that the user and group management, directory sync, and any custom integrations work as expected.
- Verify that the new node is listed in the Cluster Monitoring page in the Administration menu.
6. この新しいノードをロードバランサに接続する
Verify that the new node is in the cluster and receiving requests by checking the logs on each node to ensure both are receiving traffic. Also check that updates done on one node are visible on the other.
Repeat steps 3 and 4 for each node
Interested in learning more about what Crowd Data Center provides? Click here for an overview.

