Oauth 2.0 Configuration for Confluence
プラットフォームについて: Server および Data Center のみ。この記事は、Server および Data Center プラットフォームのアトラシアン製品にのみ適用されます。
サーバー*製品のサポートは 2024 年 2 月 15 日に終了しました。サーバー製品を利用している場合は、アトラシアンのサーバー製品のサポート終了のお知らせページにて移行オプションをご確認ください。
*Fisheye および Crucible は除く
要約
Confluence Data Center and Server provide APIs that allow external services to access resources on behalf of a user using the OAuth 2.0 protocol. OAuth 2.0 was introduced in Confluence version 7.17 and onwards.
環境
7.17 onwards
はじめる前に
To register your application in Confluence, create an incoming link in the application links section. During the registration process, you can enable proper scopes to limit the range of resources that the application can access. Once you've created the link, you'll receive the OAuth credentials: Client ID and Client Secret. Make sure to keep these credentials secure. For more information, please refer to the documentation., see Configure an incoming link
アプリケーション リンクによって受信リンクを作成する
受信リンクを作成するには、次の手順に従います。
Go to Settings > General Configuration > Application links.
Select Create link.
Select External application, and then choose Incoming or Outgoing as the direction.
以下のセクションの説明に従って、詳細を入力します。
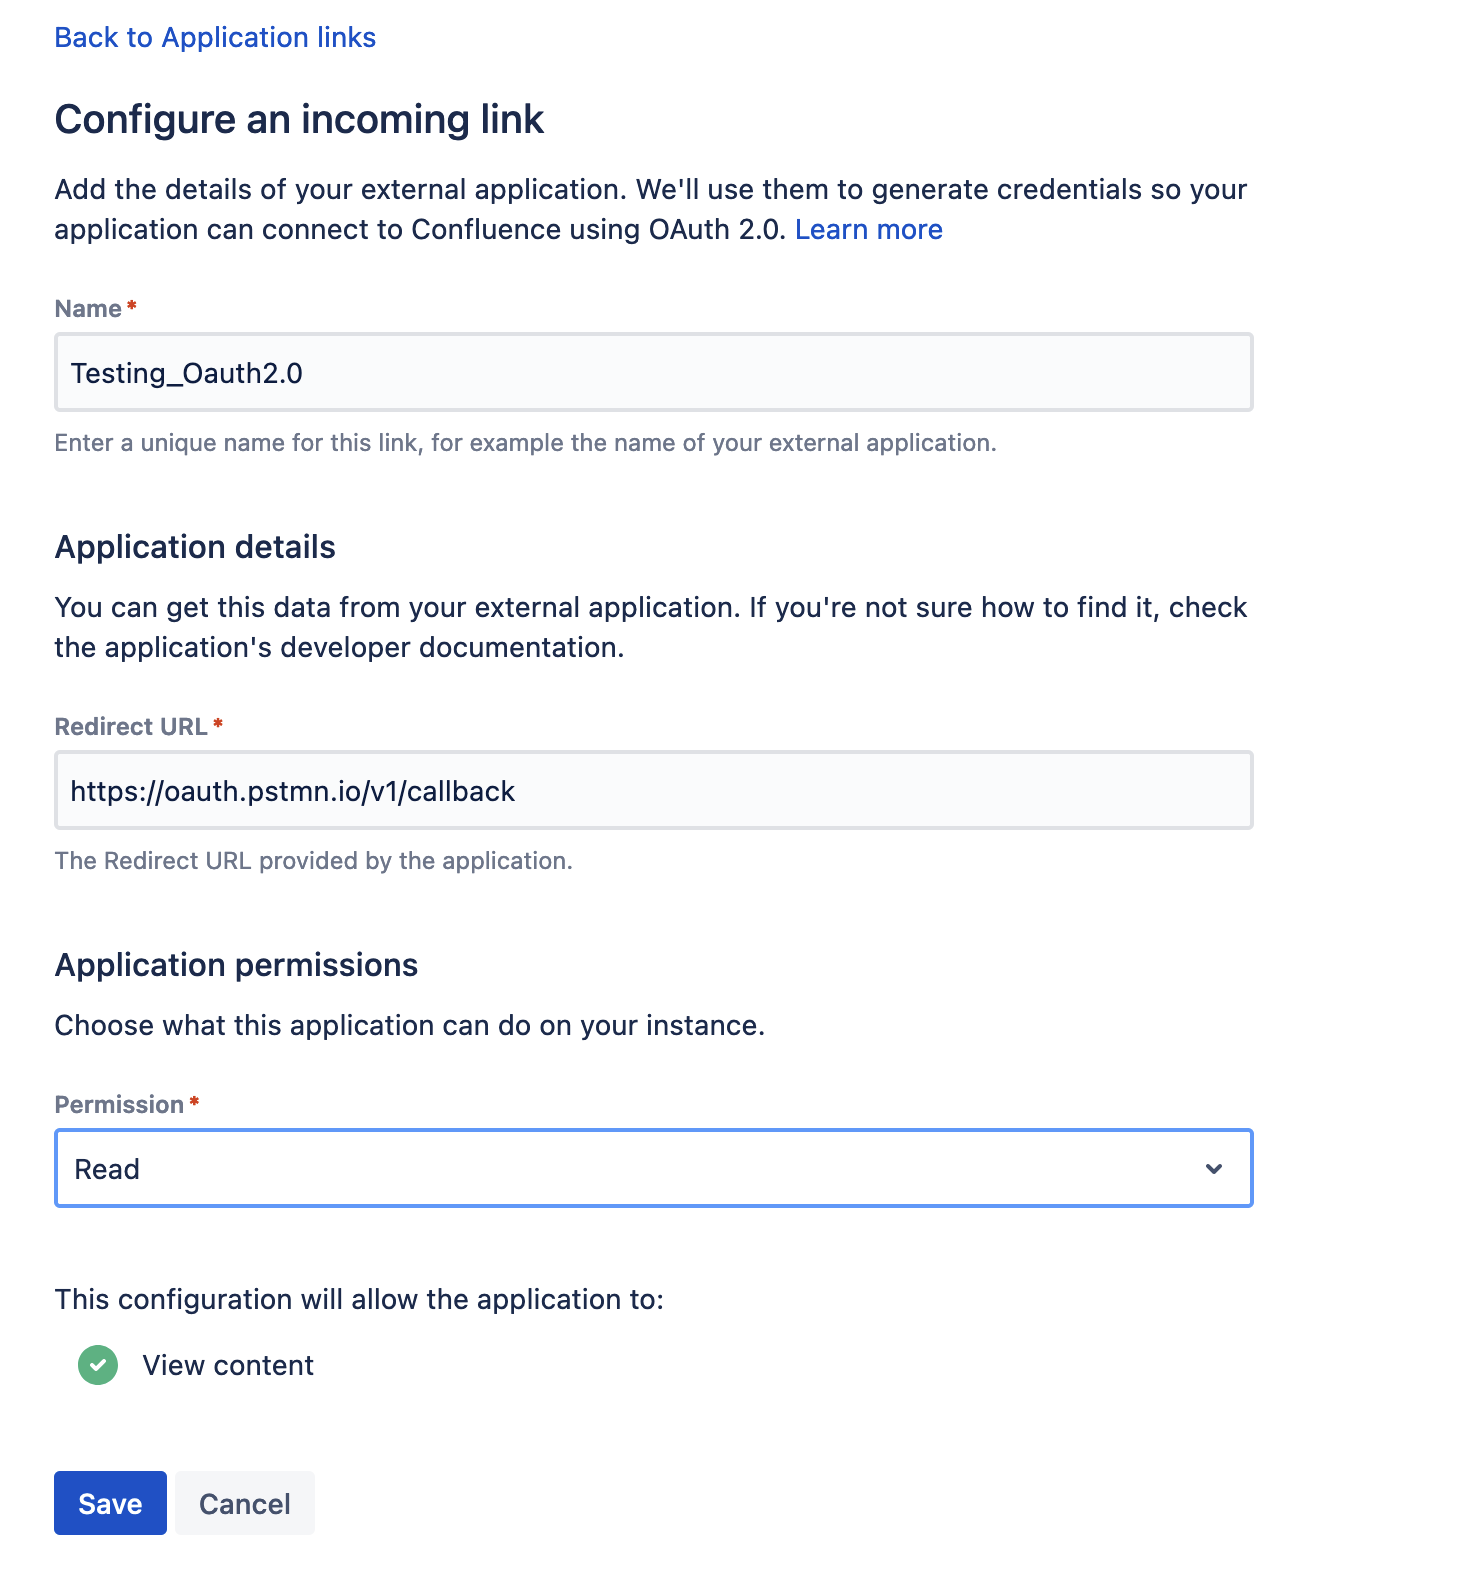
アプリケーションの詳細を入力する
このタイプのリンクで必要な設定は、外部アプリケーションからのリダイレクト URL (コールバック URL とも呼ばれる) の指定のみです。アプリケーションを承認すると、ユーザーは認可コードでこの URL にリダイレクトされます。
Note: Here https://oauth.pstmn.io/v1/callback is the Postman CallbackURL which is used for testing purposes only.
アプリケーション権限を付与する
アプリケーションがインスタンスに対して持てる権限を選択します。次の権限スコープを選択できます。
対象ページ
書き込み
管理
システム管理者
- サブスクリプションの管理
Note that even if you grant higher permissions, the application won’t be able to do more than the user authorizing it. For more info on what each of these scopes do, see OAuth 2.0 scopes for incoming links.
OAuth 認証情報をアプリケーションにコピーする
リダイレクト URL を入力してスコープを選択すると、Confluence がこれらの詳細を含む OAuth 資格情報を生成します。リンクを完成させるには、資格情報を外部アプリにコピーする必要があります。
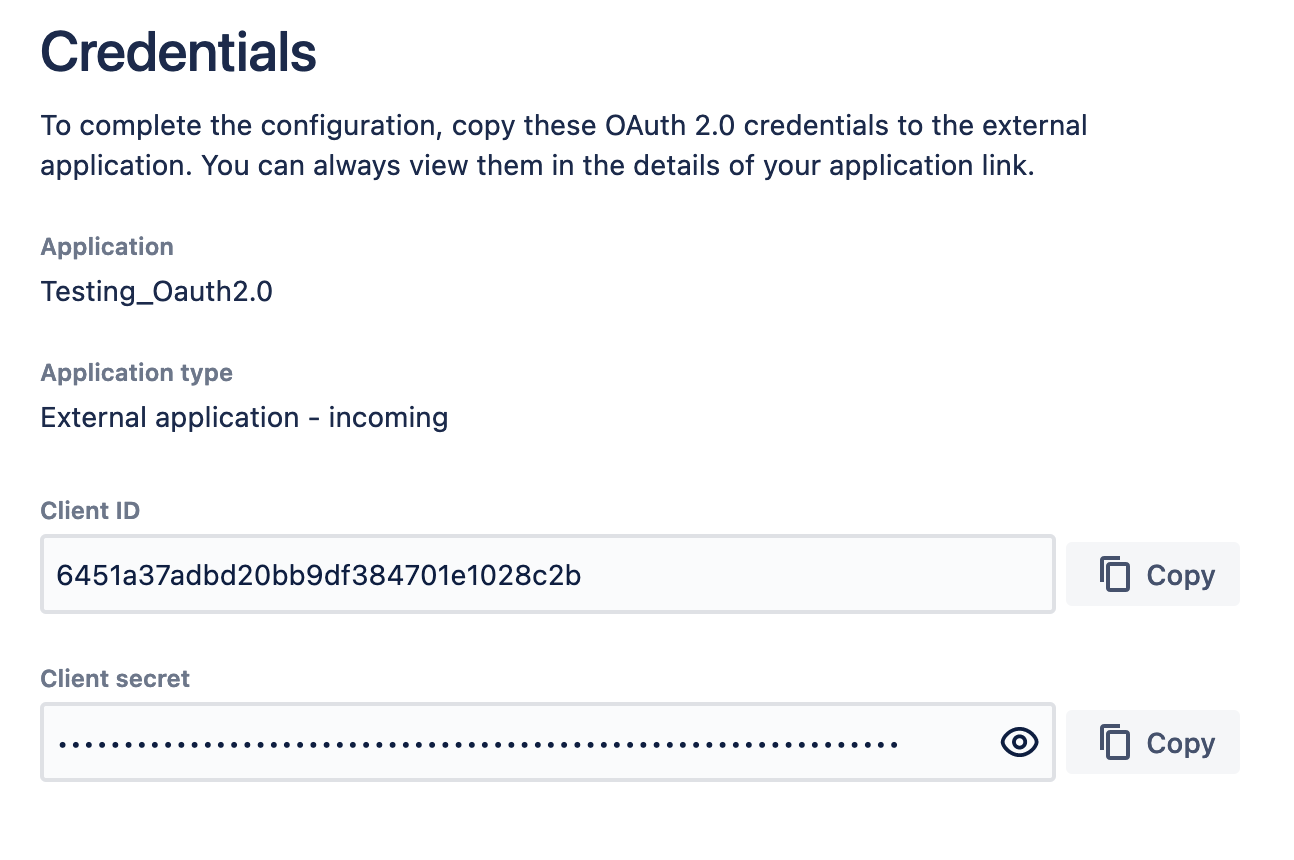
この時点で、アプリ リンクは Confluence で既に作成されています。OAuth 資格情報を含むアプリ リンクに後でアクセスする必要が生じた場合に備えて、その詳細を表示できます。
既存のリンクに関する OAuth 認証情報を表示する
OAuth 認証情報がわからなくなった場合は、作成したアプリケーション リンクの詳細からいつでもアクセスできます。
OAuth 認証情報を表示するには、次の手順に従います。
- Go to Settings > General Configuration > Application links.
- Find the application link you’re interested in, and select More actions > View credentials.
Proof Key for Code Exchange (PKCE) を含む認可コード
このフローによって、公開クライアント上でアクセス トークンに対するクライアント認証情報の OAuth 交換を安全に実行できます。
このフローで使用するパラメーターは次のとおりです。
| パラメーター | 説明 | 必須 |
|---|---|---|
| redirect_uri | リクエストの承認後にユーザーがリダイレクトされる URL。 | はい |
| client_id | Client ID received from Confluence after registering your application. | はい |
| response_type | 認可コード。 | はい |
| scope | Scopes that define application’s permissions to the user account. For more info, see Scopes. | はい |
| code_challenge |
| はい |
| code_challenge_method | Can be plain or sha256 depending on how the code_challenge was generated. | |
| code_verifier | High-entropy cryptographic random STRING using the unreserved characters: [A-Z] / [a-z] / [0-9] / "-" / "." / "_" / "~". It must be between 43-127 characters. For more info, see the RFC. | はい |
| state | A value that can't be predicted. It will be used by the client to maintain state between the request and callback. It should also be used as a CSRF token. It can be generated in a similar manner to code_verifier. | いいえ |
手順
Generating authorization and access token using Postman
- As per the initial steps, the incoming link with an external application is already created and already generates the Client ID & Client Secret.
- Copy both Client ID & Client Secret and save them somewhere as these 2 values will be used for generating the access token.
- After that, Open a new request in Postman and open the Authorization tab.
- Here select the type as Oauth 2.0 and configure the new token.
- Here provide the following values:
- Token Name -> Anything
- Grant Type -> select "Authorization Code"
- Callback URL -> Use the Callback URL whatever you have. For testing we used https://oauth.pstmn.io/v1/callback"
- Authorize using browser: Uncheck this open
- Auth URL -> https://<Base URL>/rest/oauth2/latest/authorize
- Access Token URL -> https://<Base URL>/rest/oauth2/latest/token
- Client ID -> Client ID generated during the Incoming app link Configuration
- Client Secret -> Client Secret generated during the Incoming app link Configuration
- Scope -> Whatever Scope you want to define
- State -> Any unique Value
- Client Authentication -> Select "Send Client credential in the body"
- Last click on the "Get New Access Token". This will open the application login page, where you need to provide the credential:
- After authenticating the user, the application will open the consent page, where you need to allow the request:
- After this Postman, will use the authorization code and generate the access token and you will get the following screen with detail:

i. Using this access Token, Confluence REST API can be used on a user’s behalf with the OAuth 2.0 protocol.