Connect Bitbucket to Pgpool-II
This page describes how to connect Bitbucket to Pgpool-II.
Pgpool-II について
Pgpool-II is a high-availability (HA) database solution based on Postgres. Here’s why we recommend moving to high-availability databases like Pgpool-II:
No single point of failure (SPoF). Pgpool-II addresses the challenges typical of PostgreSQL databases that expose a Single-Point-of-Failure resulting in business impact due to service downtimes.
接続プーリング。Pgpool-II は接続プーリングを提供しているため、複数のクライアント アプリがデータベース接続プールを共有できます。これにより、クライアント リクエストごとに新しい接続を確立するオーバーヘッドが大幅に軽減され、結果的にパフォーマンスが向上し、リソース消費量を削減できます。
負荷分散。Pgpool-II には、クライアント リクエストを複数の PostgreSQL サーバー全体に分散するロード バランサーが組み込まれています。これにより、ワークロードが均等に分散され、利用可能なデータベース サーバー全体で最適なリソース使用が保証されます。
高可用性。Pgpool-II は、自動フェイルオーバーやオンライン復旧などの機能を実装することで、可用性の高い構成をサポートします。プライマリ PostgreSQL サーバーに障害が発生したことを検出し、スタンバイ サーバーを自動的にプライマリ サーバーに昇格させることができるため、ダウンタイムが最小限に抑えられ、データベースの可用性を確実に維持できます。
Visit Pgpool-II official documentation
はじめる前に
ご利用の PostgreSQL のバージョンがサポート対象であることをご確認ください。詳細は「サポート対象プラットフォーム」をご参照ください。
Backup
If you're migrating your Bitbucket data from the HSQL internal database, back up the home directory.
If you're migrating your Bitbucket data from another external database, back up that database by following the instructions provided by the database vendor before proceeding with these instructions.
More about recovery and backups
1. Pgpool-II 環境を実行/設定する
このドキュメントでは、VMware が提供する Bitnami の Docker イメージを使用して説明します。Pgpool の公式ドキュメントによると、この方法には いくつかのメリットがあります。
- Bitnami は上流のソースの変更を綿密に追跡し、当社の自動システムを使用してこのイメージの新バージョンを速やかに公開します。
- Bitnami イメージがあれば、最新のバグ修正と機能を早急に利用できます。
セットアップ
まず、Postgres ノードをセットアップする必要があります。これらのノードは相互にアクセスできる必要があります。同じプライベート サブネットの一部にすることも、インターネットに公開することもできます。ただし、インターネットへの公開はお勧めしません。
別のマシンにプライマリ PostgreSQL ノードを作成します。次のコマンドを実行します。
docker network create my-network --driver bridgeノードを起動すると次のようになります。
docker run --detach --rm --name pg-0 \
  -p 5432:5432 \
  --network my-network \
  --env REPMGR_PARTNER_NODES={PG-0-IP},{PG-1-IP} \
  --env REPMGR_NODE_NAME=pg-0 \
  --env REPMGR_NODE_NETWORK_NAME={PG-0-IP} \
  --env REPMGR_PRIMARY_HOST={PG-0-IP} \
  --env REPMGR_PASSWORD=repmgrpass \
  --env POSTGRESQL_POSTGRES_PASSWORD=adminpassword \
  --env POSTGRESQL_USERNAME=customuser \
  --env POSTGRESQL_PASSWORD=custompassword \
  --env POSTGRESQL_DATABASE=customdatabase \
  --env BITNAMI_DEBUG=true \
  bitnami/postgresql-repmgr:latest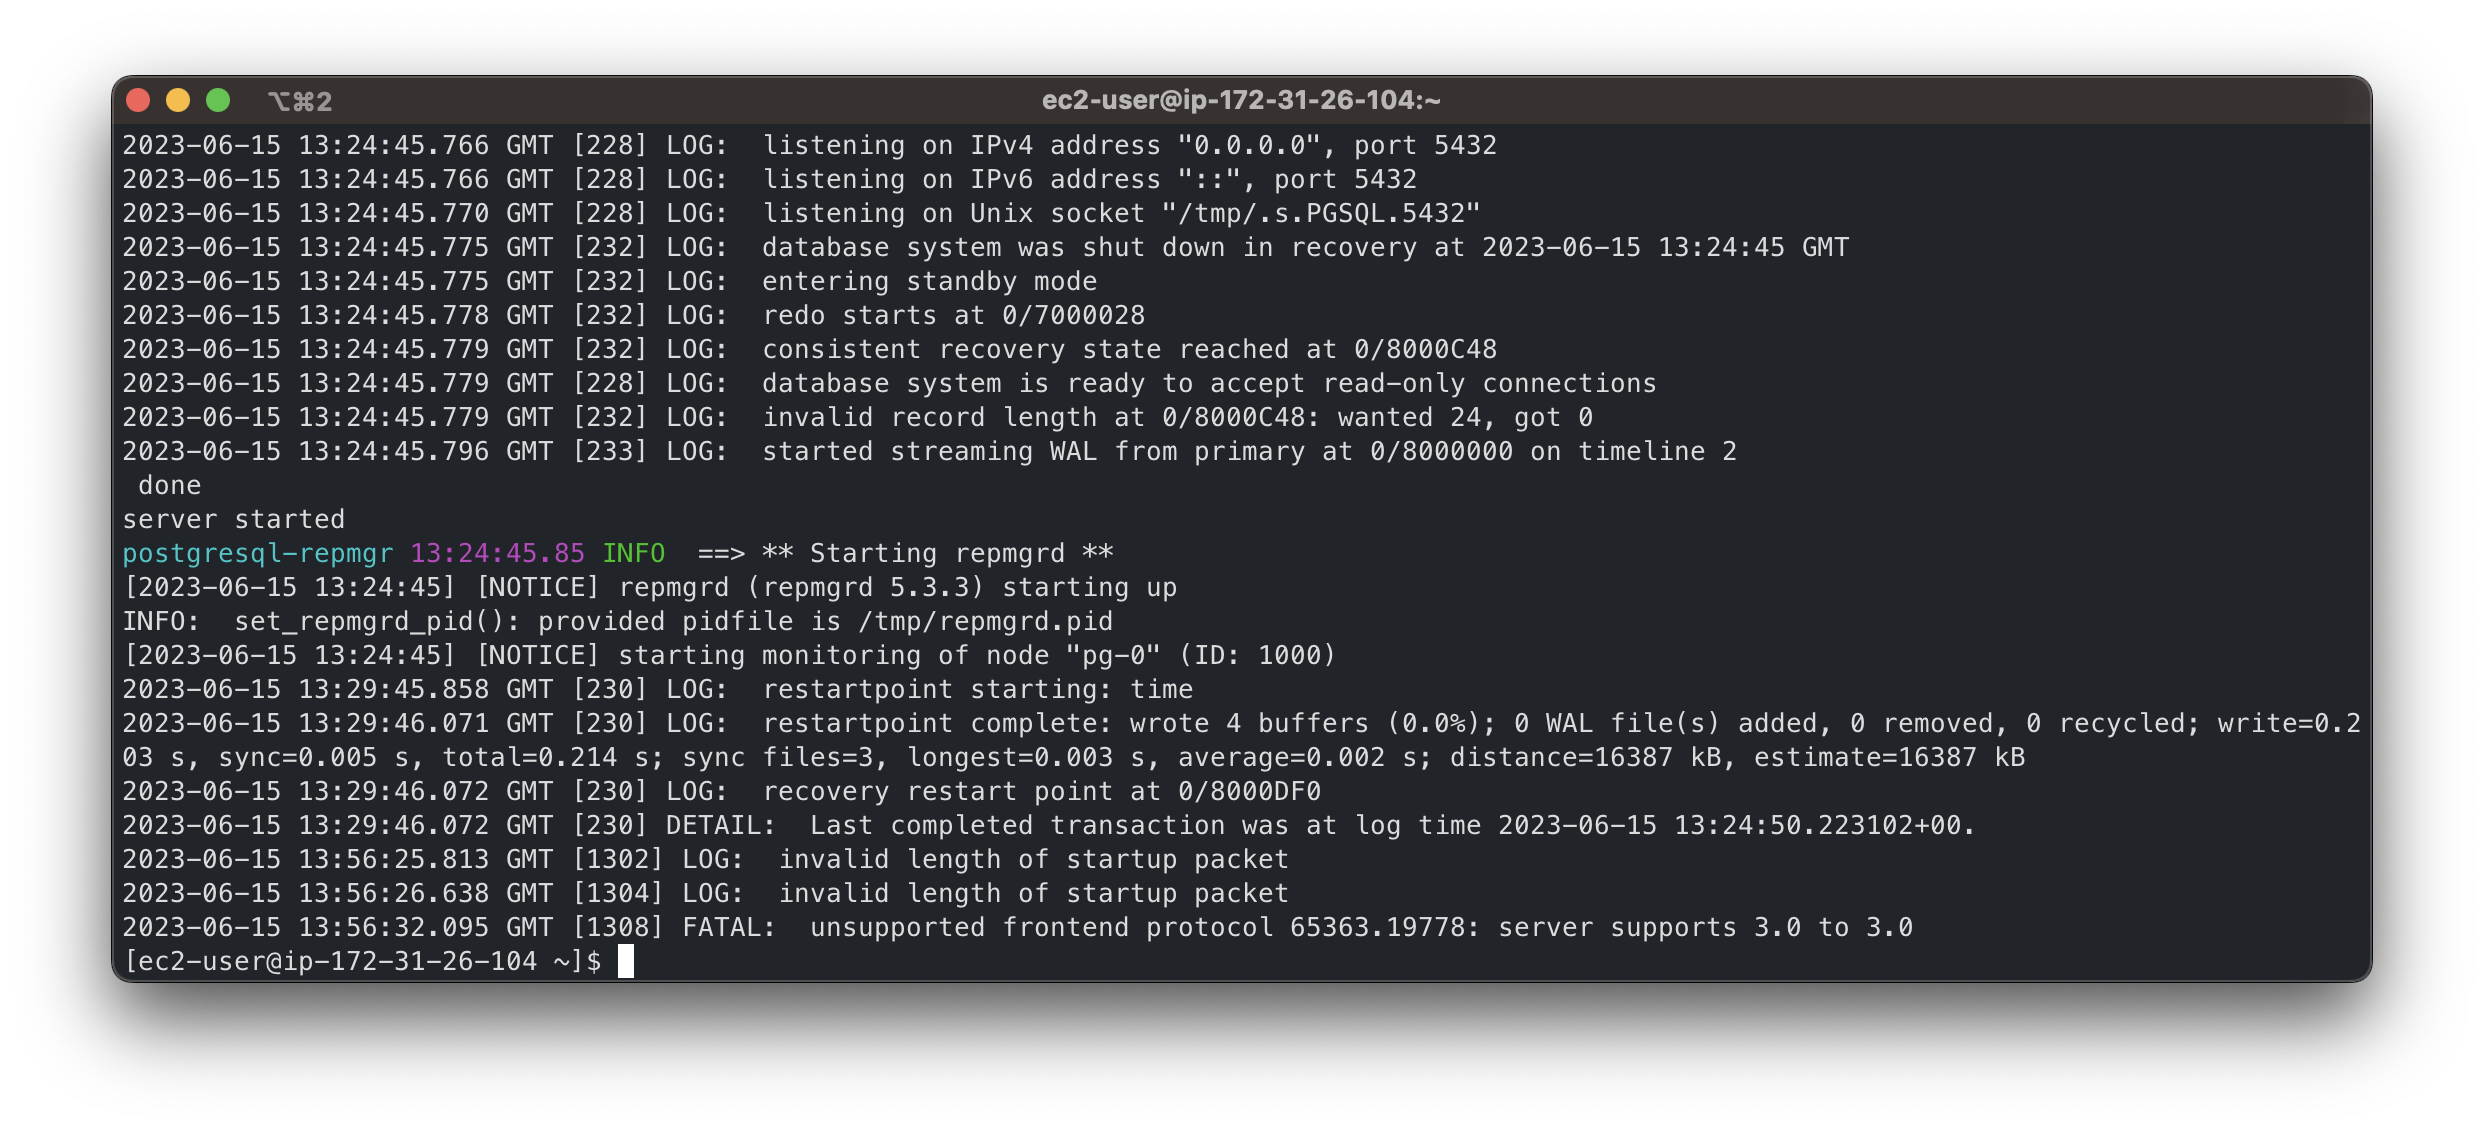
The message[NOTICE] starting monitoring of node "pg-0" (ID: 1000)confirms the successful creation of the primary node.別のマシンにスタンバイ ノードを作成します。次のコマンドを実行します。
docker network create my-network --driver bridgeノードを起動すると次のようになります。
docker run --detach --rm --name pg-1 \ -p 5432:5432 \ --network my-network \ --env REPMGR_PARTNER_NODES={PG-0-IP},{PG-1-IP} \ --env REPMGR_NODE_NAME=pg-1 \ --env REPMGR_NODE_NETWORK_NAME={PG-1-IP} \ --env REPMGR_PRIMARY_HOST={PG-0-IP} \ --env REPMGR_PASSWORD=repmgrpass \ --env POSTGRESQL_POSTGRES_PASSWORD=adminpassword \ --env POSTGRESQL_USERNAME=customuser \ --env POSTGRESQL_PASSWORD=custompassword \ --env POSTGRESQL_DATABASE=customdatabase \ --env BITNAMI_DEBUG=true \ bitnami/postgresql-repmgr:latest- コード サンプル内の
{PG-0-IP},{PG-1-IP}を、pg-0 ノードと pg-1 ノードへのアクセスに使用できるコンマ区切りの IP アドレスに置き換えます。例:15.237.94.251,35.181.56.169 - 相互接続を確立するために、スタンバイ ノードは起動後すぐにプライマリ ノードへのアクセスを試みます。
- コード サンプル内の
その他のノードを参照する Pgpool バランサー ミドルウェア ノードを作成します。次のコマンドを実行します。
docker network create my-network --driver bridgeノードを起動すると次のようになります。
docker run --detach --name pgpool --network my-network \ -p 5432:5432 \ --env PGPOOL_BACKEND_NODES=0:{PG-0-HOST},1:{PG-1-HOST} \ --env PGPOOL_SR_CHECK_USER=postgres \ --env PGPOOL_SR_CHECK_PASSWORD=adminpassword \ --env PGPOOL_ENABLE_LDAP=no \ --env PGPOOL_USERNAME=customuser \ --env PGPOOL_PASSWORD=custompassword \ --env PGPOOL_POSTGRES_USERNAME=postgres \ --env PGPOOL_POSTGRES_PASSWORD=adminpassword \ --env PGPOOL_ADMIN_USERNAME=admin \ --env PGPOOL_ADMIN_PASSWORD=adminpassword \ --env PGPOOL_ENABLE_LOAD_BALANCING=no \ --env PGPOOL_AUTO_FAILBACK=yes \ --env PGPOOL_BACKEND_APPLICATION_NAMES=pg-0,pg-1 \ bitnami/pgpool:latest- Replace
{PG-0-HOST},{PG-1-HOST}in the code sample with the host addresses of the pg-0 and pg-1 nodes, including ports. For example,15.237.94.251:5432.
More about the configuration of the Bitnami containers
- Replace
これで、
pgpoolコンテナーをデータベース クラスタへのエントリ ポイントとして使用できます。pgpoolコンテナーに接続するには、次のコマンドを使用します。psql -h {PGPOOL-HOST} -p 5432 -U postgres -d repmgrReplace
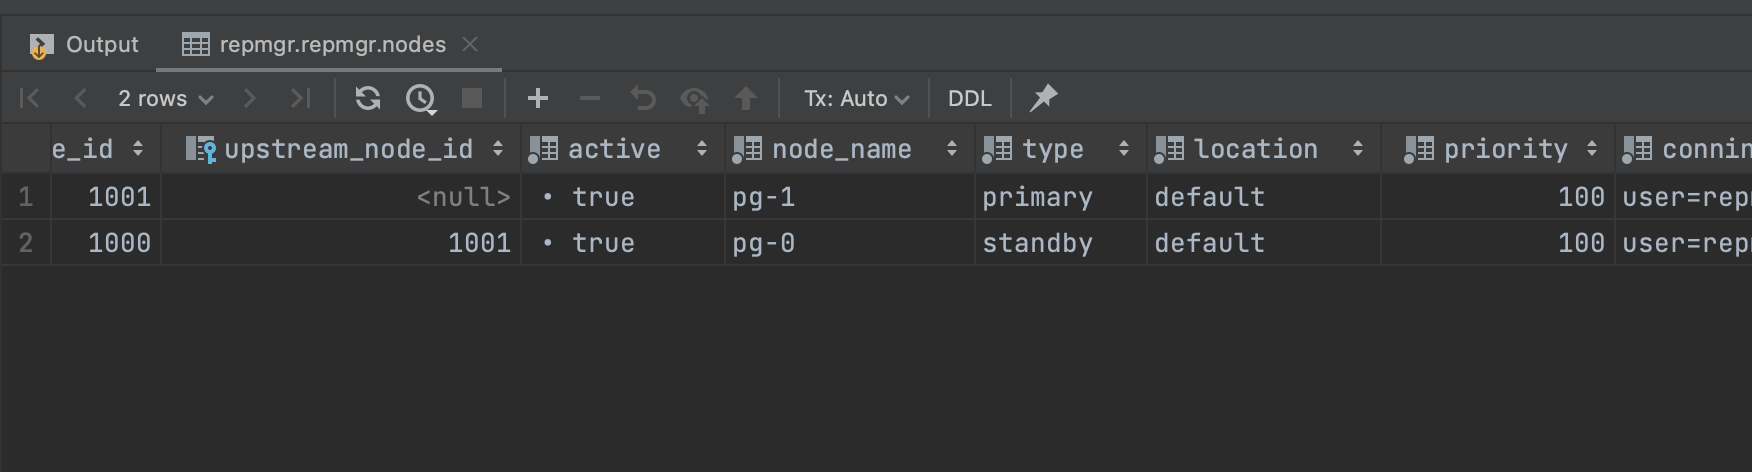
{PGPOOL-HOST}in the code sample with thepgpoolnode address. For example,34.227.66.69. To confirm the successful deployment, access the tablerepmgr.nodesby using the following SQL query:SELECT * FROM repmgr.nodes;出力には、各ノードの状態に関する情報がすべて表示されているはずです。
Create the Bitbucket database
Before you can use Bitbucket with PostgreSQL, you must:
- Create a role for Bitbucket to use when it connects to the database.
We strongly recommend that this role be established for Bitbucket's use exclusively; it should not be shared by other applications or people. - Create a database in which Bitbucket can store its data.
The database must be configured to use the UTF-8 character set.
During normal operation, Bitbucket will acquire 25–30 connections to the database. The maximum number of connections is a configurable system property – see Database pool. - Note that Bitbucket requires the database to keep idle connections alive for at least 10 minutes. If the database is configured with less than a 10-minute connection timeout, there will be seemingly random connection errors.
Here is an example of how to create a user called bitbucketuser with password jellyfish
, and a database called bitbucket , which is configured for use by bitbucketuser. Using a PostgreSQL client application like psql or pgAdmin, run the following commands, replacing the user name, password, and database name with your own values.
CREATE ROLE bitbucketuser WITH LOGIN PASSWORD 'jellyfish' VALID UNTIL 'infinity';

CREATE DATABASE bitbucket WITH ENCODING='UTF8' OWNER=bitbucketuser CONNECTION LIMIT=-1;
Ensure that the Bitbucket server can connect to the Pgpool server.
Connect Bitbucket to Pgpool-II
You can now connect Bitbucket to Pgpool-II, either:
- when you run the Setup Wizard, at install time,
- when you wish to migrate to PgPool-II, either from the embedded HSQL database or from another external database.
The instructions below are the same as for connecting to a Postgres database, except that the host and port are those of the Pgpool-II server rather than connecting to the Postgres database server directly.
If migrating to Pgpool-II without using the setup or migration wizards, it's important to ensure the jdb.url property in $bitbuckethome/shared/bitbucket.properties doesn't contain a "targetServerType" parameter. This was added automatically in previous versions of Bitbucket but will cause issues with Bitbucket startup when using Pgpool after a failover to the secondary has occurred. If it is there it is safe to remove. Previous versions of Bitbucket would add it back in when the driver is org.postgresql.Driver and there is no "?" in the jdbc.url property.
When running the Setup Wizard at install time
- At the Database step, select External.
- Select PostgreSQL for Database Type.
- Complete the form. Refer to the table below for details.
- Select Next, and follow the instructions in the Bitbucket Setup Wizard.
When migrating to PostgreSQL
- In the Bitbucket administration area, select Database.
- Select Migrate database.
- Select PostgreSQL for Database Type.
- Complete the form:
- Hostname: The hostname or IP address of the computer running the Pgpool-II server.
- Port: The TCP port with which Bitbucket can connect to the database server. The default value is the default port that PostgreSQL runs against. You can change that if you know the port that your Pgpool-II instance is using.
Database name: The name of the database that Bitbucket should connect to.
Database username: The username that Bitbucket should use to access the database.
Database password: The password that Bitbucket should use to access the database.
- Select Start Migration.
