Jira Core 9.11.x アップグレード ノート
Here are some important notes on upgrading to Jira Core 9.11.x.
次のセクションにジャンプ
- アップグレード ノート
- Mask secret keys in automation rules
- New actions added to Jira automation
- Allowlist in Jira automation is now enabled by default
- Feature improvements: project shortcuts can now be reordered
- Store attachments more efficiently in the S3 object storage
- サポート zip 作成の改善
- プロジェクト権限の構成方法を拡張
- Jira のデータベース接続のドロップアウトに対する回復力が向上します
- チェックの状態を追跡する進行状況バーをデータベース整合性チェッカーに追加
- システムを再起動しなくても、ユーザー セッションをクラスター全体で無効化できます
- AWS Secrets Manager を使用して Jira Software の設定を管理する
- 製品内診断用の新しいインフラストラクチャ指標
- Jira モバイル Web インターフェイスの廃止
- サポート対象プラットフォーム
- アプリ開発者向けの情報
- アップグレード手順
8.x から 9.x へのアップグレードでは Jira の完全な再インデックスがトリガーされるため、プロセス中にダウンタイムが発生します。現在 8.x をご利用の場合、ダウンタイムを予測したうえでアップグレードに最適な時間枠を選ぶようにしてください。
 アップグレード ノート
Jira automation 9.0 release
Along with Jira Software 9.11 and Jira Service Management 5.11, we’re releasing Jira automation 9.0 – an upgrade to the Automation for Jira app. Jira automation 9.0 comes with security improvements and introduces two new actions to automation rules — Lookup issues and Create variable. This version is compatible with the following Jira applications:
- Jira Software Data Center 8.20.0 以降
- Jira Service Management 4.20.0 以降
Mask secret keys in automation rules DATA CENTER
We realize how important it is to establish a secure and uncompromised connection with an external app, like Microsoft Teams or Slack. In Jira automation 9.0, we’ve started masking secret keys and URLs that you use in notification actions for automation rules to connect to external services.
With secret key masking, we’re providing a reliable solution for security concerns and safe data reuse across your instance:
- The masking mechanism ensures that the values of secret keys in automation rules aren’t visible to any user. When viewing a secret key or selecting it from a list, you’ll see the name of the secret key, but not the value.
- You now have one place – the Secret keys panel – where you can create, edit, and remove secret keys according to your role.
- Based on its scope, you can reuse a secret key across multiple projects without the risk of disclosure.
To view secret keys or create a new one:
Upgrade the Automation for Jira app to version 9.0.
- 画面右上で [管理] > [システム] の順に選択します。
- In the left-side panel, select Automation rules.
- ミートボール メニューで [シークレット キーを管理] を選択します。

- 新しいシークレット キーを作成するには、[新しいシークレット] を選択します。
- Fill in the fields and select Add. Note that if you’re a project admin, you can select only the Single project scope for your secret key. If you’re a system admin, you can select the Single project, Multiple Projects, or All projects scope.
Learn more about secret key masking
New actions added to Jira automation DATA CENTER
Manage your work in Jira more efficiently by using two new actions added to Jira automation 9.0:
- Lookup issues to query for issues and aggregate results for use in other actions.
- Create variable to store text values or other smart values and use them in other actions.
Learn more about Jira automation actions and how to use them
Lookup issues action
This action allows you to search for issues based on a JQL query and store their data in the smart value {{lookupIssues}}. This value acts like a list so it’ll work with other values of the same format.

Learn more about using smart values in the following guides:
既定では、JQL クエリで取得できる課題の最大数は 100 に設定されています。次の値を使用すると、グローバル設定で課題リストの制限を変更できます。
- 1 から始まる任意の整数を追加します。
- Enter “-1” to remove the limit. Consider that this might potentially lead to performance issues.

- Global configuration options in Jira automation
- 課題のルックアップ アクションで JQL がクエリする課題の制限を設定
Learn how to configure the issue results limit
Create variable action
This action allows you to store the content of a smart value inside a variable, which will be available within the entire scope of the rule, including inside branches.

For example, you can create a variable called storypoints, which is accessed in the rule by using the syntax {{storypoints}}.
Consider that the variable name can only contain alphabetical characters. If this condition isn't met, the app will return the error “Value can only be alphabetic characters” when you try to save the action.
Allowlist in Jira automation is now enabled by default INCLUDES BREAKING CHANGES
This change might break currently configured rules if the provided URLs aren’t allowlisted.
Jira system administrators can fix broken rules by adding the URLs to the allowlist or disabling allowlist verification. We don’t recommend disabling the feature as it can pose a security risk.
To strengthen the security in Jira automation and enhance the protection against Server-Side Request Forgery (SSRF) attacks, we’re changing the way Jira handles external requests by enabling Jira allowlist by default. In Jira automation, the allowlist for sending outbound HTTP requests is always enabled in the Global configuration menu.

How this affects your automation rules
You can’t publish a rule if the URL you are requesting isn’t present in Jira's allowlist.
Automation rules that no longer work after this change can still be marked as successfully executed in the UI. To check if the rule was triggered and view its final result, inspect the audit log — if the rule doesn’t work due to allowlisting changes, you’ll see an execution error. Learn more about the audit log

If a rule is currently disabled, you won’t be able to make it active and will see the “Error 404: file not found” in the web console. Adding the requested URL to the allowlist will fix the error.
The information about allowlist settings is stored in the Application properties table on the System info page. To access the settings, go to Administration > System > System info.
Feature improvements: project shortcuts can now be reordered
Keep project shortcuts better organized with the new ability to rearrange them in the project sidebar. You can now make the frequently used links appear first in the list, or group them together to keep all related info in one spot:
- drag and drop the shortcuts to rearrange
- change shortcut positioning in the list by using the Move up and Move down buttons
Learn more about managing project shortcuts
Store attachments more efficiently in the S3 object storage DATA CENTER INCLUDES BREAKING CHANGES
This feature is currently available behind the feature flag com.atlassian.jira.attachments.storage.configurable. When enabled, it introduces breaking changes to the API and might also break some Jira apps. Check what’s changed in the API
Make sure that you properly test the feature before enabling it in your production environment. Learn how to enable dark features in Jira
If you’re using Jira Software Data Center 9.11.0 and running your application in AWS, you can store attachments in Amazon S3 object storage.
S3 object storage offers an enhanced enterprise experience compared to the Network File System (NFS), especially for customers with large or growing data storage needs. Learn more about configuring Amazon S3 object storage
You can also store attachments in a third-party object store that exposes an S3-compatible API. However, we’re not providing direct support for attachments that are stored in an object store other than Amazon S3.
Changes to the API
Some Jira APIs aren't compatible with the introduced S3 object storage method as they expose filesystem-specific concepts such as java.io.File.
Some apps still use these incompatible APIs and may not function correctly when attachments are stored in S3. Ensure you test the apps on your instance before enabling this feature.
These APIs have been deprecated since Jira 9.7 or earlier, and most of them have alternatives documented in the Javadocs:
The following API classes may not function correctly from Jira 9.11 for instances that have configured their attachments to be stored in S3.
How S3 object storage is configured in Jira
S3 object storage is configured in the filestore-config.xml file that should be located in Jira <localhome>. To use S3 as a target location for attachments, the filestore attribute in the filestore-config.xml must match the s3-filestore id.
If you’re already using Amazon S3 to store avatars
If you already have S3 object storage configured and want to keep attachments in the same bucket as avatars, the filestore attribute should point to the same bucket where avatars are located.
To use separate buckets for attachments and avatars, define multiple <s3-filestore> elements and reference each of them in the respective association targets.
サポート zip 作成の改善
In this release, we’ve revamped the process of creating a support zip in the Atlassian Troubleshooting and Support Tools (ATST) app. The Create a support zip page got a new design and enhanced functionality:
- Users are now able to pick one of four file size limitation options (25/100/500 MB per file)
- Added an option to select logs based on the last file modification date: any time, today, or in the past 3/5/10 days
- The default maximum file size is now 100 MB per file
- Added new API parameters to support File modification date and Maximum file size options
- After creating a zip, the customization preferences are saved and shared across the instance
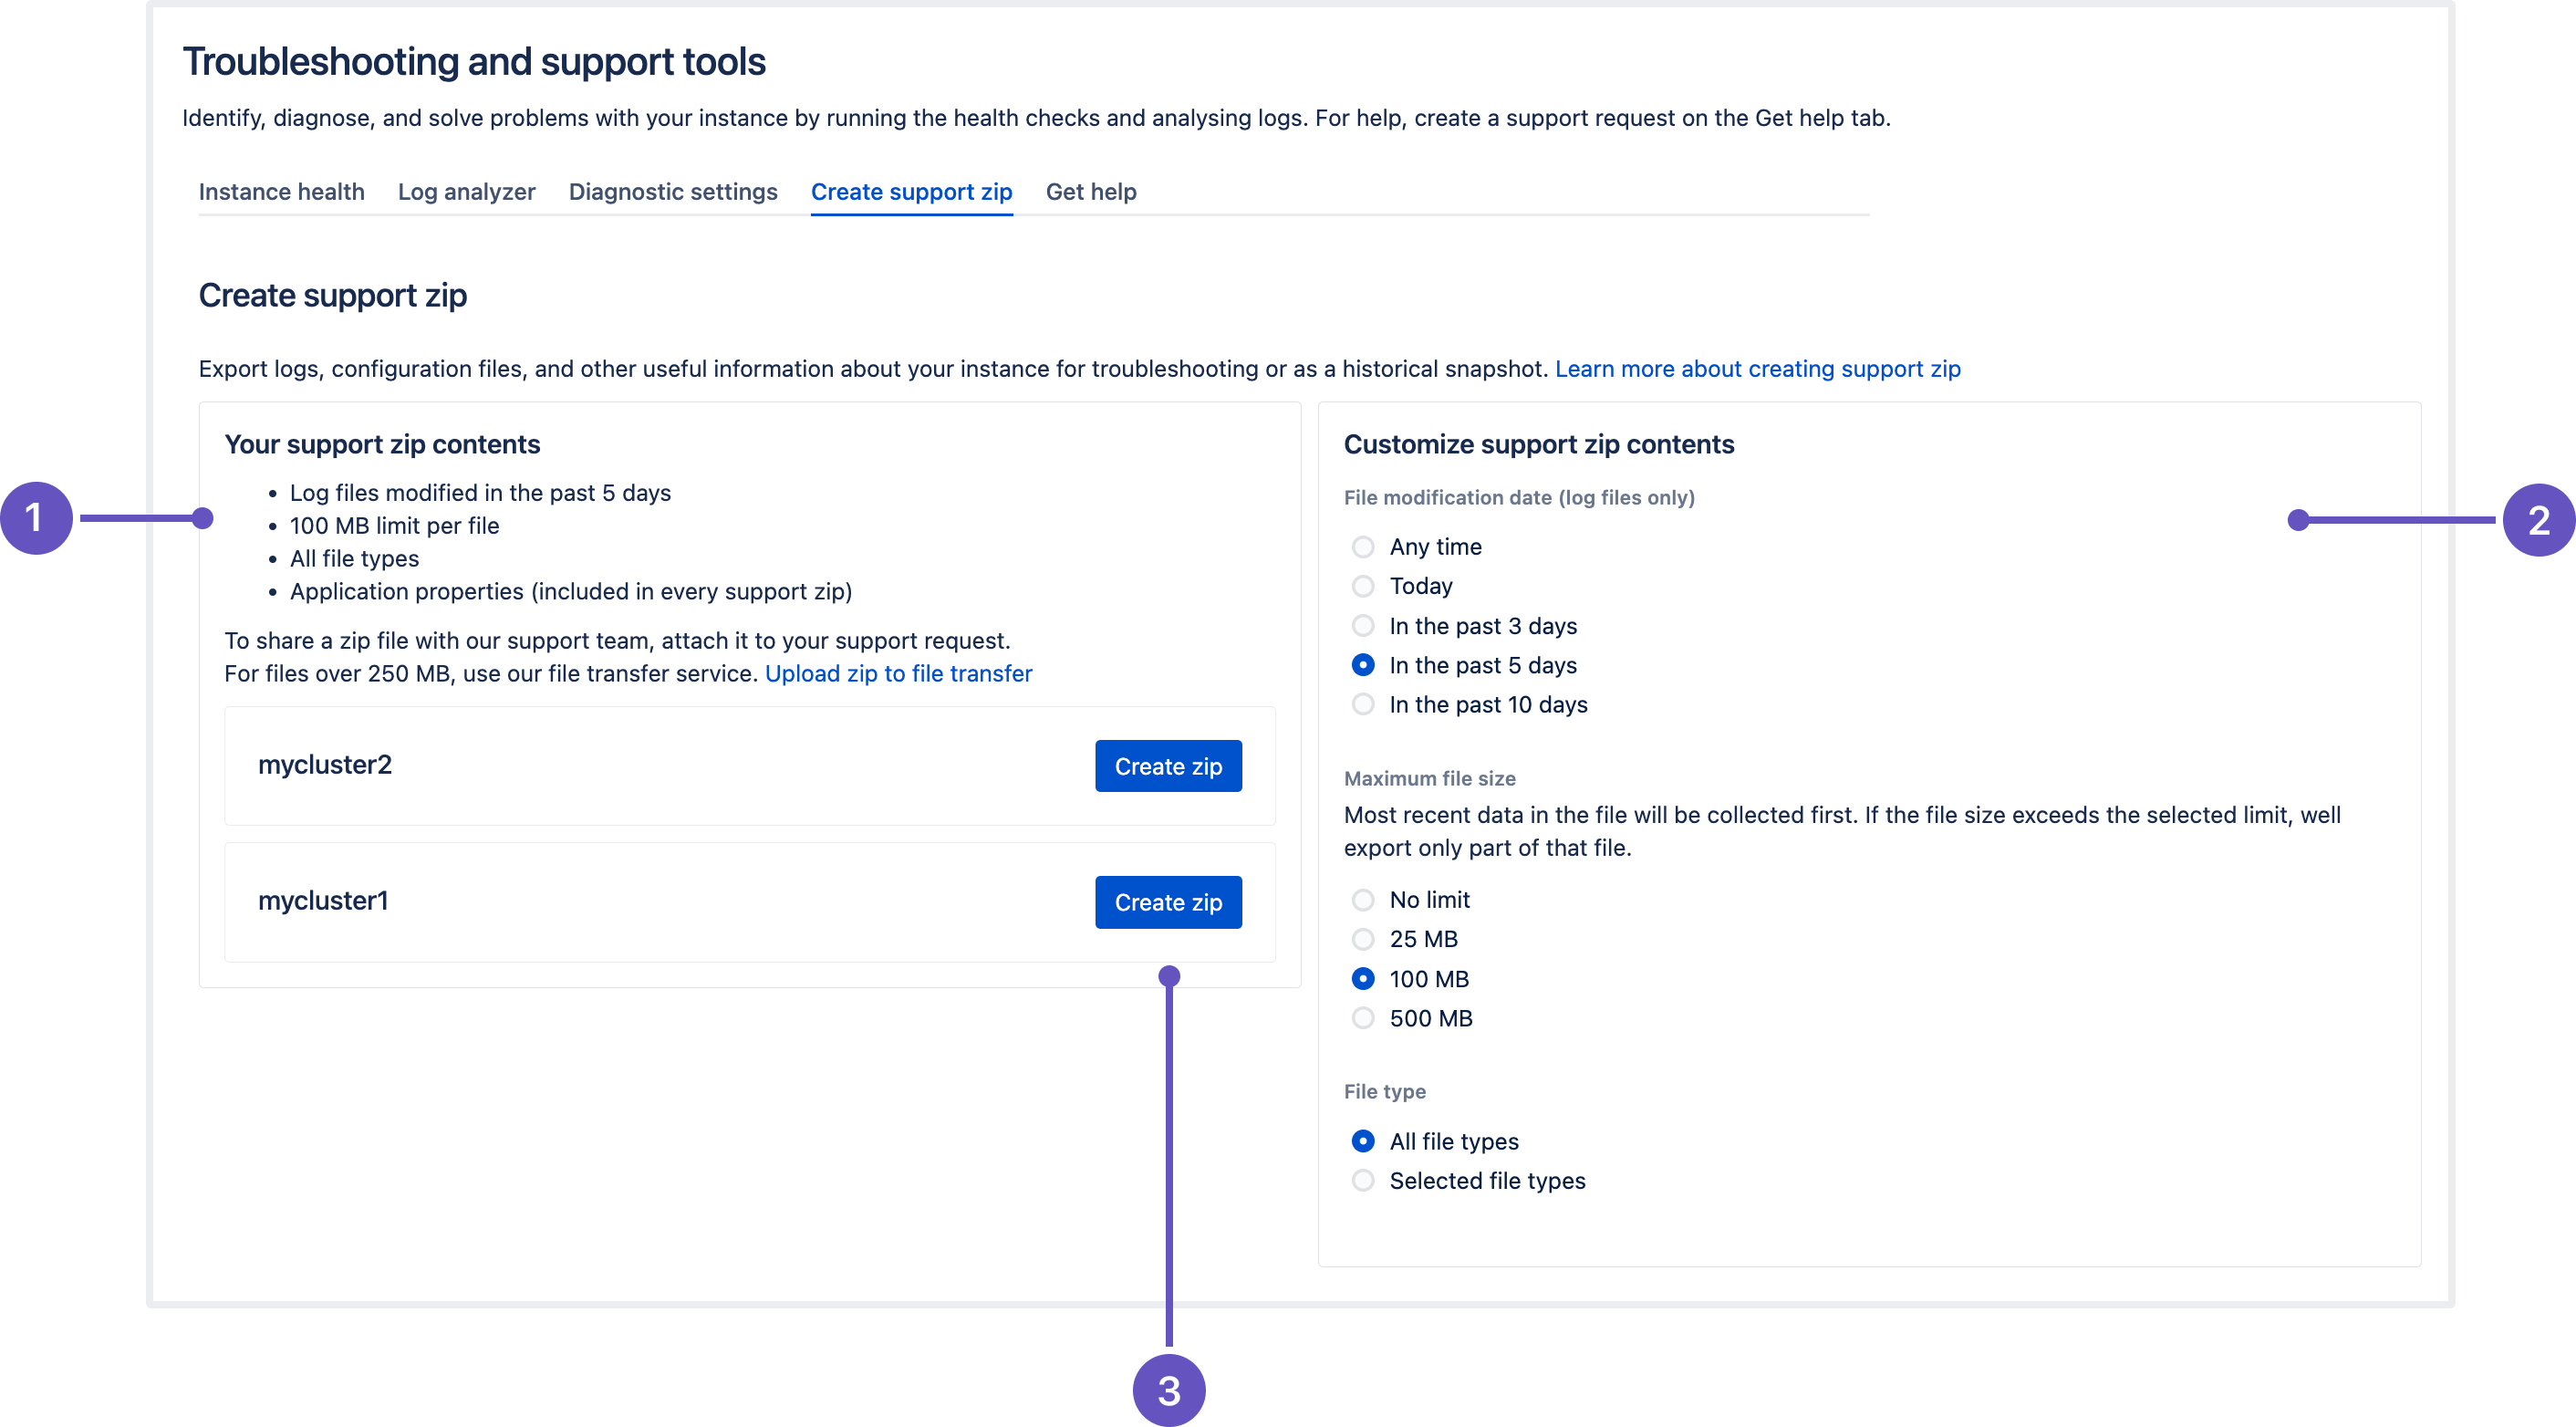
- Verify the contents of your zip file
- Customize the contents of your zip file
- Create a new support zip on this node
Learn more about creating a support zip
Project permissions get extended configuration DATA CENTER
After this update, some users might not see every person that was previously displayed in Assignee, Reporter, and user mentions.
If you don’t want to have this update immediately and need to adjust the project permissions first, disable this feature flag: com.atlassian.jira.ignoreBrowseUsersPermissionsInUserPickers.
To use the updated functionality, just enable the flag again.
To enhance the privacy and security of your project information, we’re making changes to the project permissions that’ll give your more granular control over the level of data displayed to users.
You can now set up more “contextual” browsing within the project by defining user visibility in mentions, Assignee, and Reporter pickers. This lets you disclose the key information needed to complete a task, without giving users full permissions in the project.
What has changed
We no longer check the Browse users permission for User mentions (@user) as well as Assignee and Reporter pickers. Instead, we validate the following permissions of a user that's interacting with the pickers or wants to mention someone:
- Assign issues for Assignee. This picker will now show all users that have the Assignable user permission in the project.
- Modify reporter for Reporter.
- Browse projects for User mentions.
Based on these permissions, we define whom the user will see in these pickers and mentions.
The pickers and mentions will also work for anonymous users if those users have proper access to the project. For bulk edit operations that include issues from multiple projects, only users that have appropriate permissions to all of these projects will be displayed.
Learn more about project permissions and how to configure them
Jira のデータベース接続のドロップアウトに対する回復力が向上します
If your Jira loses a database connection while a scheduled job is starting (for example, a mail queue or an automation rule), the job won’t be lost from your instance until the restart, as it could have been before the fix.
As soon as the connection resumes, the job will be automatically restored, started, and properly scheduled for the next occurrence. You’ll no longer have to restart the whole instance or a node where the connectivity dropped.
チェックの状態を追跡する進行状況バーをデータベース整合性チェッカーに追加
The Database Integrity Checker is a powerful out-of-the-box tool that allows you to examine the health of the database your instance is connected to. Because an integrity check is usually a long-running operation, we’ve added a progress bar that will accurately display its status in the user interface.
Now, when running an integrity check, you can track its progress and performance in real time, without facing request timeouts and errors. To run the check, go to Administration > System > System support > Integrity checker and select what you want to examine.
Here’s the view of the progress bar when the operation is complete.

システムを再起動しなくても、ユーザー セッションをクラスター全体で無効化できます
User sessions will now be invalidated cluster-wide, without restarting Jira, after the following local events occur:
- User changes their password.
- Admin changes a user’s password.
- Admin anonymizes a user.
- Admin deletes a user.
- Admin ends a user’s session across the cluster through a REST API on any node.
The session invalidation events are now propagated across the multinode setup environment, ensuring that a user session will be invalidated not only on a node where the event occurred. This approach guarantees security by consistently invalidating sessions and helps manage user access. This can be useful in instances where an excessive number of requests from a single account might be contributing to performance deterioration.
How does an admin end a user’s session through a REST API?
To end a user’s session across the cluster, send the DELETE request to the following REST endpoint: api/2/user/session/{username}.
usernameis the username of the user whose session you’re invalidating.
The response won’t contain a body but can return one of the following statuses:
200if the operation is successful.401if you aren’t logged in.403if you don’t have permission to perform the operation.404if a provided username wasn't found in Jira.
AWS Secrets Manager を使用して Jira Software の設定を管理する
We’ve added support for AWS Secrets Manager, which is also in development for the releases of Bitbucket Data Center 8.13 and Confluence Data Center 8.6.
Secrets Manager is a powerful tool from Amazon Web Services that provides secure storage for sensitive data, like database credentials or security keys. Avoid storing plaintext passwords in configuration files and rest assured that your secrets won’t be exposed to any vulnerabilities.
Secrets Manager stores sensitive data in the AWS cloud and returns them with a call from an access method. Rather than using hard-coded credentials, Secrets Manager lets you retrieve sensitive information programmatically through an API call that uses IAM (Identity and Access Management) roles to ensure the validity of the call.
Learn more about how to use AWS Secrets Manager in Jira Software
製品内診断用の新しいインフラストラクチャ指標
We’ve added a number of new metrics for monitoring the health and performance of your instance infrastructure:
- Outgoing and incoming mail servers
- 外部ユーザー ディレクトリ
- Shared and local home directories
- Node communication for Data Center instances
新しいインフラストラクチャ指標の詳細はこちらをご覧ください。
We’ve also implemented a new health check for the stability and security of the connection between your Jira instance and the supported user directories.
Learn more about the health check
Jira モバイル Web インターフェイスの廃止
In Jira 9.11, we've deprecated support for the Jira mobile web interface. We'll remove it in Jira 9.12 LTS in favor of the Jira Data Center and Server mobile app for iOS and Android.
Learn more about the Jira Data Center and Server mobile app
 サポート終了のお知らせ
In Jira 9.11, we're deprecating support for PostgreSQL 10 and 11. Learn more about the end of support for these PostgreSQL versions
For the list of supported platforms, check Supported platforms.
 アプリ開発者向けの情報
アプリに関するすべての重要な変更については、「Jira 9.11 への準備」を参照してください。
 アップグレード手順
Jira 8 .x.x からアップグレードの場合
- See Upgrading Jira applications for complete upgrade procedures, including all available upgrade methods and pre-upgrade steps.
- For a more tailored upgrade, go to Jira administration > Applications > Plan your upgrade. We’ll recommend a version to upgrade to, run pre-upgrade checks, and provide you with a custom upgrade guide with step-by-step instructions.