How to import issues with hierarchy from a CSV into Jira Software
プラットフォームについて: Server および Data Center のみ。この記事は、Server および Data Center プラットフォームのアトラシアン製品にのみ適用されます。
Support for Server* products ended on February 15th 2024. If you are running a Server product, you can visit the Atlassian Server end of support announcement to review your migration options.
*Fisheye および Crucible は除く
要約
This article offers a guide into importing issues with 4 levels of hierarchy into Jira, making use of Advanced Roadmaps hierarchy and Jira Software Epics.
We need to use the Admin External System Import instead of the regular and available to all users "Import Issues from CSV" from the Issue dropdown menu. To access this, go to Jira's configuration cog > System > External System Import.
The levels will use the respective hierarchy:
Level 1: Advanced Roadmaps configured hierarchy levels
Level 2: Epics
Level 3: Stories, task, standard issue types
Level 4: Sub-tasks and other sub-task issue types
The links will be made accordingly:
Level 2 ----Parent Link (Advanced Roadmaps field)----> Level 1
Level 3 ----Epic Link (Jira Software field)----> Level 2
Level 4 ----Parent Id (Jira Core field)----> Level 3
環境
All versions of Jira Software 8.x
All versions of Advanced Roadmaps 3.x if Jira Software's below 8.15.
ソリューション
1) Configuring the Hierarchy
First, we need to configure at least one hierarchy level above Epic in Advanced Roadmaps. See Configure custom hierarchy levels for more details.
2) Split the files into top-level and all-the-rest
Second, due to a limitation on how Parent Link is handled in Jira and CSV import, the link is made on the Issue Key — so we first need to import all top-level issues, then all remaining issues in another file.
3) Import the top level
This is a sample file that would create all top-level issues. We configured a custom issue type named "Feature" for this example.
Example file: hierarchy-import-features.csv
|ID | PARENT ID | EPIC LINK | PARENT LINK | ISSUETYPE | SUMMARY       | REPORTER | EPIC NAME | LABELS    | LABELS    | LABELS
|1  |           |           |             | Feature   | Feature One   | admin    |           | strategic |           |
|13 |           |           |             | Feature   | Feature Two   | admin    |           | fy22q1    | hr        |
|22 |           |           |             | Feature   | Feature DRAFT | admin    |           | it        | strategic | something-else
You only really need the Issue Type and Summary columns — and whichever other required fields you configured in the project. Reporter and Labels are aded just for example.
You may upload the same file structure and just don't map the columns/fields in the mapping step in Jira import tool.
4) Import all other issues
Example file: hierarchy-import-everything-else.csv
|ID | PARENT ID | EPIC LINK | PARENT LINK | ISSUETYPE | SUMMARY                         | REPORTER | EPIC NAME | LABELS    | LABELS    | LABELS
|2  |           |           | PROJ-61     | Epic      | "Epic One Summary, and a comma" | admin    | Epic One  |
|3  |           | Epic One  |             | Story     | "Story One"                     | admin    |           |
|4  | 3         |           |             | Sub-task  | "Sub One"                       | admin    |           |
|5  | 3         |           |             | Sub-task  | "Sub Two"                       | admin    |           |
|6  |           | Epic One  |             | Story     | "Story Two"                     | admin    |           |
|7  |           |           | PROJ-61     | Epic      | "Epic Summary Two               | admin    | Epic Two  | draft     |           |
Now you'll need Id, Parent Id, Epic Link, Parent Link, Issue Type, Summary and Epic Name — and whichever other required fields you configured. Reporter and Labels are added just for example.
Dealing with commas
When using the Admin External System Import you need to use the comma as the column delimiter, so if you have commas in your summaries or other fields you need to wrap them in double-quotes like in the example above.
Epic to Features
This is why you need to split the files in two: the Epics are linked to Features through the issue key. You first need to create the issues then take note of their keys (PROJ-61 in the example above) then edit the other csv file to link the Epics to them accordingly.
Stories to Epics
This link can be made on the same file. You need a column "Epic Link" that will link the corresponding Story to the Epic through the Epic's Name. On the Epic Link column of the Story you fill the corresponding Epic's "Epic Name".
Sub-tasks to Stories
Mapping a sub-task to a story is accomplished through the ID and PARENT ID fields. Notice in the example above sub-tasks id 4 and 5 are sub-tasks of story id 3.
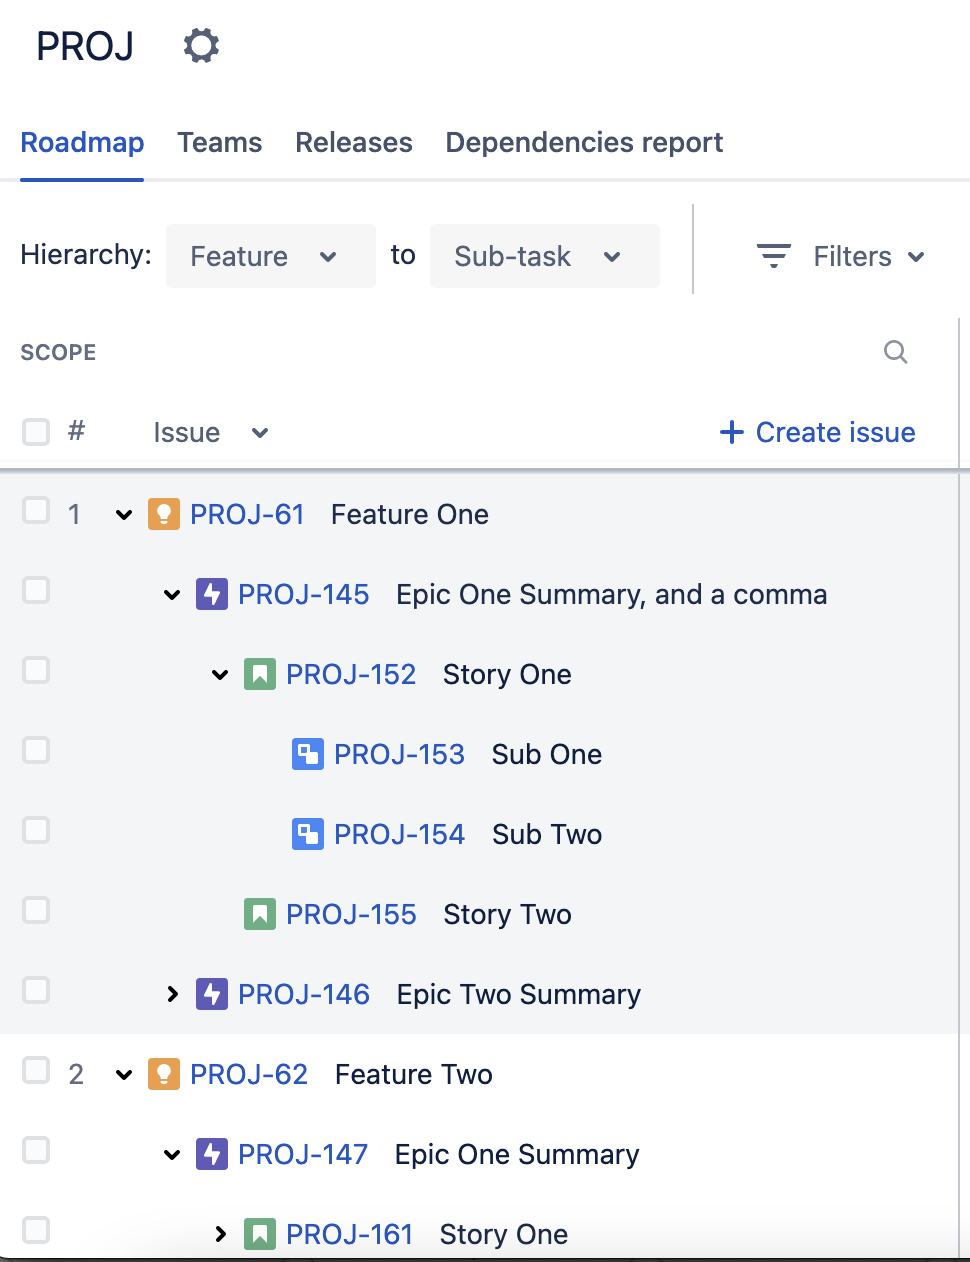
結果
This is how the example CSV files would look in Advanced Roadmaps once imported (the keys and project will be different depending on how you setup your instance):