Upgrade a Bitbucket cluster on AWS without downtime
ステップ 1 - アップグレード モードの有効化
- Go to > Administration > Rolling upgrades.
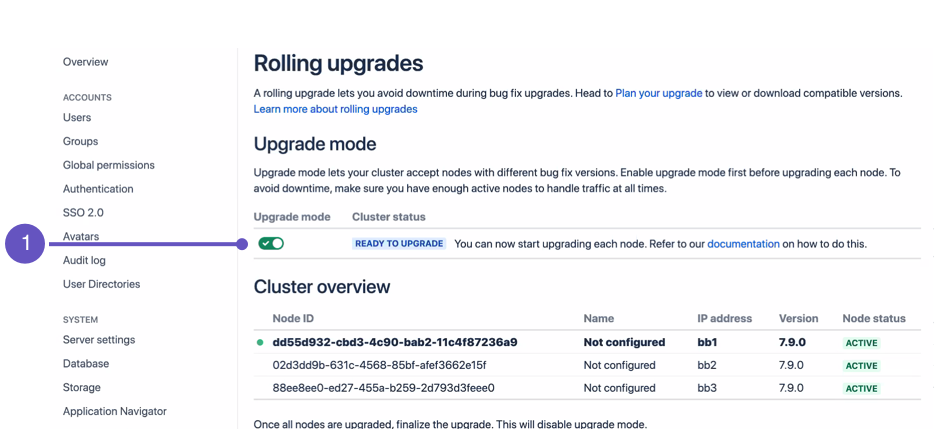
Select the Upgrade mode toggle (1).
You can disable Upgrade mode as long as you haven’t upgraded any nodes yet.
ステップ 2: スタック内の現在のすべてのアプリケーション ノードを見つける
AWS コンソールで、[Services] > [CloudFormation] に移動します。デプロイメントのスタックを選択してスタックの詳細を表示します。
- [Resources] ドロップダウンを展開します。[ClusterNodeGroup] を探し、その Physical ID をクリックします。Jira アプリケーション ノードの Auto Scaling Group の詳細を示すページが開きます。
- Auto Scaling Group の詳細で、[Instances] タブをクリックします。ここに表示されているすべての Instance ID を記録します。これらを以降のステップで終了します。
ステップ 3: CloudFormation テンプレートの更新
Your deployment uses a CloudFormation template that defines each component of your environment. In this case, upgrading Bitbucket means updating the version used in the template. During the upgrade, we highly recommend that you add a node temporarily to your cluster as well.
AWS コンソールで、[Services] > [CloudFormation] に移動します。デプロイメントのスタックを選択してスタックの詳細を表示します。
スタックの詳細画面で、[Update Stack] をクリックします。
[Select Template] 画面で、[Use current template] を選択してから、[Next] をクリックします。
- Set the Version parameter to the version you’re updating to. Since this is a rolling upgrade, you can only set this to a later bug fix version (for example, from Bitbucket 7.9.0 to 7.9.4).
- 新しい Jira ノードをクラスタに追加します。これによって、クラスタでユーザー トラフィックに対するノードの不足が発生しにくくなります。これを行うには、次のパラメーターの値を 1 増やします。
- Maximum number of cluster nodes
- Minimum number of cluster nodes
[Next] をクリックします。以降のページをクリックして進み、[Update] ボタンを使用して変更を適用します。
After updating the stack, you will have one extra node already running the new Bitbucket version. With Upgrade mode enabled, that node will be allowed to join the cluster and start work. Your other nodes won't be upgraded yet.
Mixed status
最初にアップグレードされたノードがクラスタに参加するとすぐに、クラスタのステータスは Mixed に移行します。つまり、すべてのノードで同じバージョンが実行されるまで、アップグレード モードを無効にすることはできません。
Once the new upgraded node is running an in an Active state, you can start upgrading another node. To do that, shut down and terminate the Bitbucket node – AWS will then replace the node with a new one running the updated Bitbucket version.
Step 4: Upgrade another node
最も負荷のノードから開始する
We recommend that you start upgrading the node with the least number of running tasks and active users. This is typically the node with the lowest CPU utilization. If you deployed Bitbucket with Amazon CloudWatch, you can view each node's CPU utilization through your CloudWatch dashboard. Learn more about listing available CloudWatch metrics
In Step 2, you noted the instance ID of each node in your cluster. Choose a node to upgrade first, and terminate it:
- In the AWS console, go to Services > EC2. From there, click Running Instances.
- Check the instance matching your chosen node.
- From the Actions drop-down, select Instance State > Terminate.
- クリック スルーして、インスタンスを終了します。
Each time you terminate a Bitbucket node, AWS will automatically replace it. The replacement will be running the new version of Bitbucket. Once the new node's status is Active, you can move on to upgrading another node.
Only terminate the Bitbucket nodes. Do not terminate the NFS Server EC2 instance.
ステップ 5: 残りのノードを個別にアップグレードする
At this point, your cluster should have two nodes running the new version of Bitbucket. You can now upgrade other nodes. To do so, simply repeat the previous step on another node. As always, we recommend that you upgrade the node with the lowest CPU utilization each time.
ステップ 6. アップグレードを完了する
- Update your apps accordingly
- Perform UAT and other tests as needed
Scale down cluster
In Step 3, we added a node temporarily to the cluster as a replacement for each one we terminated. This was to help ensure we'd have enough nodes to handle normal user traffic. After finalizing the upgrade, you can remove that node:
AWS コンソールで、[Services] > [CloudFormation] に移動します。デプロイメントのスタックを選択してスタックの詳細を表示します。
スタックの詳細画面で、[Update Stack] をクリックします。
[Select Template] 画面で、[Use current template] を選択してから、[Next] をクリックします。
- 次のパラメーターの値を 1 減らします。
- Maximum number of cluster nodes
- Minimum number of cluster nodes
次へ を選択します。以降のページをクリックして進み、[Update] ボタンを使用して変更を適用します。
You can now remove one node from your cluster without AWS replacing it. Find the least busy Bitbucket node and terminate it (refer to Step 4 for detailed instructions).
トラブルシューティング
ロード バランサーを使用してクラスタからノードを切断する
If an error prevents you from terminating a node, try disconnecting the node from the cluster through the load balancer. In the AWS Classic Load Balancer, each node is registered as a target – so to disconnect a node, you'll have to de-register it. See Register or deregister instances and Configure connection draining for more information.
ローリング アップグレード中のノード エラー
対処方法はいくつかあります。
Shut down Bitbucket gracefully on the node. This should disconnect the node from the cluster, allowing the node to transition to an Offline status.
If you can’t shut down Bitbucket gracefully, shut down the node altogether.
すべてのアクティブ ノードがアップグレードされたら、ローリング アップグレードを完了できます。問題のあるノードの問題を後で調査し、エラーに対処したら、クラスタに再接続できます。
Rolling back to the original version
アップグレードしたノードを元のバージョンにロール バックするには、次の手順を実行します。
AWS コンソールで、[Services] > [CloudFormation] に移動します。デプロイメントのスタックを選択してスタックの詳細を表示します。
スタックの詳細画面で、[Update Stack] をクリックします。
[Select Template] 画面で、[Use current template] を選択してから、[Next] をクリックします。
- Set the Version parameter to your original version.
- [Next] をクリックします。以降のページをクリックして進み、[Update] ボタンを使用して変更を適用します。
Afterwards, terminate each Bitbucket node running the new version of Bitbucket. Each time you do, AWS will replace the node with one running the original version. Wait until the AWS replacement node is Active before terminating another node.
Once all nodes are running the same version, the cluster’s status will revert back to Ready to upgrade. This will also allow you to disable Upgrade mode.
Disabling upgrade mode
- まだアップグレードされていない
- エラー状態になっている
アップグレードされたノードがクラスタに参加するか、ノードがエラー状態になると、クラスタのステータスは Mixed に変わります。
アップグレード モードが無効になっている Mixed ステータス
アップグレード モードが無効のノードが Error 状態の場合、アップグレード モードを有効にすることはできません。問題を修正するか、クラスタからノードを削除して、アップグレード モードを有効にします。
