How to integrate Confluence DC with OneLogin for SAML SSO 2.0
プラットフォームについて: Data Center のみ - この記事は、Data Center プラットフォームのアトラシアン製品にのみ適用されます。
この KB は Data Center バージョンの製品用に作成されています。Data Center 固有ではない機能の Data Center KB は、製品のサーバー バージョンでも動作する可能性はありますが、テストは行われていません。サーバー*製品のサポートは 2024 年 2 月 15 日に終了しました。サーバー製品を利用している場合は、アトラシアンのサーバー製品のサポート終了のお知らせページにて移行オプションをご確認ください。
*Fisheye および Crucible は除く
目的
Confluence Data Center is bundled with the SSO for Atlassian Server and Data Center App – we will refer to it simply as Atlassian SSO App in the remainder of this document.
With this App, Confluence administrators can configure SSO using SAML 2.0 or OIDC with your preferred Identity Provider (IdP). Check SAML single sign-on for Atlassian Data Center applications for further details on supported IdPs and more information on the SSO App.
This document highlights the steps to integrate Confluence Data Center with OneLogin for SSO using SAML 2.0.
This document is not intended to be a full reference guide, since you may need to change Okta or Confluence configuration to your organization's needs. Hence, this describes a sample configuration to have it working.
Atlassian Support can't provide assistance with configuring third-party tools like OneLogin. If you have questions, check the OneLogin documentation, OneLoing Support Team, ask the Atlassian Community, or get help from a Solution Partner.
要約
This is a guide to easily integrate Confluence (Service provider) with OneLogin (Identity provider IdP). Each requires their own specific configurations and we'll outline these below. If there are specific settings that need to in place and which are out of scope of this page, please check those with your IdP admins.
For more technical details and documentation, please refer to:
You may want to enable Confluence's default login page, as a security measure, so you won't lose access to Confluence, in the event of any issue during the following steps.
For reference: Enable default login page to bypass SAML in Confluence Data Center
環境
- Confluence 7.10.0 with SSO for Atlassian Data Center plugin version 4.1.2.
- Confluence 7.12.2 with SSO for Atlassian Data Center plugin version 4.2.4.
Integration Steps
To begin building the integration between Confluence and OneLogin, we'll tackle the setup within Confluence.
Confluence
User Base
First, we'll need a set of users within Confluence who also exist within OneLogin. These users can be located in any directory whether its an internal, Jira or LDAP directory. In this example, we'll be setting the user's username to their email address.

SAML SSO 2.0 Configuration
Next, go to Confluence Administration > General Configuration > Authentication Methods (also known as SSO 2.0 on Confluence v7.15 and earlier versions). Here, we'll enter some preliminary information. Some of this will then be entered within OneLogin which, in turn, will allow us to generate some OneLogin specific data that we'll need to then plug back into Confluence in order to complete the overall SSO 2.0 configuration.
Note that newer versions of the SSO for Atlassian Data Center plugin have changed the SSO 2.0 configuration page layout. By default, most version 7 instances of Confluence come packaged with version 4.1.2 of the SSO for Atlassian Data Center plugin. However, version 4.2.x of this plugin is now available for Confluence 7.12 and higher. Because of this, we've included screen shots of the SSO 2.0 configuration page for both versions.
SSO for Atlassian Data Center plugin version 4.1.x
- First, select SAML single sign-on for the Authentication method.
- When configuring SAML SSO 2.0 for the first time, the following fields will be empty. Leave these blank for now as their values will be generated within the OneLogin app configuration:
- Single sign-on issue
- Identity provider sign-on URL
- X.509 証明書
- For Username mapping, enter ${NameID}.
- Take note of the Assertion Consumer Service URL and Audience URL (Entity ID) values that are generated by Confluence. These will be entered within the OneLogin app configuration.
- Check the Remember user logins option.
- For Login mode, you have the option of selecting Use SAML as secondary authentication or Use SAML as primary authentication. The first option configures Confluence to use its native login functionality with SAML as a backup. The latter option forces Confluence to rely on the IdP as the primary authenticator.
 When setting this up for the first time, we suggest selecting Use SAML as secondary authentication. With a successful test, we can then switch this over to Use SAML as primary authentication. If you get stuck and need to bypass SAML, please refer to Enable default login page to bypass SAML in Confluence Data Center.
- While we keep this configuration page open, hop on over to your OneLogin instance so that we can continue with its configuration using the OneLogin section below as a guide. Once OneLogin is setup, we'll then come back here to finish up our SSO 2.0 configuration.
- With the OneLogin piece set up, let's now copy the following from the OneLogin SSO page over to the Confluence SAML SSO 2.0 page:
- Copy the Issuer URL value from OneLogin to the Confluence Single sign-on issuer field.
- Copy the SAMl 2.0 Endpoint (HTTP) value from OneLogin to the Confluence Identity provider single sign-on URL field.
- Copy the X.509 Certificate value from OneLogin to the Confluence X.509 Certificate field.
- Click the Save Configuration button.
Here's what the completed configuration screens within Confluence should look like:


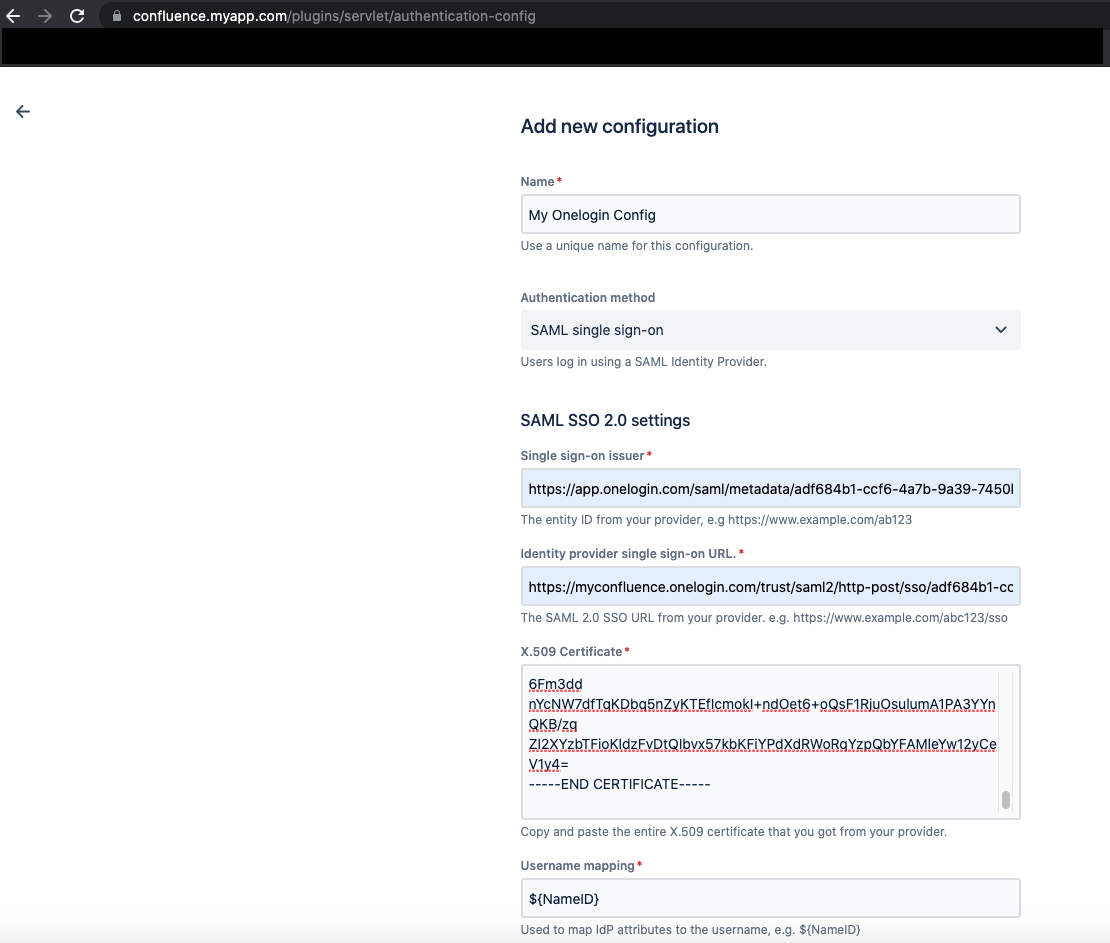
SSO for Atlassian Data Center plugin version 4.2.x
- First, enter a name for this SSO 2.0 configuration.
- Next, select SAML single sign-on for the Authentication method.
- When configuring SAML SSO 2.0 for the first time, the following fields will be empty. Leave these blank for now as their values will be generated within the OneLogin app configuration:
- Single sign-on issue
- Identity provider sign-on URL
- X.509 証明書
- For Username mapping, enter ${NameID}.
- Take note of the Assertion Consumer Service URL and Audience URL (Entity ID) values that are generated by Confluence. These will be entered within the OneLogin app configuration.
- Check the Remember user logins option.
- For Login page settings, you have the option of displaying the IdP on the Login page. It's been checked in this example. We can also add custom text on the Login button. Enter an appropriate value.
- While we keep this configuration page open, hop on over to your OneLogin instance so that we can continue with its configuration using the OneLogin section below as a guide. Once OneLogin is setup, we'll then come back here to finish up our SSO 2.0 configuration.
- With the OneLogin piece set up, let's now copy the following from the OneLogin SSO page over to the Confluence SAML SSO 2.0 page:
- Copy the Issuer URL value from OneLogin to the Confluence Single sign-on issuer field.
- Copy the SAMl 2.0 Endpoint (HTTP) value from OneLogin to the Confluence Identity provider single sign-on URL field.
- Copy the X.509 Certificate value from OneLogin to the Confluence X.509 Certificate field.
- Click the Save Configuration button.
- You'll now be directed to a page that provides the option for making the IdP the primary authenticator or the secondary authenticator with the inclusion of a native login form acting as primary. To set the IdP as primary, deselect the Show on login page option for Username and password option. Otherwise to make the native Product login form act as primary and the IdP secondary, leave this toggle selected to the green On position.
- When setting this up for the first time, we suggest selecting the Username and password option. With a successful test, then we can switch this over to making the IdP primary. If you do need to bypass SAML, please refer to Enable default login page to bypass SAML in Confluence Data Center.
- To test these, click on the '...' link to the right of the appropriate option under the Login options section of the SSO 2.0 page and click Test sign-in.
Here are screen shots showing this setup:


OneLogin
To begin this piece, we'll need to create an OneLogin account. This can be a permanent account, a free developer account that doesn't expire, or a simple free trial account that does expire after 30 days.
OneLogin Application Configuration
- Here, we'll need to create an application. From the OneLogin Admin panel, go to Applications > Add App:

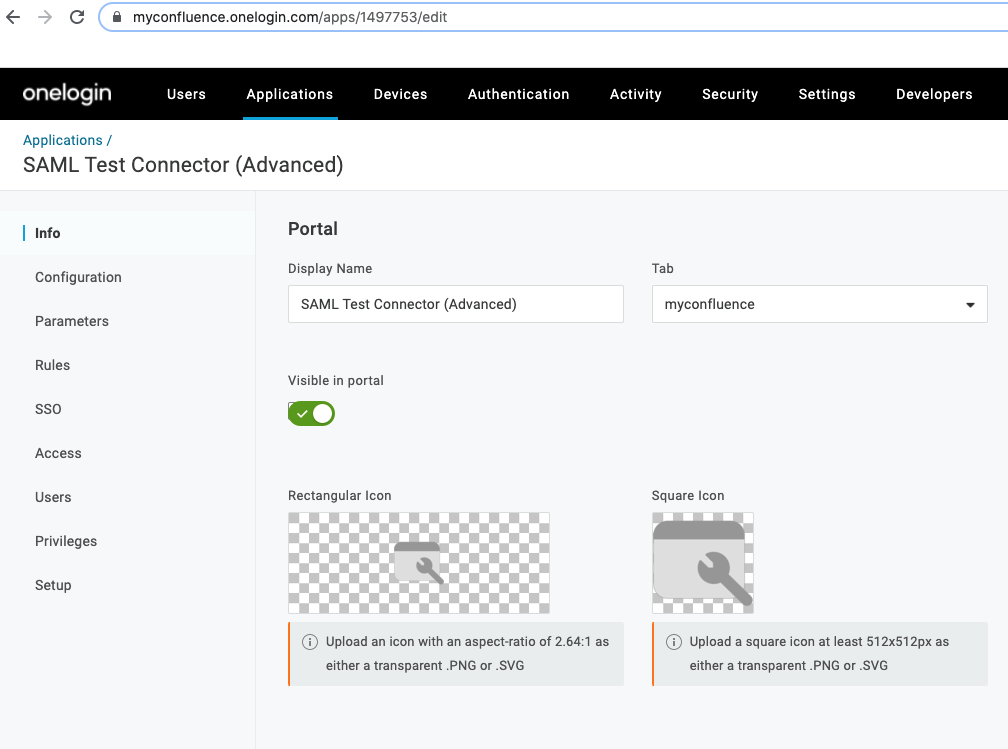
- Next, within the search box, type "SAML Test Connector (Advanced)" and select this application type.
- Provide an application name and click Save.
- You'll be redirected to a screen like the one below:
- Now, click on the Configuration menu option on the left. On the resulting screen, we'll need to make the following entries:
- For the Audience (EntityID) field, copy and enter the Audience URL (Entity ID) value from Confluence. This is the intended audience of the SAML assertion.
- For the next three fields, Recipient, ACS (Consumer) URL Validator, and ACS (Consumer) URL, copy and enter the Assertion Consumer Service URL value from Confluence.
- Within the SAML not valid before/after fields, you may need to increase this depending how in sync your workstation or server time is with the OneLogin server time.
 In my local test environment, I increased this to 15 minutes.
 - For SAML initiator, select OneLogin.
- For SAML nameID format, select Email.
- For SAML issuer type, select Specific.
- For SAML signature element, select Both.
- For SAML encryption method, select TRIPLEDES-CBC.
- For SAML sessionNotOnOrAfter, enter 1440.
- [保存] をクリックします。
- The completed entry screen should look something like this:


- Now, we'll need to ensure that the NameID value is set to Email on the Parameters screen:

- Next, click on the SSO page for several values that we'll now need to copy back to the Confluence SSO 2.0 configuration screen:
- Click the View Details link to get the contents of the X.509 Certificate.
- Note the Issuer URL and SAML 2.0 Endpoint (HTTP) values.


- Now, we'll need to create some users within OneLogin from the Users main menu option.
- Make sure that they have the same email address as those users created within Confluence.
- Also, be sure to associate these users with the OneLogin application that we created for our Confluence instance.
- For this example, we simply created some local users within OneLogin. If you wanted to configure OneLogin to use an OpenLDAP server as the user directory, please refer to OneLogin Active Directory Integration.
- With this all set up, let's now go back to the instructions above for whichever version of the SSO for Atlassian Data Center plugin is in use.
Login/Logout Behavior
Depending on whether the IdP is set as the primary authenticator or not or if there's a mix between that Confluence's native login form, the login and logout behavior can change. Here's a rundown of what occurs depending on the configuration scenario.
When the IdP is not enabled
In this scenario, the native Confluence login and logout screens and process will occur.
When the IdP is enabled along with the native Product login form
- If you have a logged in session with OneLogin and access Confluence from there, you should be taken directly to the Confluence home page with a logged in Confluence session.
- If you access Confluence directly from its base URL:
- Confluence will display a screen with options to login from OneLogin or to continue with using a username and password:

- Choosing the OneLogin option, Confluence will perform a quick redirect to OneLogin. If you are not logged in with OneLogin, you will need to enter your credentials there. For example:

- Choosing the OneLogin option, Confluence will perform a quick redirect to OneLogin. If you are not logged in with OneLogin, you will need to enter your credentials there. For example:
- Confluence will display a screen with options to login from OneLogin or to continue with using a username and password:
- Once provided or if you already have a logged in session, you should then be redirected to the Confluence home page with a logged in Confluence session.
- Choosing the username/password option, Confluence will display its native login screen.
- When logging out, Confluence will display a screen with a link to log in again:

- Clicking on this link results in Confluence displaying a screen with options to login from OneLogin or to continue with username and password.
When only the IdP is enabled
- If you have a logged in session with OneLogin and access Confluence from there, you should be taken directly to the Confluence home page with a logged in Confluence session.
- If you access Confluence directly from its base URL, Confluence will redirect you to OneLogin. If you are not logged in with OneLogin, you will need to enter your credentials there. Once provided or if you already have a logged in session, you should be redirected to the Confluence home page with a logged in Confluence session.
- When Logging out, Confluence will display a screen with a link to log in again. Clicking on this link causes Confluence to quickly redirect to OneLogin which then checks to see if you have valid OneLogin session. Next, you're routed back to the Confluence home page with a logged in Confluence session.
トラブルシューティング
After configuring Confluence SSO 2.0 and OneLogin, testing sign in action failed with stack trace:
2022-01-12 12:08:53,249 ERROR [http-nio-8090-exec-7] [impl.web.filter.ErrorHandlingFilter] logException [UUID: b8cd4812-03f5-4a8c-8364-8c80bde4d22d] Received invalid SAML response: A valid SubjectConfirmation was not found on this Response: SubjectConfirmationData doesn’t match a valid Recipient
 -- referer: https://atlassian-support-eng-dev.onelogin.com/ | url: /plugins/servlet/samlconsumer | traceId: 9b05bb15b1e6e9b3 | userName: anonymous
com.atlassian.plugins.authentication.impl.web.saml.provider.InvalidSamlResponse: Received invalid SAML response: A valid SubjectConfirmation was not found on this Response: SubjectConfirmationData doesn’t match a validCause: user's name doesn't match. The checks are case-sensitive. User's names in Confluence are in lower case, but names are capitalized in OneLogin.


Fix: Ensure the user's names match exactly, including the letter case.