How to configure Amazon Web Service Application Load Balancer with Confluence
Platform Notice: Data Center Only - This article only applies to Atlassian products on the Data Center platform.
Note that this KB was created for the Data Center version of the product. Data Center KBs for non-Data-Center-specific features may also work for Server versions of the product, however they have not been tested. Support for Server* products ended on February 15th 2024. If you are running a Server product, you can visit the Atlassian Server end of support announcement to review your migration options.
*Except Fisheye and Crucible
Summary
The content on this page relates to platforms which are not supported. Consequently, Atlassian Support cannot guarantee providing any support for it. Please be aware that this material is provided for your information only and using it is done so at your own risk.
Confluence 6.0 introduces collaborative editing, which requires WebSockets. Additional configuration is required to ensure this new feature works with Amazon Web Services (AWS) Elastic Load balancing (ELB).
If you have a pre-existing setup, you may need to adapt these instructions to suit your current settings. These instructions cover creating a new Elastic Load balancer.
Environment
Confluence Data Center 6.0+
Solution
Before you begin
Ensure you have updated Confluence's base URL to the eventual address of your load balancer.
Ensure your
server.xmlfile contains theproxyNameandproxyPortparameters, andschemeif you're using HTTPS.
For example, if you were configuring an Elastic Load Balancer to listen at https://confluence.example.com/ you'd configure your HTTP connector as follows:
1
2
3
4
5
<Connector port="8090" connectionTimeout="20000" redirectPort="8443"
    maxThreads="48" minSpareThreads="10"
    enableLookups="false" acceptCount="10" debug="0" URIEncoding="UTF-8"
    protocol="org.apache.coyote.http11.Http11NioProtocol"
    proxyName="confluence.example.com" proxyPort="443" scheme="https" />
Creating the targets
The targets must be created for a specific Virtual Private Cloud (VPC) first. We can then address those targets in the load balancer.
From the EC2 Console, choose Target Groups under Load Balancing.
Create two new targets - one for Confluence, and one for Synchrony using the recommended settings below.
Once the targets have been created, click the Targets tab, and choose an instance to register the targets to. Both targets must be registered to the same instance of Confluence. If you are running Data Center, make sure to add all instances on both targets.
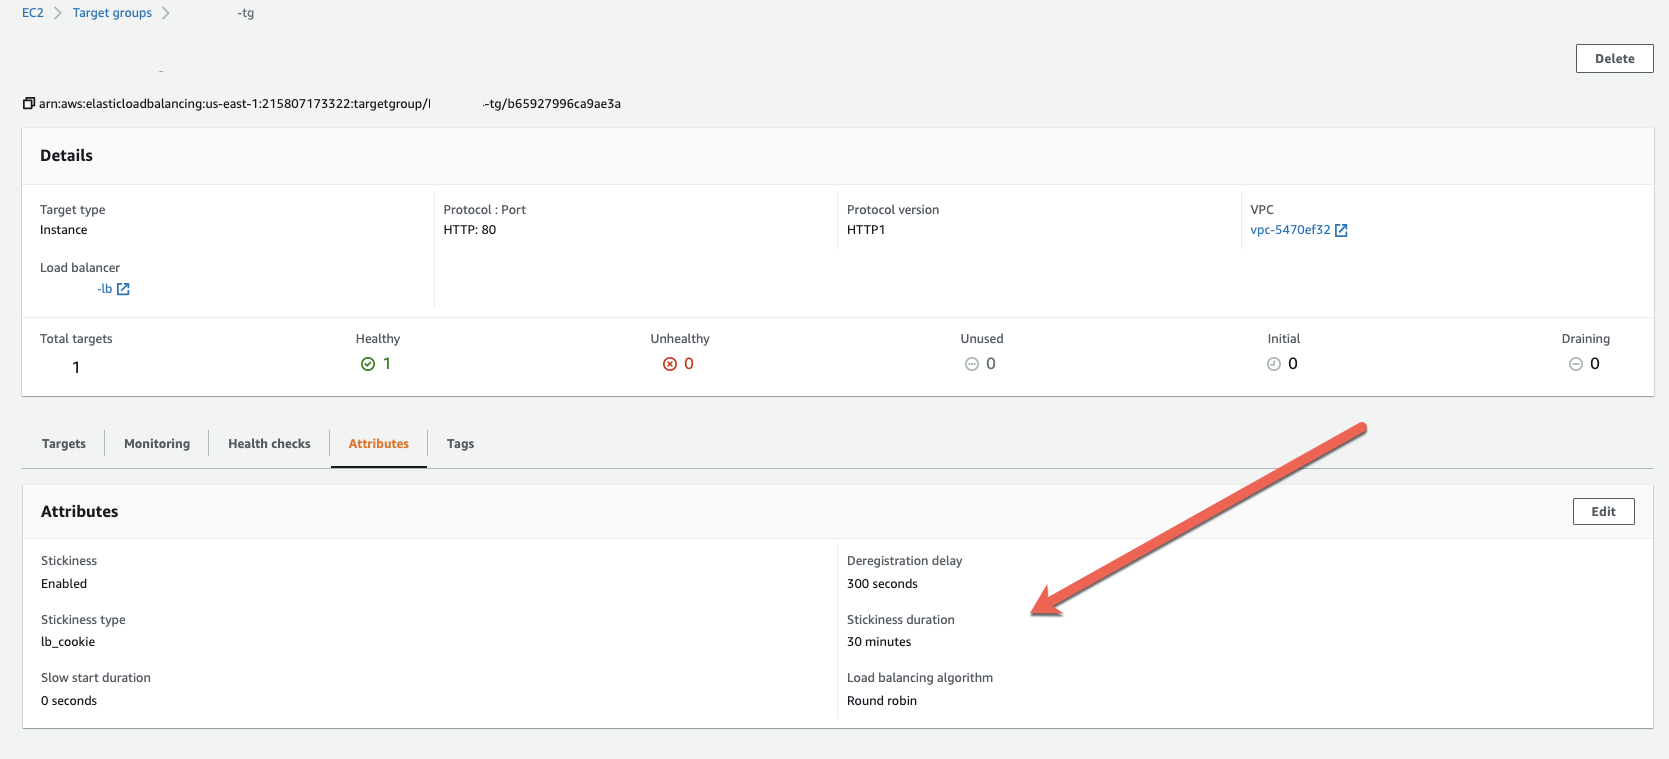
Recommended settings
For Confluence | For Synchrony | |
|---|---|---|
Name | Confluence | Synchrony |
Protocol | HTTP1 | HTTP1 |
Port | 80902 | 80913 |
Health check protocol | HTTP | HTTP |
Health check path | /status | /synchrony/heartbeat |
Stickiness | On | Off |
Notes
The protocol refers to the protocol between the load balancer and Tomcat - not what protocol your users will use. You should use HTTP unless you are specifically terminating SSL at Tomcat for the Confluence target. Synchrony only accepts HTTP requests.
The default port for Confluence is 8090. Check your
server.xmlto see what port Confluence is listening on.The default port for Synchrony is 8091. The port is configured with the JVM parameter
-Dsynchrony.port. See Recognized System Properties for more information.Make sure that the port used by Synchrony (8091 or a custom one) is open on the security group configuration in order to allow connections to the JVM.
Creating the load balancer
With the targets created and registered to the instance, we must now create the load balancer to proxy connections to Synchrony.
Create a new Application Load Balancer.
Note: the Classic Load Balancer is not supported, and is outside the scope of these instructions.
Choose which listeners the Load Balancer will handle (at least HTTP or HTTPS).
Specify your VPC and availability zone (subnets).
Click Next.
If you have an SSL certificate, you can install it on this screen then click Next. If you aren't using SSL, you can skip this step.
Choose an existing (or create a new) Security Group then click Next.
Choose the Confluence target you created earlier then click Next.
Review the settings then click Next.
Click Create.
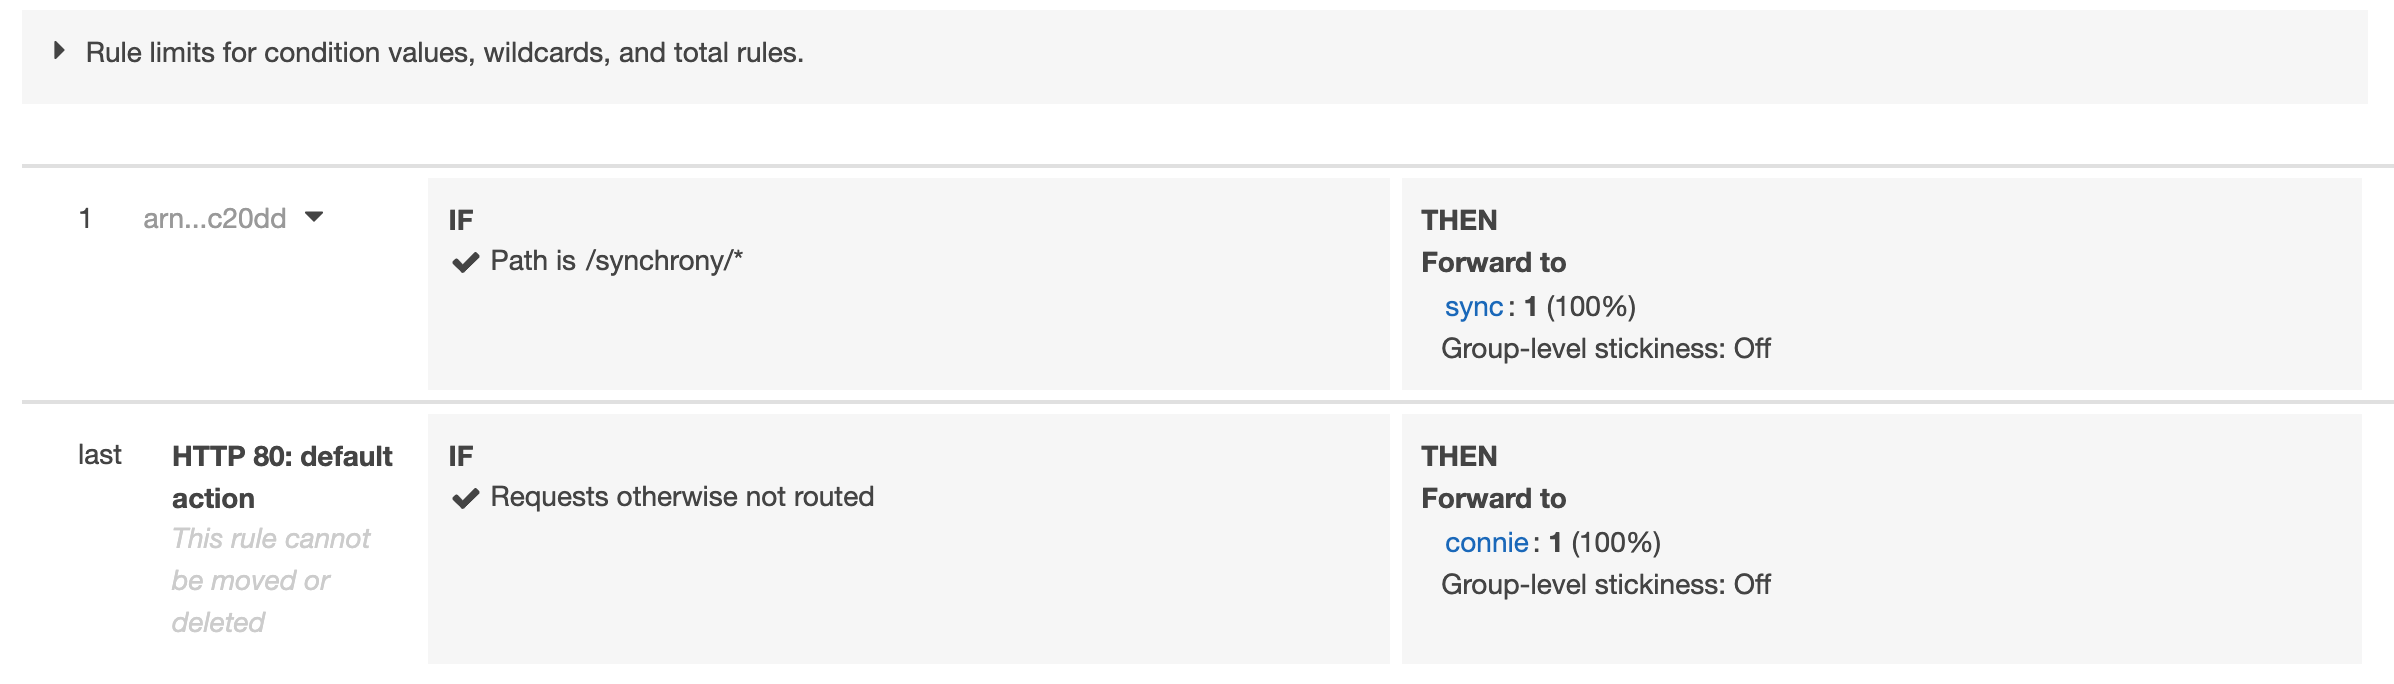
Once the load balancer has been created, we must create an additional rule to send Synchrony traffic to the Synchrony service.
On the Elastic Load Balancer page, Click the Listeners tab.
Expand the appropriate listener (or listeners) and click View/Edit Rules.
Click the + button and select insert rule.
Add condition and select path from the drop-down.
In the Path is Value field, add
/synchrony/*Choose the Synchrony target you created earlier.
Click Save.
This is how the rules page should look like once properly configured:
Rules
Target Groups
Testing
Once the settings are in place, we can do a few tests to ensure everything is working fine:
Go to Target Groups > Target Name > Targets and ensure the instances are listed as Healthy in the Status column
This means the target group is properly configured and can reach the instances on that particular port
Try to access https://<Domain>/synchrony/heartbeat on your browser to test the Synchrony rules
If it returns OK, it means the Load Balancer rule and the Target Group settings are correct
Redirecting HTTP to HTTPS
The steps above can result in a single HTTP listener or single HTTPS listener based on the choices you made. To have the ALB redirect HTTP to HTTPS you will need 2 listeners, one for port 80 and one for port 443. The HTTP listener's only function will be to redirect traffic to the HTTPS listener and the HTTPS listener will be configured to pass traffic to the target groups as described in the "Creating the load balancer" section above (including the additional rule to route Synchrony traffic).
For more information on these steps please see AWS's article: How can I redirect HTTP requests to HTTPS using an Application Load Balancer
Was this helpful?